Vikings Wolves of Midgard Secrets. Vikings - Wolves of Midgard
In this article, we will consider in detail the passage of Vikings: Wolves of the Midgard: how to find the iron skulls, all artifacts, pass additional tasks and many other nuances of the game.
Passage Vikings: Wolves of the Midgard. Village
On this location, you will spend time between missions, improving your hero, pumping skills, buying new weapons and selling various louts. First you have to improve the altar on the left side. Due to blood, you will increase your hero's level every time.
Chapter 1. Ambush on iotuna
Each mission has a major and several additional tasks. In the first chapter, you will be offered to find three skulls and kill 30 goblins (Tomta). Goblins on location Exactly such a number as stated in the task. Just go through location and kill all opponents.
At once, several advice on the game, including management, objects of the surrounding world, etc.:
- Attack - LKM.
- Roll - "Space".
- Movement - WSAD.
- Try to break everything you see - so you will find a tree and gold, later - iron.
The beginning of the video in the video:
Moving forward, hold on the right side of the screen to find the first cheese chest.
By killing a big enemy, again, go to the right side of the screen and, for the fence, find the bare chest with the second skull.
Learn about the totems of healing, a little later - about the altars. For healing, press the Tab key.
Move around the markers, kill enemies and save the Heldanland. Having done this, a few steps to the top of the location, find the chest with a third skull. In the upper left corner of the map will be Helga - Kill Tomta and go back to the main door.
CHAPTER 2 VIKINGS: WOLVES OF THE MIDGARD. End of yocula
In the left left of the screen, you can see the gradually filling circle - this is rage. It is best to save it to the final part of the episode when you have to fight with yokul.
Video list of the second mission:
For additional purposes, it is necessary to find 3 skulls, kill 2 yotunov and destroy 10 idols.
The skulls are hidden inside the gold chests, while in ordinary lout lying in the usual. In total, you will find 4 gold-colored chests. It's not so simple to get to one of them - it is located on the removed rock, the path to which is possible only if the bridge is raised.
On iotunas, everything is simple - exploring the location, you will definitely find them both.
To get to the chest on a separate rock, you need to raise the bridge. The bridge rises due to the activation of all levers - they are a total of 5 pieces. Inside the chest is the first part of the artifact "Onions Skadi".
THE NOTE. In the game you can find and collect 4-5 artifact weapons. Each of them is divided into 3 parts. They are hidden on location. Some you will find without any problems, others can find only if you are attentive.
Each of the five levers is hidden inside high towers, behind wooden boards in niche. It's not so easy to notice, but if you know how they look like, the task will be much thus simplified.
Check out the card below:
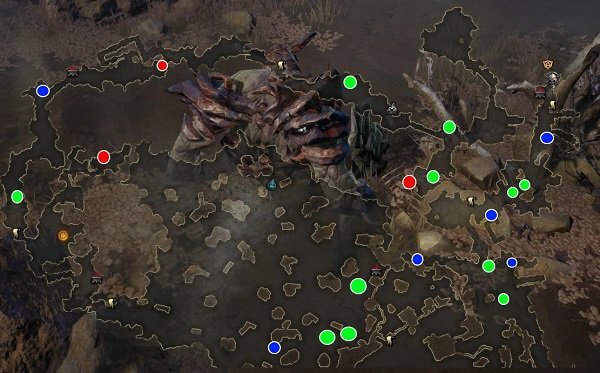
Map "End of Yokula"
Yellow dots on the map marked fires from which you can warm up.
 Map "End of Yokula" (part 2)
 - Blue - Yotny.
- Green - chests with turtles.
- Blue Marketers - Idols Yokula.
- Black - levers.
- Red - golden chest with part of Luka Skadi.
Inside the cave awaits you a battle with yokul. The boss creates ice spheres that explode in certain locations on the location. To recognize them is simple enough. If you get to the explosion place, then they freeze for a few seconds.
Do not forget to get up on yellow circles to warm. Bates on the throne of yokula - just so you can kill the boss. After the throne is destroyed, Bate Yokula.
Chapter 2. Old Enemy
You will be offered to find 3 skulls, kill 15 sores and destroy 10 Svanung signs. You can also find a chest with the legendary accessory "Gusli".
First of all, check out the location map:
 Map "Old Enemy"
 - Green - Sumanung's banner.
- Red markers - skulls.
- Blue - Psari.
- Yellow - Chest with "Husls" (Look for in the grass).
On the plot run to the left and read the new enemies. Opponents with shields are dangerous rivals, if not to know how to act against them. Here you need to or run, or wait when they let go shield to hold an attack. If you frozen the enemy holding the shield, you still have to attack it exclusively at the back.
Inspect the gate that will be locked. Go around Marquer to the left, on the swamp. Destroy the temple to get to the settlement territory. Follow the house of the Yarla and kill it after destroying the spearners. At the end of the battle, you can make a choice - take 5,000 gold at times or get 1000 each time you pass some mission.
CHAPTER 3 VIKINGS: WOLVES OF THE MIDGARD. Horror Fangzara
Interact with dragon (boat) to start the quest. For additional purposes, you need to kill 320 fenvayites, destroy 30 huts (Tolk's caps) and find 3 skulls.
Fenvailites are enemies that appear in the water. They will be more than you need to kill. Simply
4 or 5 Huts Tomta you will find before you get inside the cave. The rest will be inside it. There are only 31 huts when you need to destroy 30. Be careful and everything will turn out!
In the chests with turtles: two of them will be outside the cave. But before kill Grindan. When Goblin jumps, rolling to the side, otherwise you will be stunned. From time to time, he will have to fight with the usual Tomet, while the Grindan hides in the shade. After his destruction, you will receive a part of the artifact - to handle "Lawatina".
By killing the enemy, go through the gates and go on the left side. There will be water. Enter the water and kill Fenwayites. At the end you will find a cheese chest. The second chest is closer to the right side of the card, on the other side, but not far from this place. Again, you will have to enter the water, kill the fenvayites and seize the chest.
You can't get inside the cave - the way is closed. But in fact, everything is quite simple. You see various symbols on the stone, which blocked the path inside. Remember them. On the left side of the entrance there is one disk, and on the right - three more pieces. On these disks, it is necessary to immediately set the correct combination of characters.
Go to the left inside the cave and kill the troll to get the legendary Ring "SWARAGRIS".
The chest with the third skull is hidden inside the cave. Just follow its left upper part.
When you fulfill all the tasks, go around Marquer to Grindil, Mother Grindan. Damage to its techniques and try to destroy the emerging totems as soon as possible (they will constantly heal Grindil). When it disappears, deal with simple enemies, trying not to become green circles.
In the end, you must win.
Village
A rune blacksmith will appear in the village by the name of the fracture. Found runes through blacksmith can be installed in weapons with empty slots. To do this, go to the left upper part of the village. Held will appear here. If talk to her, you can pass tests. The more waves are like, the better there will be a prize.
Chapter 3. Iron Fist
Additional goals include search for 3 skulls, killing 20 warriors and destruction 10 signs.
See all this on the map:
 Map "Iron Fist"
  Map "Iron Fist" (Part 2)
 - Green - skull.
- Red markers - Warfish.
- Yellow - chest with a legendary talisman.
- Blue - banner.
The first cheeper with a skull is hidden at the top of a swampy terrain. There will be a way inside alkova, which is difficult to notice.
In the plot, go to the goal that will be locked. Kill opponents and move left, to swamps. Understand the enemies and laugh even to find a snow-covered area. The fire is here only one. Therefore, first clean the location, step by step, returning to the fire to warm up.
You will find an entrance to the cave. Inside, talk with the beast and carefully wake the spikes. Rear to the wooden structure in the background, but do not hurry to go somewhere. Here you can find the legendary talisman. Find three glyphs depicted on the wall on the right. As it seems, there was once a bridge. Remember glyphs. Find in the background, at the top of the wall with an active point. Use it to get to another part of the cave.
Go to the closed door. There are combinations of four characters above it. Enter it on the stone disks on the left side. Follow the corridor with logs. Each of them will be a stone disk. Enter the combination on three discs, which was mentioned earlier, when you only entered the cave.
Enter the code is completely optional. But if you do it, then get the talisman Hel. Go to the room, which has opened, and get useful items from the chest, including the talisman. Observe the enemies and go back. Now you need to defeat the boss - Iron Guard.
Choose equipment that will increase your fire protection. Even if we are talking about a regular ring, giving 10%. It will be better than the legendary, giving great, but other protection.
Talisman Hel will allow you to damage the opponent with dark energy, because ice and fire are useless here. Among other things, Hel restores your health. Attack the enemy and appreciate. Fear his fiery breathing. We shoot more often, because periodically the guard explodes. Next will be iron fingers - they need to be destroyed.
By winning, you can again solve the fate of the settlement - 250 iron at once or 50 after each mission.
Chapter 3. Revenge
In the Larkens, you need to fulfill the following side quests - find 3 skulls, kill 9 witches and destroy 15 idols.
On the location of all this neither more, no less:
 Map "Revenge"
 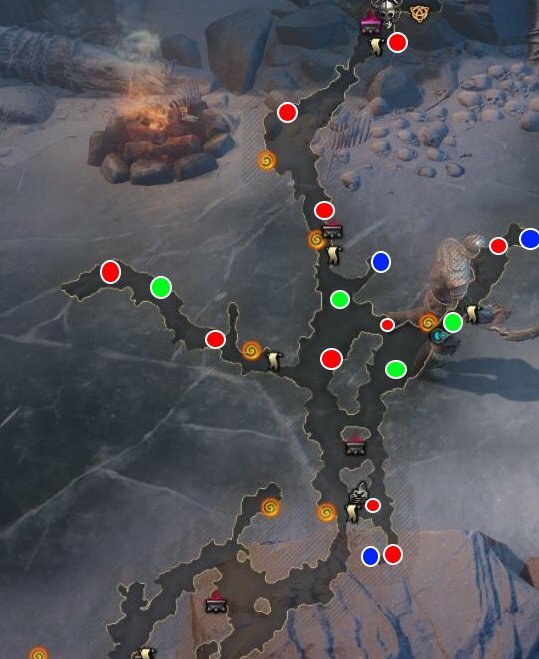 Map "Revenge" (part 2)
 - Blue - skull.
- Green markers are witches.
- Red - idols.
In this mission you can find 2 parts of the artifacts. Once in the cave trolls, follow the left side of the screen. Soon you will find the passage that will lead to a dead end. There will be a strong witch with defense from darkness. Observe her to pick up a part of the artifact from Mielnir's hammer.
Part of the artifact shield "Pryven" you will find already after the cave. After leaving her, move on the left and side. Find the turn left. Roll closer to the top of the screen, find the log hidden passage. Destroy the birch and take from the ENARMS chest from the Pryven shield.
The scene part is easier than simple! Kill trolls and move to the boss. When leave the cave, you will have to solve a riddle with levers. Just switch the levers to move Lava to those vests that are located next to it (down).
So you will raise the stone and can fight Scully. During the battle, keep the edges of the location and wait for Scully to run into your direction. Apply, using a jerk, and then hit the boss 2-3 times. Return and repeat. Archers will be easier.
Chapter 4 Passage Vikings: Wolves of The Midgard. Paired runes
For additional purposes - 3 skull, 10 elite soldiers and 10 wagons.
Elite soldiers you find out without much effort - just read every corner of location. All of them are hiding in the open area - there will be nothing secret here.
But I will find the carts and a chest with turtles it will be harder. The most difficult thing to find the third chest, which, as it turned out, most likely, for you will be the first. The chest is located inside the house of the Yarl, in which you will appear right away how the quest will begin. Just come to the wall on the right and find the cheeper chest.
The second chest is located inside the fortress - there will be a single bridge, leading up the wall. There is a chest. Last skull Lay close to the shore at the right bottom of the card.
Take a look at the map:
 Map "Paired Runes"
 - Red markers - chests.
- Blue - wagons.
On the territory of this location you can find the fourth chest inside which the Haymdal Talisman lies. With it, you can scare the enemy and cause damage to dark magic. When you choose from the village and get ashore, then follow the right upper part of the card. Lay the marina with the ship. On the ladder, climb the ship and take the mascot from the chest.
By plot kill enemies and move to Marcéra. Follow back to use the passage. Go to the catapults and destroy them. Then go to the boss and kill it. This is a simple rival. The only difficulty can be what he operates the shield and calls on a gold boar.
Chapter 4. Gambit Bishop
For additional purposes, you need to find 3 skulls, destroy 10 wagons and kill 15 priests. We offer to familiarize yourself with the map:
 Map "Gambit Bishop"
  Map "Gambit Bishop" (Part 2)
 - Red markers - skulls.
- Blue - wagons.
- Green - priests.
There will be no artifacts or legendary items on the location.
Follow the inside of the cave, go down to the traps and find the pit. Click on it to talk with the beasts. You can decide - help him or not. Go to the swamp and proceed to Marcéra. Talking with a witch, you will turn into an iron guard. Destroy everything on your way and destroy the gate.
Waning, talk to the witch and take the rune stone. The following tasks are waiting for you at the portal.
Chapter 5 Passage Vikings: Wolves of The Midgard. Tunnels and trolls
You need to perform 3 goals - deal with 10 yotunas, destroy 8 idols and find 3 skulls.
To begin with, read the map you suggested below:
 Map "Tunnels and Trolli"
 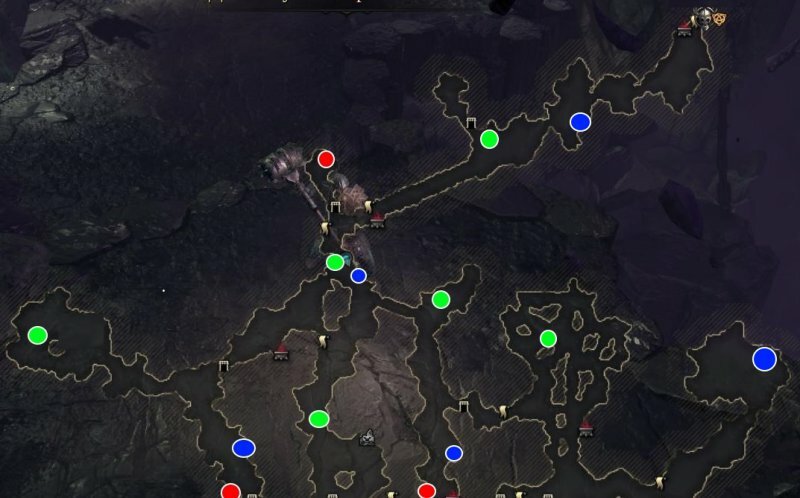 Map "Tunnels and Trolli" (Part 2)
 - Green - Yotny.
- Blue markers - idols.
- Red - skull.
- Finally, during the fulfillment of the mission, you will have the opportunity to find two legendary subjects - Yellow Marketers.
To obtain the first item, disperse with the troll (yellow marker in the left corner of the map). Winning will not be easy, but in the award you will receive the legendary Ring of Nibelung. As for the legendary talisman of Khodel, then find the chest marked with a yellow marker.
In the plot, go from one checkpoint to another. Turn the mechanism by moving clockwise to open the path further. Go to Marquer, passing to the cave in order to remove the poisoning effect.
The gate will be closed. The mechanism from them is broken and you will have to go to search for three parts. First, go left and inside the cave, disperse with iotun. From it will fall out the first part. The remaining details will also fall out of yotunov. By the way, these iotunas are marked on the map with green markers.
Opening the gate, go to the boss. Again, Grindil will fight with you. Observe her using the same tactic, not forgetting about totems. After the victory, you will have anvil Jotunov in the village. It allows you to improve the gunsmith and a blacksmith. After the quest it will be possible to make deals with the merchant.
Chapter 5. Flotnar - Liberation of the Floton Clan
Single Goals - Search for 3 skulls, the salvation of prisoners (five cells, not five people) and the destruction of 5 capits (can be said, totems or idols).
Check out the card below:
 Map "Flotnar"
  Map "Flotnar" (part 2)
 - Green - Kapieff.
- Red markers - chests.
- Blue - prisoners.
In the plot, go along the coast and kill ordinary and giant crabs. By the way, the second are some kind of opponents with shields. Go to the goal to make sure they are closed. On the left side there is a rise on the wall. The same is also on the right side of the gate. Both ways will lead to two tools - shoot from these guns on the goal to destroy them.
The village has a chest with the legendary talisman Odin. To find it, find the crack in the fence, destroy it and climb the hill. The chest at the building on the left. Four of five cells will be located for the destroyed gates. But to open the fifth cell harder - go to the right and pull the lever located on the corner of the building (in any case, the place is indicated on the screenshots above).
The third cheese chest is located near the location with the boss. When you tell you that you need to raise the grille, then you should not hurry. Go to the wooden platform on the left side, where the abyss is, and then pull the lever. A second platform will appear on which the chest will be.
Getting to the locked grid, go to the left and pick up the wall. At her end on the right side there will be a lever. Pull out for it to raise the grille.
Go to the courtyard and kill three enemy detachments. Select a point to destroy the balleys. When everyone kill everyone, the mission will end a conversation with the Ferdaine.
Chapter 6 Passage Vikings: Wolves of The Midgard. Castra Ignis - Robbery in the Spirit of Vikings
Sided targets - 3 skulls, 5 giant crabs and 10 towers.
Inspect the map below:
 Map "Robbery in the Spirit of Vikings"
  Map "Robbery in the Spirit of Vikings" (Part 2)
 Red markers - skulls.
Green - crabs.
Blue - towers.
During the task, you can find two artifacts. On location there is only one cave! Inside, you will find a closed grille. To open it, you will need a key. The rusty key (namely, it is called) lies in the chest located on the boat. Coming out of the cave, go up, holding the right side (water). Here you will need to notice the boat tied to stick. Destroy this stick (pole) and wait, when the boat approaches the pier. Go to it and pull the key from the chest. Return to the cave, open the grille and pick up the "Lavate" blade from the other chest.
The second artifact - Pryven's shield, is located at the Crusader, whom you meet, if you study the left part of the card.
In the plot, go through 4 posts and kill enemies. After raising the bridge, go back and turn right. The path will lead you to the cave. Use the portal to get into another cave. Go on the battlefield.
During the battle, when you kill all your enemies, the game can hang - just nothing happens. If so, then reboot and perish in the arena, losing the troll. Load the last save and this time to defeat the enemy. The mission must end automatically.
Chapter 6. Sigurd Ring
Side quests - 3 skulls, 30 Waitirov, 6 Mengirov.
Mengira is structures from stone, something similar to idols. Weights on locations are more than you need to kill, so they are not considered below the screenshots:
 Map "Sigurd Ring"
  Card "Sigurd Ring" (part 2)
 - Red markers - skulls.
- Yellow - Mengir.
On the map there is a secret trail leading to a difficult enemy. For the victory over him, you will receive a part of the artifact - the shoulders of the "Big Low Skad". As part of the passage, the mission is divided into three stages.
Each of them will offer you to find a way to open a pass through Kurgan. Usually we are talking about a code combination that is entered on stone disks. With this type of puzzles you must be familiar.
At the first stage, two disks are located on the left side of the passage, and the other two are with the right. The combination is exhibited from left to right, as usual.
In the second stage, everything is the same, just there will be more empty trenches.
At the third stage, you will have to not only remember the correct combination, but also to pay attention to what positions are about or other characters on disks.
For example, if earlier the arrow pointed up the upper time (it was opposite the arrow, it was necessary to set the correct character on each disk), now it will be directed down. The position of the characters changes.
And here is the right decision in turn from the left disk to the right:
- "Arrow" at the bottom of the disk (that is, if you leave the arrow up, it will be directed up, but in combination - down).
- Letter F at the top.
- Letter X below.
- | X | on right.
After that, fight the Sigurd. Try not long to stay in a circle, otherwise you will get damage from the dark energy.
Chapter 7 Passage Vikings: Wolves of The Midgard. Symul - fire camp
Side tasks - 3 skulls, 15 priests, 10 Kappits. Check out the map:
 Map "Fire Camp"
  Map "Fire Camp" (Part 2)
 - Red markers - skulls.
- Yellow-heads.
You will find the priests in any case if you kill all the enemies that meet on the way.
The first chest is in a niche inside the cave, closed by boards. Two other skulls are hidden inside build-up structures, on the territory of the fortress.
In the blacksmith you will see the gate with two grains. On the right there is the first lever. After its activation, go left and follow the above to get into the left side of the gate. Here you will find the second lever. Go to the other gate and go down and down to the left, where the wooden wall is located. Shot out of the ballists to destroy the gate. Eviating white circles, Bate Bishop at that moment when he does not have a protective barrier.
Chapter 7. Lair Symul
Sided targets - 3 skulls, 3 mengira and 3 defender doors.
You will meet the doors in any case, but on the map below their location is still indicated. The first chest is hidden - there is a stove with a shimmering hole on the corner of the stone wall. Destroy it and take the skull of the cheese.
And here is the map of the area:
 Map "Lair Simul"
  Map "Lair Simul" (part 2)
 - White - chest with the legendary mascot "Braga", sleeping opponents.
- Green - doors.
- Red markers - skulls.
- Yellow - Mengir.
- Purple - chest with artifact (Gunnira blade).
To get to the artifact, you need to remove stone columns. You can click on each of them to raise and lower. You need a regular combination that is visible at the beginning of the location. After killing the door on the wall, it is possible to detect white sticks, and some of them will be crossed.
From left to right you need to highlight the following columns - 2, 4, 5, 7.
CHAPTER 8 VIKINGS: WOLVES OF THE MIDGARD. Imperial fleet - knife in the dark
Self-targets - 3 skulls, 20 Tomta huts, 5 bunks.
There will be exactly 20 huts on the location, so we will note it. The last of them is hidden behind the big door.
To find all the huts, at the beginning go to the right up. There will be two caves here. The right - deaf, and through the left you can pass through. In both caves, there will be 11 huts! If you have found less, then study them carefully.
You will also pass through 3 more caves - necessarily if you move on Marcéras. There will be another 6 huts. Already 17.
Two penultimate huts are not in the caves, so we indicated them on the map below.
You destroy the last hut after the big door is open. To find it, at the beginning of the location, go to the top and go to the left, through cave. It will be a big locked door. It was hidden with a hat and a chest with an artifact - handle from Mjolnir's hammer.
In order to open a large door, you will need to find 4 levers. There are as many caves on the map and in each of them - by lever. This cave is no exception!
The first skull is hidden behind the boards inside the rock, the second - behind the stone in the cave, the third is in the water near the altar that increases the character level.
The legendary gold ax is hidden in the chest guarded by the crab. See the map:
 Map "Knife in the Dark"
 - Red markers - skulls.
- Blue - huts.
- Green - the naval.
- Pink - chest with a gold ax.
- Purple - Four levers and door.
Chapter 8. Path in Darkness
Sided targets - 3 skulls, 20 trolls, 10 mengirins.
 Map "Path in Darkness"
  Map "Path in Darkness" (part 2)
 - Red markers - skulls.
- Yellow - Mengir.
Inside the cell that is at the end of the location, there is a coil talisman chest. He is marked with a purple marker on the map above. To get it you need to solve a riddle with levers, which are scattered on the map. The numbers are marked with the right levers.
How to use levers (if nothing has not yet time to "cheat"): 1, 2, 3, 2, 4, 5.
Chapter 9 Passage Vikings: Wolves of The Midgard. Albion - Lost Clan
Sided targets - 3 skulls, 10 banned, 15 fenvayites.
Fenwayites are looking for in those places of the map where flowers are visible. They are more than you need.
The first chest find the most difficult - it is well hidden. It is inside the house on the left side of the Kurgan, above your appearance.
The map is attached:
 Map "Lost Clan"
 - Blue - banner.
- Red markers - skulls.
- Yellow - Druid with Talisman Tyura.
Chapter 9. Hyperships
Side task - 3 skulls, 30 huts, 15 dragugs.
Higis and dramas are exactly as much as stated in the task.
In the middle of the location, you will find the burial with levers and plates. Pull the levers in the following order - x, f, | x | to open the grave. Kill the Drague and take the Talisman "Vidara".
After you swim the river on the boat, find another puzzle with a lot of levers. Name like this:
 Puzzle with levers
 If you did nothing, then activate the levers in the following order: 3, 1, 8, 7, 1, 5, 3, 5, 4, 7, 2, 5, 6, 8, 1, 4. In the award, get part of the shield " Pryven "(artifact).
Chapter 9. Osada Carlion
Side tasks - 3 skulls, 8 carts, 3 balleys.
See the map:
 Map "Osada Carliona"
 - Blue - wagons.
- Red markers - skulls.
- Green - Ballists.
- Yellow - legendary weapon.
The legendary weapon is hidden at the very beginning of the location, behind the board on the left.
In battle with Arthur and Gwinneur, Attack Arthur. So you scare a woman and the battle will stop. Survive both characters!
Chapter 10. Ferroka with giants - plain shower
Side tasks - 3 skulls, 30 trolls, 7 mengirov.
The last chest is hidden in the mound behind the wall in the right part (visible through the crack).
You can find 2 artifacts. The first falls out of a noble-in-line giant, and the second is looking inside the mound with levers. Find a hole with spikes and follow the right from it. Hit the vertical beam to form a bridge. Go around the territory and go to the chest with the artifact.
Chapter 10 Passing Vikings: Wolves of The Midgard. Union in fire
Side tasks - 3 skulls, 20 giants, 10 idols.
Location map:
 Map "Soyuzne on fire"
  Map "Soyuzne on fire" (part 2)
  Map "Soyuzne on fire" (part 3)
 - Red markers - chests.
- Green - idols.
Giants on the location of 18 pieces, while the two remaining are bosses.
The wall with symbols opens with the correct combination. Moving to her, inspect the walls and stones, remembering the sequence of characters.
If you exhibit correctly, the passage will open. You will get to the precious chest, inside which lies the legendary ring of dispersion. Very valuable and useful subject!
Where you need to open the bridge, check the levers from "1" to "3", starting from the bottom. Pull out for them in the following order - 2, 1, 2, 3.
Chapter 11 Vikings: Wolves of The Midgard. Battle for carlione
Side quests - 3 skulls, 5 Cardinals, 3 Ettin.
Three cardinal will be at the beginning of the quest. The fourth you kill when protecting the wizard behind the gate. Go to the shore and destroy 2 Ettin. On the right side there is a chest with a skull. You will find other items without problems.
Chapter 12. Eternal Well - Dear Ice and Flame
In this task, everything is very simple, including side goals. There will be two huge opponents - ice and fiery giants. For their destruction you will receive two artifacts - from Luke Skadi and from the Lavateyne ax.
The final. Eternal well
The battle with Grimnir is divided into 2 stages. On the first you fought with a common giant, doing everything that they taught before. In the second stage it will be a big monster. Apply damage will not work, but you can win. You must attack not the boss itself, and those tentacles who appear from under the ground.
Another story about the salvation of the world is this time far in the north and with Viking in the lead role.
Gambling https: //www.Syt/ https: //www.Syt/

Vikings - Wolves of Midgard did not have time to go out, and everything is already compared with the series Diablo.. And this is not at all surprising, because in our time developers it is enough just to cry about the ARPG genre so that their project MiG will be swamped with another "Dyabloid". But is it all obvious with the project of Slovaks from Games Farm.?
In the glory of Asgard!
Wolves Of Midgard suggests us to take on the role of the Jarl of a small clan Ulfung, whose members are called "Midgard's wolves." One day, the hero cares the native village is pretty shaped: they grow home on the horizon, and among all this horror they roam the soldiers of the enemy troops. As a result of fierce battles, you beat off your native fjord, save from the death of several settlers and begin to prepare the plan of revenge.

The game has "tests of the gods", during which you will fight with the waves of opponents to get resources and unique items.
The plot in the new game does not shine the originality, but also frankly to the tangle to call his tongue will not turn. Your character has only one task: to get to the leader of the ice giants of the Grimnir and take revenge on the attack on his native Ulfung. However, everything is not so simple: in the course of the matter, it turns out that the crown will not only take revenge on the enemy, but also to protect the whole world from the onset of Ragnarek. Character himself, by the way, responds to such fate, like any normal person, phrases in the spirit "What should I do alone with the end of the world?".

One of the missions will allow you for a while to turn into a giant golem and drive even the most abnormal enemies to the ground.
Nevertheless, the Yarl is a man of business. It is simply not allowed to give a hero of a unique character (at the beginning of the game only a simple editor is available), so for all Wiking players is a harsh, silly and proud men: enemies squeeze with mockery, and in dialogues with allies offended by unfamiliar words. Any question, according to the Yarla, can be solved by fists, and in his case such an approach is really working. Even a mission to conclude a favorable union, he will certainly complete the steady.


A successful combo will turn the murder of the enemy in a bloody spectacle, and all this is in slow motion.
Ruby them!
There is no familiar class system in Wolves of Midgard. All skills and unique skills depend on how God worships the protagonist. Possible patrons are five Asov: Tyur, God of war, Tor, God of thunder, one, father of the gods, Scribes, the goddess of hunting, and Loki - God of tricks.
West gods in Vikings Street: Your choice determines the weapon. So, taking into the hands of the sword and the shield, you will begin to worship the Turon, with the staff - every my own murder devote the same, and so on. At any time of the game, you can change one-handed blade on two-handed hammer and thereby switch to another God, which will give you other skills. True, the skills will not come out: the change of weapons entails the disabling of all passive and active gifts tied to the class. If you forget about the gods, then we have a full typical set of classes: Paladin, warrior, magician, archer and robber.
Who would you choose, the lion's share of the whole game you have to fight. To run around the world to explore locations, it is impossible, and there is no need to - in addition to the passage of the main plot, in Wolves of Midgard, it is possible to make raids.


The interface in the game is not to say very simple, but understandable.
The raid is a very ordinary and tedious mission on the location passed. As a rule, the main task in these moments: kill several wolves, a tolt (local goblins), fenwayites (local zombies), trolls or giants ... In addition, there are three tests on any card, an additional iron will be awarded for them. And gold - the main resources for the creation of the equipment and the development of the village (about it a little later). Tests also do not differ originality. You are offered to destroy several enemy buildings, find three chests and chop on pieces of rare for the specific location of opponents.
The battles themselves look bright and very cruel. You can add separate blows in combination, the most successful bundles are completed by the dismemberment of the enemy in a slowdown. Some reptiles, by the way, have special properties and unresponsible to ordinary attacks. In this case, special skills will come to the rescue.


Greater pleasure in the game Deliver exactly the battles with bosses, where every time you need to learn new tricks.
By the way, the Yarl knows how to roll, and this "ability" is noticeably reviving the battle. The developers seem to understand this too: in the statistics tab in the Character window there is a meter of focate. In ordinary traveling, they will help to catch up from the battle of the battle, if the situation comes out of control, but they really help in final battles with bosses.
The battle with the boss is completed any Locations in Wolves of Midgard. The mechanics of battle with each unique, and defeat the leader will oh, how difficult: you can play all the enemies on the location, go through all the tests and defeat even secret opponents ... but die with a dozen times in the battle with the boss.
The death of Ulfung's enemies!
Actually, the whole game you will be engaged only to the systematic destruction of anyone who at least somehow is involved in attacking the village. The Yarl begins his journey in the surrounding forest, but over time will see the worlds and outside the patrimony of people, Midgard. Lands of fiery giants and trolls, etc. aboutklyaty graves, tropical islands - Wolves of Midgard pleasantly surprises the wealth of locations.
And the locations themselves will become not only a different climate and landscape, but also an aggressive environment that has an indicator of "impact". Something similar is in every "survival", but for the role-playing game it is imbon. The bottom line is that at some levels the environment does not allow you to live peacefully. Poisonous evaporations in the swamps, a brutal cold on ice empty, unbearable heat in the vulcan reservoir - the longer you are in such conditions, the actively filled with a special scale. If you are not lucky on time to warm or swallow fresh air, the character is simply will die.


The shaft is a mysterious provincial, which directs your hero and tells the player his story in the preceding missions investers.
That is why there are shelters in Wolves of Midgard. Not every new territory will try to kill you, but where nature itself rises against the character, there is always a corner for the respite. From poisonous marshes, for example, it is enough to reach a clean coast, and from an unsuitable atmosphere of other worlds will save caves. To pass some levels in one breath, distracting except for evil local inhabitants, will not come out, and at some point the game will remind even the domestic indie game The Wild Eight , with her survival from the fire to the fire.


Occasionally in the game you can face puzzles. It is not difficult to decide: it's nice sometimes to distract from the meat grinder.
Another element without which there is almost no game now - the development of its own settlement. In the refuge of Clan Ulfung, you can always bypass a new weapon, bring the gods a bloody sacrifice or simply sell the trash collected during the adventures.
But if you do not want to get stuck in the era of stones and sticks, it is necessary to work as a developer. For a local blacksmith, it is necessary to improve the forge, for Bronnik - his workshop, and the shipyard should be improved to open new routes, and the altar, because without it, do not access advanced skills. In contrast to the same Fallout 4. where urban planning did not know you, in Wolves of Midgard, the development of the settlement is vital. In the end, you are here Yar!
Charka Deafty
Vikings - Wolves of Midgard is able to captivate not for a joke. Here you want to get involved in battle again and again to experience new weapons and split from a dozen enemy skulls. And I also want to follow the plot - let him rustle, but a couple of unexpected turns surprises. Sometimes flat, and sometimes thin humor, prisoner, for the most part, in your character, gives the history of some special parody tint.

Closer to the final, your character will be increasingly and more often to be outraged by its unenviable position.
However, without flaws in the new game, it was not necessary. During the passage, the hero constantly finds the details, of which you can sow the Miolnir hammer, the spear of the Guznir or something else is so glorified. But this is not so easy to do, because the found items are not displayed anywhere. In other words, the developers forgot to add an interface for crafting of such things.

Sometimes you can even have allies. Only they are very quickly killed.
In addition, Wolves of Midgard has problems with mathematics. The lion's share of all the numbers means not at all what you think. So, the cost of any product can be safely multiplied by ten: if the description states that the thing costs 500 coins, then in fact, the trader will sell it for five thousand. The same applies to the numbers in the Hero window: the game promises that when improving the skill, its limit indicator will change by 1%, but this is a hoax. The right answer is 16%.
If you are a fan from Scandinavian mythology, love to cut runes at leisure, dress in the skins and build dragkars, then our guest will have to taste. Meet - New "Diabloid" from Slovak Studio Games Farm. called Vikings - Wolves of Midgard. The game broke into the category of isometric Hack & Slash, did not produce Furore, but not exactly unnoticed. And why happened so, you will learn from our review.
According to the plot, the settlement of Vikings Ulfung suffered from ice giants, who walked to another war with the gods. Naturally, rake problems accounted for a gamer that heads the local clan of Midgard's Wolves and becomes a local bud. Thus, we boar to our shoulders to revenge by commander, providing village resources and clarifying relations with dangerous neighbors. In the meantime, before the restoration of justice, it is necessary to rebuild the settlement, to discourage the strategic reserves of resources from other tribes and show opponents that Ulfung did not just recover from the strike, but also intends to give delivery.
Long live a yarn!
The first scene missions of the gamer disassembled with their neighbors, and only then constitutes the place of revenge and proceeds to its implementation. Each local task is called a raid: the hero appears at the beginning of the card, it is introduced into the course of the case, after which the brush stripping of the terrain begins. Locations B. Wolves of Midgard. Not similar to the usual battlefields of diablopod-like slashes are long and narrow corridors with light riddles and a mandatory boss at the end. In addition to the main mission, the player is given a couple of additional tasks. We destroy enemy totems on them, kill the necessary mobs or we clean certain places on the map. For the performance of quests, the character receives bonuses in the form of three resources (wood, iron and gold). The most enemies are diverse and represents the rich Scandinavian folklore, historical chronicles, as well as the imagination of the authors. In geography and changing locations, there is no lack either, so in Vikings - Wolves of Midgard Players will be in sinister snow-covered wastelands, poisonous tops, gloomy volcanic caves, green solar pastures, exotic islands and other worlds where the northern gods live. There they will meet Lutovolkov, trolls, Tomta, Jotunov, Ettinov, Dogs, Witches, Deads, other Vikings, warriors King Arthur and even soldiers of the Sacred Roman Empire. Each enemy received its features, skills, size and strength, and also knows how to famously confront a certain class of the hero and is killed far from one hit.

IN Wolves of Midgard. Geimer will be something to do between missions. For example, it is necessary to develop a settlement, improving the buildings of the Blacksmith, Rune Masters and other important NPCs. In addition, players can participate in repeated raids on the locations already passed to obtain additional resources. They are also earned in the arena of gods - this is a map where the character must drastically destroy rolling waves of mobs. And if you get tired and this, then we join the multiplayer game and together with a partner we clean new locations.
There will be something to do in inventory - to clear the place from unnecessary trash, pick up the equipment or insert a useful rune into it. The lute in the game is not so much, as in other similar projects, but it falls enough to periodically spend a couple of minutes for this business. Things and weapons themselves are divided into standard for RPG gray, green, blue, purple and orange colors. They have light, medium and heavy properties and can be used to be sold out, and just destroyed using a special button with a basket in inventory.
Bay, dir, shoot, Ruby!
Battle B. Vikings - Wolves of Midgard Pass rubbish, Boyko and Zadorno. True, the first mission is boring, because the developers did not take care of putting the character even one active skill. So it is in the literal sense of the word to curse virtual sacorants with a standard blow. But then the level of interest is shrinking to the limit and you want to go through the mission for the mission in anticipation of the new boss, fresh tactics and, which is so sin there, to further promote the plot.
The haziness in battles bring and rolled out. They are applied constantly and often save lives when the opponent is in front of us. Yes, and with conventional mobs it is easier to straighten if you leave in the crowd from the crowd, and then destroy them with active skills. Returns in the game paid so much attention that the severity and type of armor affects their range, and in the character menu, except for the main statistics, the number of carved pans is displayed.

IN Vikings - Wolves of Midgard No classes. It all depends on what of the five Scandinavian gods (Tyur, Tor, One, Skadi and Loki) the player will choose for prayer. For example, to play a local version of the classic warrior with a sword and a shield, you need to worship the God of Tura, and after choosing Odin, the gamer will run the local version of the magician with a two-handed staff. At any time you can change the weapon to another, but the invested glasses of the skills can not be returned, so you have to either continue to play a non-disconnect newcomer and re-promote experience, or decide at the beginning of the game, what direction to choose. As an option - to worship two gods at the same time, and skill glasses are divided between distant and neighboring weapons.
Active skills for every deity in the game six, plus additional passive skills. But simultaneously on the panel only five skills and two artifacts are taken. The latter received special properties, fall out in the course of the game or crash at the blacksmith. One gives health restoration during the mission and is replenished in special places of power. The other provides a powerful attacking skill with a rollback in one minute. In addition, three scales are located on the panel: health, elements and rage influences. If everything is clear with health and rage (we kill the enemies, we accumulate rage, turn on the berserka mode), then the scale of the influence of elements requires an explanation.

The fact is that developers Wolves of Midgard. Added to the project elements of survival. Each location is hazardous for the hero: snow-covered empty - cold, poisonous fuses - harmful evaporation, the earth of the gods - their air, and the dark volcanic caves - the heat of the lava. When the character turns out to be on the same map, the special scale on the panel is gradually filled with cold, poison, heat, or harmful atmosphere. After reaching the scale limit, the character loses health and dies in a matter of seconds. That this does not happen, the player needs to move faster from one safe place to another, pass through the mobs, to fulfill additional tasks and collect LUT. Of course, the gamer is constantly tired of constantly in such a survival in the survival in the world (after all, not in the Flame in the Flood play), so places with an aggressive environment come across a couple of times for the mission.
The beauty of mythical scandinavia
Vikings - Wolves of Midgard It does not shine licked graphics, but her picture is pleasant, juicy and not annoying eyes even after a couple of hours of play. If you look at, the curves of the texture, discover parts of the character, and other similar little things are noticeable in some places. But in the heat of the local battles they do not pay attention to them at all. I am glad and optimization. The game is not demanding to the gland, it will easily go even on the weak PC, does not seek on FPS and is not buggy.

The project acquired and minuses. Adequate playability arience and magician causes doubts. The first received a meager range of attacks and weak strikes, so the game for it will consist of eternal kite. For some reason, for some reason turned out to be a small-time class and is equipped with only a long-range ability. At the same time, the local magician carries light armor, it has a weak protection and is killed by a medium bundle of mobs by the middle of the game. And his battles with bosses turn into blood pressure and endless use of focate.
There are complaints and to inventory: it is possible to sell things only one thing and with mandatory confirmation. In addition, the creators forgot to add a place for special finds. For the game, the gamer collects weapons from the Scandinavian myths (for example, the legendary Mjölnir hammer). But it is visible only in the pop-up window during the time they were found, and in the inventory itself are not displayed. Therefore, find out what exactly the player has already collected from such weapons, will not come out.
Vikings - Wolves of Midgard It turned out exciting and perky game in the family of imitators of the legendary Diablo. The project is hardly wanting to refirm anew, but it is easily able to captivate for a couple of evenings. Wolves of Midgard. Received a fearful milk, an unusual system of aggressive environment for this genre, a pleasant picture and low demands for the game gamer. The game is able to attract the attention of the fans of Scandinavian setting, fans of isometric Hack & Slash and even casual players. But she has flaws, and the first patches have not yet corrected the developers too explicit errors.
Life experience suggests that the very impression is the most important, even if not always true. If the game cannot capture the player for the first 30 minutes, if it hits the boredom from the very beginning and annoys the plagiarism, it is unlikely that some respected gamer will continue to pass. Such a product is tritely difficult to perceive seriously, you quickly forget about it.
However, our world is contradictory. If you look at the mediocre game product on the other hand, give him a second chance, pay attention to other aspects, it may suddenly be that everything is not so bad. Vikings - Wolves of Midgard personally reminded me of such cases.
Genre Hack'n'slash never pleased with innovation. Everything is so bad that in the people all the games of such a people are cliche in honor of one famous Horned Demon. It is not strange - it is difficult to somehow turn the genre of infinite Grind and come up with something new. But this is not a reason for laziness - progress should not stand still.
Games Farm, Vikings - Wolves of Midgard developers, are perfectly understood and, using all your accumulated experience with the Action-RPG genre (previously they have already worked on inexpressive Shadows: Heretic Kingdoms), decided to experiment.
The coolest Hack'n'slash always lies in the combat system. Here Vikings - Wolves of Midgard is seriously different from all his fellow in the genre in many details and trifles. In Hack'n'slash, you should always kill whole armies of almost harmless blanks who are not able to give at least some kind of sporing the player. But our client has a different opinion on this score - any battle with a little serious group of enemies can have a fatal outcome, if you act carelessly. And if you also have a difficult level of difficulty, then each fight becomes the most real test. Fans of hardcore will be roaring, just exactly.

Vikings - Wolves of Midgard was created under explicit inspiration from Dark Souls. It feels in many mechanics of the game. The enemies apply a lot of damage, so it is necessary to drive all the time by knuckles. The health recovery system also moved from there - there is a bank of treatment with a limited number of charges and the wells scattered around the card, where you can fill the empty bottle.
In addition, Vikings - Wolves of Midgard is made with an emphasis of the gamepad game, so that the classical control of Kim is rather unusual, relatively with other representatives of the genre. It is quite adequate, but the exhaust nephon can feel clear discomfort in the first minutes of the game. It is also used to get used to the climatic convention - if we run through the winter card, then from time to time it will be necessary to warm up the fire, and everything is in such a style.

Separately all this is the little things, but in the aggregate it makes Vikings - Wolves of Midgard quite fresh product, you can even say, original. However, everything is not perfect. The game is quite a small number of interesting abilities and skills (they are tied to the type of weapons, just like VRAN VRAN), monotonous enemies and an irritant crafting and trade system.
Oh yes, crafting system. Finding the best artifacts and endless mathematical analysis is almost the sweetest pastime of lovers of the genre. But in Vikings - Wolves of Midgard is quite bad. There is no interesting system for creating objects or their further improvement. Everything is extremely simple, from that and the horror is boring. Sometimes this system simply breaks all interest in the game. Life case: the buildings here need to be improved by investing a huge amount of resources to get the opportunity to make better equipment. One time I decided to spend and improved the forge, and then scratched a gorgeous spear with excellent characteristics. Satisfied, went to the drake to go to the story mission. It turned out that for further campaign, it is necessary to improve the ship, investing the astronomical amount of resources. I, without Shisha in your pocket, was forced to go on the boring mission grind and perform monotonous tasks several times to a row to build this damned dragon. There should be no such incidents.

The game has problems and with another important for the genre aspect - a multiplayer. When I and my valiant companion @ilya sent to conquer the northern tribes, our main enemies ended up not sacustoms, but the game itself. The terrible Internet connection system raises questions and stream. Instead of the game, we got a slideshow, and the heavy level of difficulty became incredibly turned into a light. In addition, the cooperative campaign one in one repeats the single one. In general, if you decide to play, then play alone - do not repeat our mistakes.
Vikings - Wolves of Midgard can attract gamers' attention to its setting. The adventures of the horned demons of Midgard always excite the blood of the audience, because the image of severe bearded viking is so popular in the gaming industry. At first glance, with the story and the atmosphere, everything is fine: the Vikings on the spot, they all shout about the Torah and Odin, everywhere snow, wolves. But the developers went further and stacked so much that the plot became difficult to perceive seriously. There is also a repetition of the feats of Beowulf, and the army of trolls, goblins with giants, and the approaching Ragnarök, which, according to the laws of the genre, should stop the player. The most dignity causes the invaders from the south - the Roman Empire, which mowing under the crusade head led by the bishops. It seems that the development of the plot has not advanced on the starting brainstorm. It is worth noting that all this does not prevent Vikings to be an atmospheric game with a pleasant authentic saundtrack. Ragnar Lotter would approve.

The biggest cognitive dissonance causes the main character (or heroine). We, players, are used to that we are under control give some super strong characters capable of fighting with a huge number of enemies alone. The main character of Vikings - Wolves of Midgard differs from all - he knows that he is incredibly strong, and constantly sich. He mocks his enemies, mixes their name with mud simply because he can. In battle, he shouts all the time to horror self-confident phrases, sort of: "I am invulnerable!" Or "everyone will fall before me!". He knows that every sigh, step and gesture changes the vector of time and the future of the whole world. Tell him that his tribes would not prevent the allies, and he only laughs to you in the face and go to kill and rob potential friends. The main character loves himself so much that a feeling appears, as if he was already planning to build a temple in honor of himself. Viking analogue of Dudkey Nyukhema to the horror of Fun and Charismatic. True, unfortunately, the castomization of the hero is not happy - too there is a small selection of available hairstyles and facial types.
Passage Vikings: Wolves of Midgard.
Chapter 1. An ambush on iotuna.
Having created a character and choosing his class (God), launch a new game in Vikings: Wolves of Midgard, confirming one of the four levels of difficulty (in our case - "warrior"). By the way, when creating a character, you can activate the Valkhalla mode - in this case, the first your death will lead to the death of the main character (you will have to create a new savings).
During the mission you need to kill 30 Tomta and find 3 iron skulls.
Move on location, killing enemies. Just click on them LKM. For evasion, use rigs. To make a carbonate, click on the "space" or W, S, A, D. Endurance is consumed.
As you move through the village, destroy wooden barrels and wagons to collect gold and wood.
Do not rush to move through the location. Follow closer to the right edge of the screen to find the first chest inside which lies the iron skull (1/3).
After meeting with the first giant, hold on the right side of the card. Behind the fence in the trees there is a hardly noticeable second chest. Open it to get an iron skull (2/3).
The healing system in the game is unusual: you use one of the healing totems that you can find or buy from merchants. Each totem has a definite amount of charges and efficiency. After you use healing (Tab), the number of charges will decrease by one unit. You can restore these charges in the altar of healing.
By the way, the first such altar you will find on the left, in the countryside. Use it after the destruction of a few tottol. From the altar go down and right, to Marcéra. Save the Heldarde from Tomta. A man will join your squad! A little higher than its initial location is the third chest - iron skull (3/3).
Go to the left top corner of the card to save from Tomta Helga. Together with two characters, go back to the healing altar, climb along the steps and go through the door, which previously tried to break opponents.
Reward:
Rune Algiz.
Blood 200.
Tree 30.
Gold 220.
Iron 7.
Chapter 2.1. Dangerous neighbors.
After conversation with Vejund, go to the left of the map and find the altar. Donate 200 units of blood to raise the level. The character level in the game is raised exclusively in this way.
End of yocula
Follow the goal in the upper right corner of the map and go to the desired location. So the next task will begin.
You will have three additional tests:
Find 3 iron skulls.
Kill two yotunov.
Destroy 10 idols yoculus.
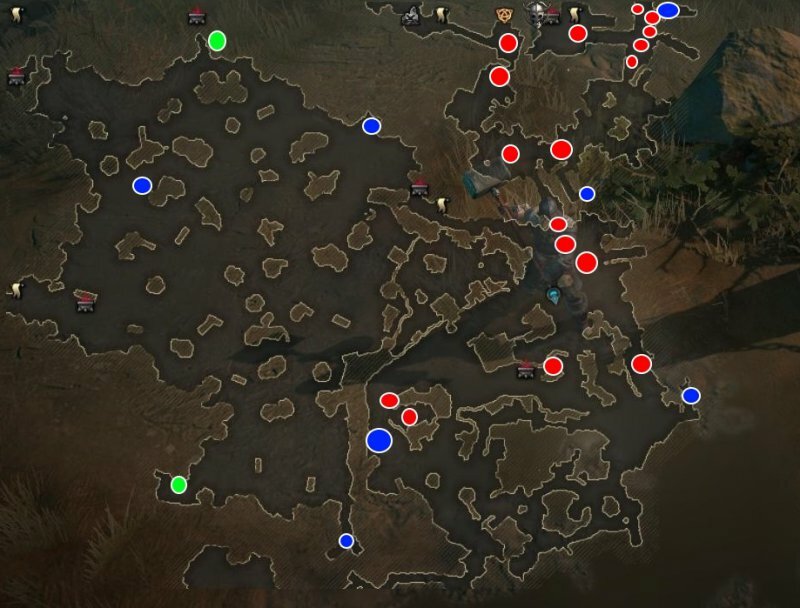
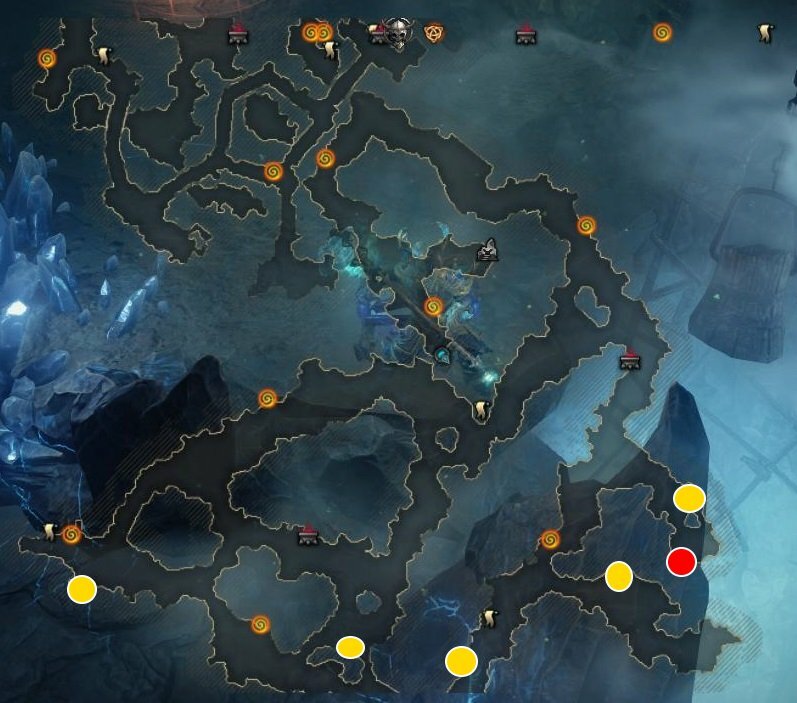
On this location you can climb. Under the scale of health in the lower left corner of the screen, the blue scale is gradually filled. If it becomes complete, you will start getting damage. To avoid this, you will need to periodically stand by the fires - they are marked on the map of yellow markers.
Jocul's idols are marked with blue circles, chests with green cheeks, levers to raise the bridge to the fourth gems on the location - black, the location of Jotunov is light blue, a chest with artifact - red.
Thus, destroy idols and yotunov, assemble the skulls from the chests, find and activate five levers and take the artifact.
Go on Marcéra to the cave and get ready for battle.
How to defeat yokula in an ice cave?
Fight is pretty simple. In his first part, the yoke will create ice spheres and explode them in points indicated on location. You also need to avoid these points if you do not want to stay frozen for two seconds.
Periodically get on yellow circles to warm. Killing wolves, do not forget to attack the throne of yokula on which it stands. After the destruction of the throne, attack and the yocula himself, who, by the way, can go down to you down and before the destruction of the throne. Trone recommend attacking in rage mode to destroy it faster.
Talisman Skadi.
Rope belt.
Runa Hagalaz.
550 blood.
620 gold.
90 wood.
20 iron.
Chapter 2.2. Old enemy
In this task you have to capture the village of Svaunov and kill their Yarl (Boss). This settlement is an impregnable fortress, so you have to work hard to find an entrance.
Additional tests The mission includes:
Search for 3 iron skulls.
Murder 15 sores.
Destruction 10 Svanung signs.
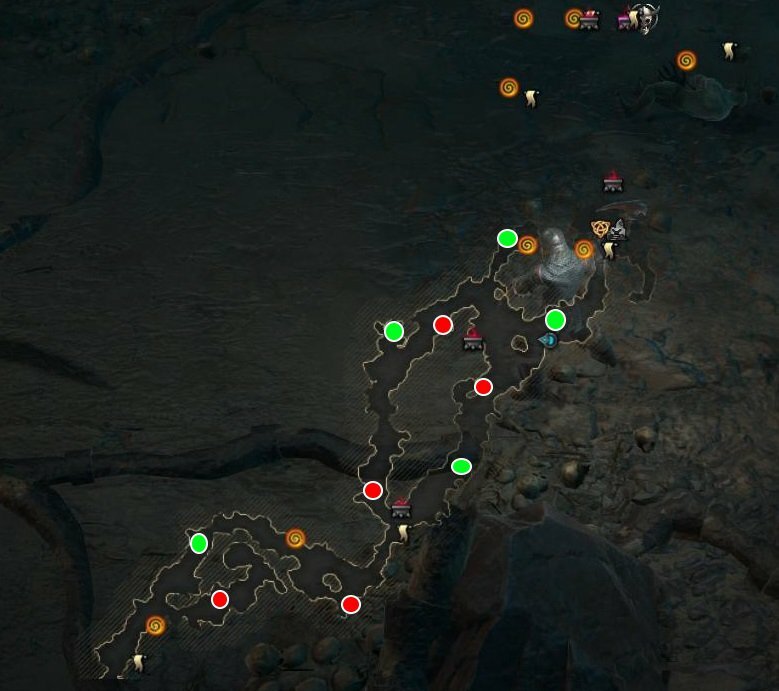
As always, on the map you do not show places where you need to look for all these items. And since the location is even more than in the quest "End of Yokula", then the necessary items are very easy to skip.
In the screenshot below you can see the designations of test items: Red circles - chests with iron skulls, blue circles - the location of the psares (13 of 15, two others - obvious), green circles - the location of the Svanung sign, the yellow circle - the chest, hidden in the grass, Within which the accessory "Gusli" is located.
As for the passage of location as such, you need to go to the left side. You can destroy small wooden barricades, as well as tows on which there are archers. The opponents will appear here, actively using shields - you need to act differently: either drop out and wait, when they reveal, or wait for their attack, without doing anything, or roll to them behind the back. Even if you decide to freeze the enemy, do not forget that the shield will protect it from the attacks in front.
The iron gate will not open, so move to the swamp on the left. Slightly above and the right will be wooden trash, which you can destroy and get on the territory of the fortress. So get to the place of transition to the house of the Jar of Svaunov.
How to kill the scarlet Svaunov?
The boss does not offer anything supernatural. First you have to kill two spear shields. Do it without spending strength.
As always, it is desirable before starting the battle to stock up the energy so that you can activate the "rage" mode.
Red circles are marked by warrior, green - chests with iron skulls, blue - banner of yenung, yellow - chest with a talisman.
One of the chests with an iron skull is in the upper part of the swamp. There is a small passage inside Alkova, invisible on ordinary location. Be careful.
As for the passage of the plot, you will first need to get along the linear route to the gate, which, by the way, will be locked. Before the gate, you are waiting for several strong enemies, so finding near the round Square of the Altar of God.
Go left from the gate, on the swamp. By destroying all opponents, take it left to climb to a snowy hill.
Be careful here, since the fire is just one, plus the whole distance is large and you can easily climb.
Get to the cave and enter inside. After the warning of the yarn hormones, go around the spikes neatly and climb on the wooden forests in the wall in the background. Do not hurry! If you want to find an additional mascot, which is very useful in battle with the boss of this location, then pay attention to three glyphs deposited on the wall on the right where there is no bridge. They will need to enter the stone slabs on acquaintances.
On the wall in the background there is a point of interaction - click to destroy the stones and open the passage. Get to the locked door, over which the four-digit code is visible. Enter it on stone slabs on the left.
Note. This code is not necessary, since you do not need the door to the right, but if so, then you lose yourself the opportunity to get the talisman Hel.
Go to the opened room, take the leaf from the chest, including a new talisman, and then kill enemies.
Go back and down. You can get across the village where the enemies will be even more. And after you waiting for the fight with the boss.
How to kill Iron Guard?
This opponent is much more stronger than all previous ones.
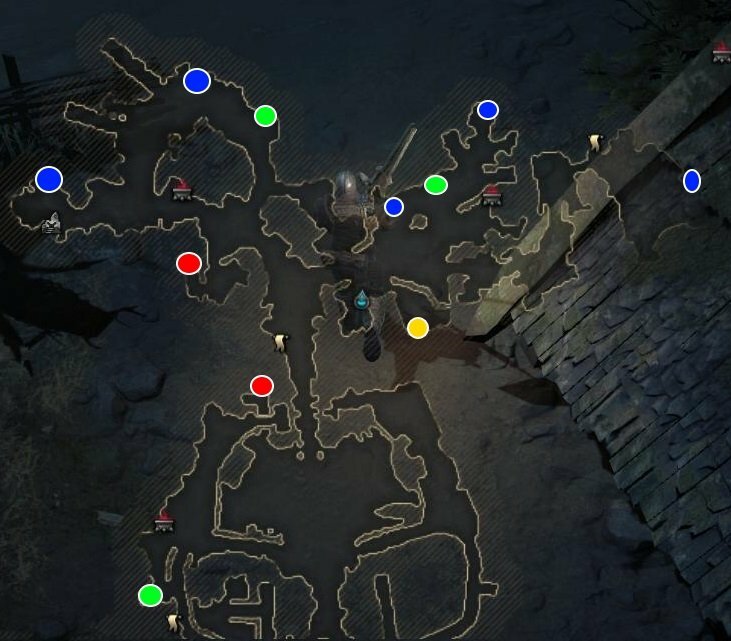
You can see the following designations: Blue circles - chests with iron turtles, red circles - idols of trolls, green circles - the trolls of the witch.
In addition to this location, you can find one part from two artifact items - sword and shield.
When you are in the cave trolls, then hold the left side. The top will be the passage leading to a dead end. Here you have to fight one of the trolls of witches with a high stock of HP and unresponsibility to darkness. By killing it, you will get the artifact one-handed hammer "Mielnira".
As for the part of another artifact item, the shield, then after exiting the cave, go along the left footpath and turn on the first turn to the left. On the side, in the direction of the top of the screen, there will be a hidden passage. Destroy the two logs and discover the chest to find the ENARMS from the artifact heavy shield "Pryven".
The passage of the location itself will not be difficult - you just need to break obstacles on the way, kill huge trolls (using Hel's talisman) and move towards the boss.
When leaving the cave, you will need to solve a simple puzzle - using the levers to the left and on the right, move the stream of lava to the vendor coming to them. Stone will go up.
How to kill Scully?
The mechanics of combat is simple - Scully either run up and trying to knock you down, either jumps when you are near to stun, or attacks the swordless movements of your club. In addition, cobblestones will fall on top of you.
In addition, there is another chest with another talisman, which is called "Haymdal's Talisman". He scares the goals and damage to darkness. To find him when leave the territory of the settlement and find yourself at the shore, then go up and right. Find here a pier and go to the ship, where the chest is located.
In the first case (marker on the left side of the map) you will need to kill a huge troll with more than 13,000 hp. Make it is not easy, so prepare for battle by collecting the energy of rage. As a reward, you will receive the legendary Nibelung Ring.
In the second case, it will be necessary to simply search the fourth gem box on the map. In it will be the legendary Mascot of Khodel.
Based on the quest, move to the checkpoint and turn the mechanism clockwise to open the passage. Follow the goal, periodically peeling into the caves to shoot down poisoning.
The following gates will be locked, and the mechanism is broken. You need to find three details of the mechanism. Go first to the left and in the cave kill Iotnah, from which the first part will fall. Looking forward, we note that all three details fall out of yotunov (which are goals in one of the tests). Anyway, go through the markelars and kill the enemies, gathering all the details.
Repair the gate and follow the location boss. Greendil will again decide to check you. Enter the same way as last time - attack, shudge, destroy the healing totems. When Greendil is invisible, avoid green circles, parallel to the trolls.
By winning, you will get a reward and anvil Jotunov. With this anvil can be improved by the gunsmith, and thanks to this - the blacksmith making things.
Upon returning to the village you will be waiting for a surprise - the merchant has already posted his products and are ready to cooperate with you.
Reward for the fulfillment of the quest:
The legendary mascot Loki.
Barbaric idol.
Rune Ingvaz.
2900 blood.
9100 gold.
1300 wood.
270 iron.
Chapter 5.2. Flotnar - Liberation of the Flotnar Clan
In this task you will be offered to pass the following tests:
Find 3 iron skulls.
Save prisoners from 5 cells.
Destroy 5 Kappitsa Vanov.
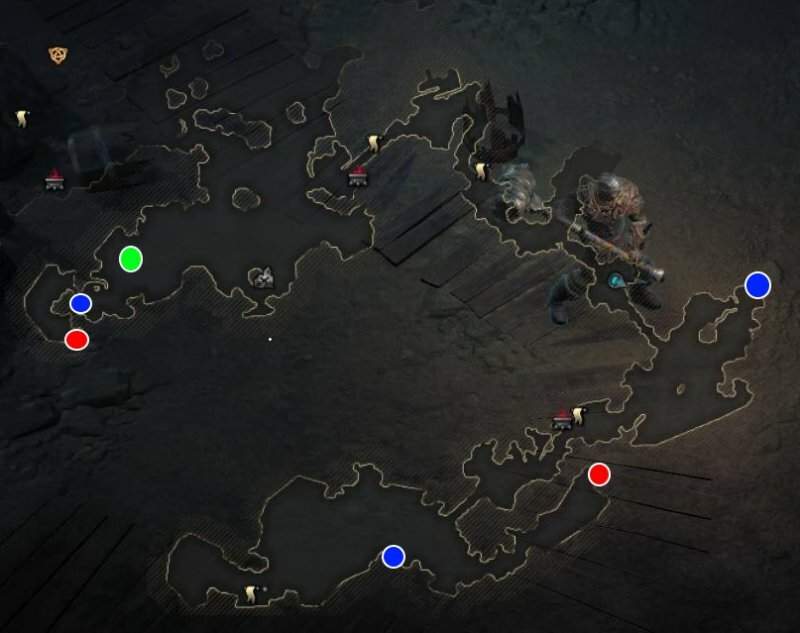
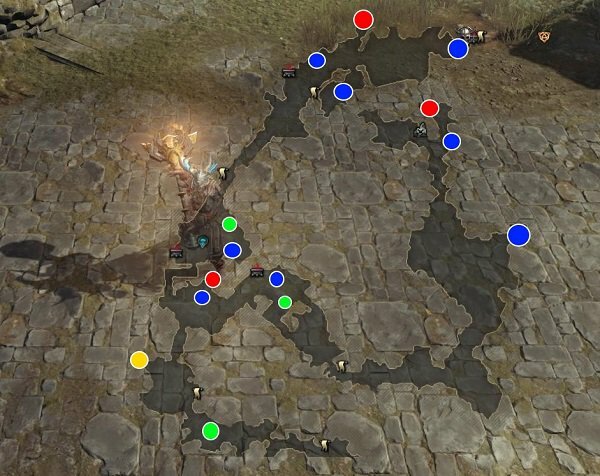
All these objects are indicated on the screenshots below: Red Circles - Chests, Blue Circles - Captive, Green Circles - Kapieff Van.
As for the passage itself, you first have to go to the shore, destroying crabs. Giant sand crabs should be killed just like warriors with shields.
But that's not all! On locations, you can find two parts of artifact equipment.
Pay attention to the iron grille in the only cave on the location (not counting the latter with the portal). To open this lattice, you need a key. Rusty key you will find inside the chest, which is a boat tied by the shore.
Destroy the helper so that the boat sailed to the right. Then pull the rusty key from the chest and return to the metal grid. Click on it to open. By killing opponents, you can get the blade of the artifact two-handed ax "Lavateyn" from the chest.
Another part of the artifact equipment is a shishk artifact heavy shield "Pryven". To find it, you need to kill the crusader, the location of which you can see on the screenshot below (the crusader is already killed, but he was on the place where the character stands).
As for directly passing the game, here you should go through four watchdogs and clean them from enemies. When the bridge is raised, then go back a little back and go to the right. Get to the entrance to the cave. Move using the portal to another cave and go on the last arena.
ATTENTION! There may be a bug here - you kill all the mobs, but nothing happens. In this case, simply go to the main menu and download the last save - they will place in front of the last arena. Complete on the last arena and die from the hands of a huge troll. When you do it, the same save will automatically boot. Go to the arena and kill all enemies this time. As soon as the last mob is dead, the window will automatically appear, notifying the end of the mission (you will see a reward).
Reward for the fulfillment of the quest:
The legendary belt of great kuznetsov.
Imperial Bulava.
Rune Ingvaz.
900 blood.
10,300 gold.
1500 wood.
300 iron.
Chapter 6.2. Sigurd Ring
In this mission you need to take his ring from Sigurd. Looking forward, we note that, unlike the ring of Odin, the protagonist will give Greendil this subject without choices.
Three tests will be available:
Find 3 iron skulls.
Kill 30 waiters.
Destroy 6 mengirov.
Under mengirors raise stone structures - something in the spirit of idols of trolls, etc.
Chest chests are marked with red circles, and mengirons are yellow.
In addition, on the location you can find a secret passage to a strong enemy by defeating which you can get the second part of the artifact "Big Leek" - shoulders.
As for the passage of the mission itself, it consists of three stages. At each stage you will need to open the passage to the next Kurgan. To do this, come to the covered transition and remember the code combination of characters (as usual).
In the first case, two stone disks will be left in secluded niches, and the other two are on the right. So left to right and exhibit the correct combination.
In the second case, all the same, just these most niches will be more.
In the third event everything will be more difficult. You need not just remember the code combination, but also pay attention to the situation in this combination are symbols. For example, if earlier the arrow stood up, this time it is directed down.
The same applies to the stone disks - if earlier it was necessary to set the characters at the top of the disks, now the discs will be fully open and need to be rotated so that the necessary characters (in the correct order) are directed correctly.
The solution will be like this (on the map move from one to another disk from left to right): arrogant at the bottom of the disk, f at the top of the disk, x at the bottom of the disk, | x | On the right side of the disk. If you do everything right, then the pass will open.
Having gathered all objects, go to the last arena.
How to defeat Sigurda?
To destroy this boss, you will have to act neatly. First, the Sigurd does not leave the central circle. Secondly, when you become a circle, the Dark Scale under the scale of health begins to fill out.
The first chest with an iron skull is hidden in Alcove inside the cave, behind wooden boards. Two other chest are hidden in the corner inside the buildings of wooden boards on the territory of the fortress. Their location is indicated on the screenshots above.
There are no artifacts or legendary items on location.
In the plot, move to the forge, where they will be closed on two dorms of the gate. From the right side of the gate, find the first lever, then go to the left, and climb up the top so to be on the left side of the locked gates, at the top. Here will be the second lever.
Deliver to the following closed gates, go below and left, on a wooden wall. Here is the Ballist. Sick out of it in the gate to destroy them and discover the passage.
Left to get to the bishop of the seas.
How to kill the bishop of the seas?
The battle will be simple enough - avoid white circles on Earth, attack the bishop when there is no protective sphere on it. The enemy is not so much hp, so the battle will not be deprived for a long time.
Reward for passing a quest:
The legendary talisman Nitard.
Honor Ayre.
Rune Evaz.
3800 blood.
12,800 gold.
1900 wood.
380 iron.
Chapter 7.2. Lorovo Srimul
To start this story quest, use the portal in your settlement.
You will be asked to go through three additional trials:
Find 3 iron skulls.
Destroy 3 mengir.
Kill 3-doors-defenders.
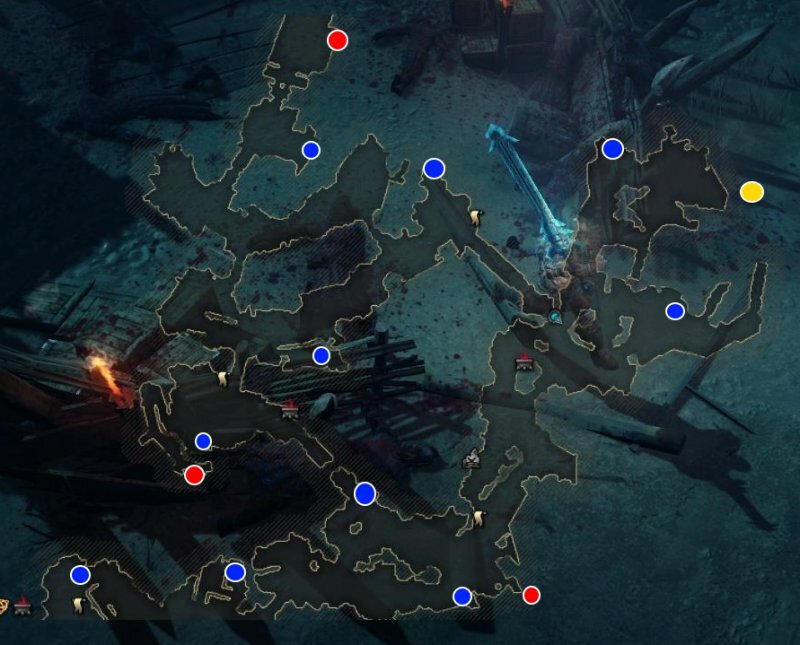
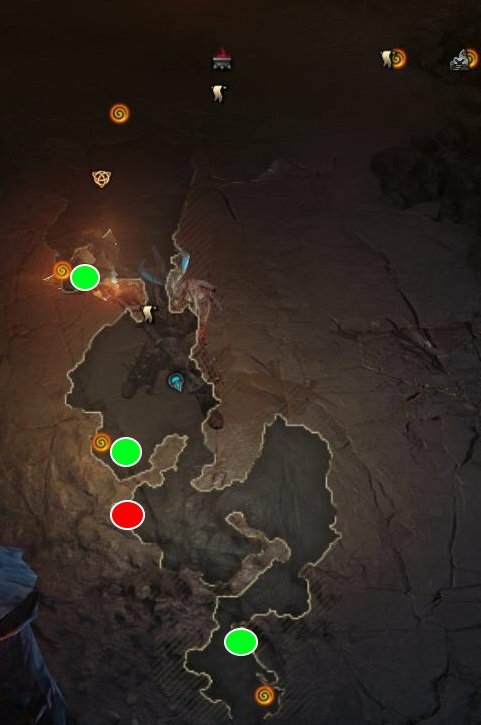
The first chest with an iron skull is on the left part of the arena, where you will meet with the first protector door. There is also the first Mengir.
But the chest is hidden from the eyes. Pay attention to the corner of the stone wall to see the stove and a small, flickering a blue hole. Drag the stone slab to find the first chest. Perhaps this is the most difficult to reach of all chests with iron skulls at this level.
In the screenshots below indicates the location of all other objects and objects: red circles - chests with iron turtles, yellow circles - mengirors, green circles - protector doors.
In addition, you can see the white circle, which indicates the location of the chest with the new legendary mascot "Braga". He is capable of sleeping enemies.
Finally, the purple circle indicates the place where the chest is located with the next artifact - the blade of the two-handed press "Gunnir".
To get to this chest, you will need to remove several stone pillars from the way. When interacting with each column, you turn on or turn off its backlight. So you need to highlight the desired stone pillars to operate.
Red circles - chests with iron skulls.
Blue circles - two huts (caps) of a tet.
Green Circles - Tomta Breasts.
Purple circles - four levers for opening the door. The fifth account indicates the location of the door itself.
Pink circle - chest with a legendary one-handed "gold ax".
Reward for the fulfillment of the quest:
The legendary ring "Stone Garamich".
Genhable Eyre.
Rune Yera.
3000 blood.
16,800 gold.
2400 wood.
500 iron.
Chapter 8.2. Path in darkness
This plot quest is performed in order to improve the forge and Bronnik to the fourth level.
You will be asked to pass the following additional trials:
Find 3 iron skulls.
Kill 20 cave trolls.
Destroy 10 mengirov.
Unlike previous missions, you will not experience problems with finding iron skulls, because they, in principle, are located on open locations and are not hidden under the boards, stones, etc.
In addition, we will not show the location of the cave trolls on the map, since they will still have to kill them all. If you do not do it, you just walk through all parts of the map - trolls will automatically appear in the right place.
In the screenshots below with red circles, chests with iron skulls are indicated, and all mengir are yellow. Just with the search for mengirov and most of the problems are connected.
Please note that Mengir, indicated on the map at the intersection of the upper and lower tiers, is at the bottom, when leaving the arches closer to the edge of the map.
In addition, by the end of the location, you will notice a locked cage, inside which is a precious chest. Looking forward, we note that in the chest is the "Mascot of Salt", applying fire damage in the amount of 550%. The purple circle is indicated by the very chest with the talisman.
If you need it, you will have to solve the puzzle with the levers.
Puzzle with levers
There are several levers opening and lifting and raising. Pay attention to the screenshot above, where the map is depicted. On the map Digital Designations: The numbers indicate the levers you need.
And the correct sequence of leverage will be like this (if you did not touch anything): the first, second, run through the first to the main hall, where the orange safe zone is located, the third, the second, fourth. Go to the fifth lever, because now the passage to it should be opened.
The task of the main plot is simple: Go to the specified location, destroy three crystals to go further, find the right mob and take the key of the guard, and then open the passage to the boss.
In the battle with the boss, the buoy door, act just like with ordinary doors. The only difference is that he has stronger attacks and significantly increased stock HP. To wake the boss when you find yourself on location, you will need to destroy the crystal.
Reward for the fulfillment of the quest:
Woven armor "Robe Odin".
Ax-cloves door.
Runa Isa.
4800 blood.
18 200 gold.
2700 wood.
550 iron.
Chapter 9.1. Albion - Lost Clan
In this task you need to walk along the location, get to the locked gate and follow even further to bypass the fortress through the cave.
For additional purposes, you will be offered:
Find 3 iron skulls.
Destroy 10 stunning badges.
Kill 15 fenvayites.
Fenwayites can be found primarily in two locations, similar to overgrown with grass and flowers Kurgan with stone high plates. There will be more than 15 pieces.
If the two chests with iron skulls are not so difficult to find, then here is the third, which is chronologically actually first, was well refined by the developers. Look for it in the house to the left of Kurgan, up from your spa point.
Red circles marked chests with turtles, blue - stunning badges. The yellow circle is a druid, which destroyed which you get the Talisman of Tyura.
In addition, the talisman of the Tyura can be found on the location. To do this, you will need to kill one of the druids - from it and the subject will fall.
At the end of the battle, you will need to defeat the barbarians, and then the imperials with shields. They need to act neatly, because near they cause huge damage. As soon as they destroy them, King Arthur will have to defeat. In principle, you just need to shy up in time, avoiding its powerful attacks, and then counterattack. The opponent has resistance to stun.
Reward for the fulfillment of the quest:
Fafnir Armor.
Affected crystal chain.
Runa Isa.
5900 blood.
21 000 gold.
3100 wood.
630 iron.
Chapter 9.2. Hypersca
This plot quest will be quite long in many ways thanks to a huge location. You will be offered to perform the following additional tasks:
Find 3 iron skulls.
Destroy 30 Tomta's caps.
Kill 15 dragugs.
Tomte's caps, like dragues on location, will be limited. Find and destroy the dragugs will not be easy, but if you study all the corners of this level, you will definitely face them.
One of them is a drag warrior that will need to awaken, having solved the puzzle. See the screenshot below.
There are four levers here. You need to pull for them in the following order (if I did not pull anything before):
Lever near X.
Lever near F.
Lever about | x |.
At the beginning of the location, if you do not know, you can go past the hidden boards with a chest, inside of which there is a legendary two-handed hammer "Gambanktein". Its location is on the map.
In the plot, move to Marcéra, destroy the gate and kill enemies behind the next door. Next will need to make a choice as it will go. But regardless of this you have to go both in the cave on the shore and on the left. If you go first by Arthur, then stop the magic gate anyway.
Thus, talk to the Mindyr. Go to the specified cave, killing enemies, and then find out what Bellatrix, according to the wizard, still loves Arthur. This love is mutual, so in the event of the death of Gwinnev (she also Bellatrix) Arthur will be wicked. You need to somehow use this fact!
Return to Arthur and go through it. Having gathered all the subjects and destroying the carts with the ballots, go to the last arena.
Fight with Bellatrix
At the beginning of the battle, Bellatrix imposes a witchcraft chairs to Arthur. He will fight against you along with a girl. You have two options - either kill Bellatrix (Gwinnevera), or attack Arthur, trying not to hurt the Bellatrix itself. Arthur You will not kill, but in the last of his hp battle stops and Gwinnev will ask for mercy.
Regardless of your choice, the plot chain will continue equally. Simply in the first case, Arthur will be sealed by the death of Bellatrix, and in the second, because of the Wizard Magic, which was imposed on it (and Bellatrix will go to your dungeon).
Reward for the fulfillment of the quest:
New Talisman Frey.
Made crystal woven armor.
Rune Mannas.
5900 blood.
24,000 gold.
3600 wood.
730 iron.
Chapter 10.1. Moroka with giants - plain shower
ATTENTION! In this story mission, you can find two parts of different artifacts at once, and if you were attentive and collected all the others earlier, both of these weapons can already be made. But everything is in more detail.
You will be prompted to perform three additional tasks:
Find 3 iron skulls.
Kill 30 trolls.
Destroy 7 Mengirov.
As for the chests with iron skulls, we will show the location of all, but with one reservation: the last chest is inside the mound, where it will be necessary to interact with the levers. This chest is visible through the gap in the wall, but the character for some reason does not want to go there. Perhaps this error will be eliminated by developers later.
The first part of the artifact you can find is the ancient two-handed press "Gunnira". To find this artifact, it will be necessary to destroy a noble line of giant. After his death, the desired subject will fall.
Note. Now you can collect weapons. To do this, in the section "Bag" of your inventory, double-click on the Gunnir Stake. There should be a picture of this staff assembly. If this does not happen, then the game will hang. In such cases it is recommended to complete the mission, and collecting weapons to collect already in your own village.
To find another part of the artifact, namely, the embodious head of the artifact one-handed hammer "Mielnir", you will have to look around in the Kurgan with levers. When you go to the pit with spikes (you will need to push the panels with the levers to make the passage further), then go to the right. Here is a vertical part of a wooden bridge in a vertical position. Hit along it to overturn the bridge and ensure the passage to the chest located right.
Note. To collect "Mielnira" you need to do everything the same. If the game hangs, then collect it after the quest.
In itself, the passage is not difficult, but you will need to sweat in the Kurgan with the levers. So, as soon as you find yourself in place, then scroll the wall on the left. Here, killing enemies, pull the lever.
You will see how the part of the bridge is put forward. The bridge is behind the wall. And on this wall just there is a weak point where you can hit. So make to get to the other side (this place is closer to the healing cup).
Activate another lever and go through the ready bridge. At the end of the way you are waiting for the third lever, which puts forward the plates on another bridge (pit with spikes, to the right of which the vertical bridge is located - it must be tilted to get to the chest with artifact).
After that, go back and go to the right. Here will be a bowl of healing. From below, there is a weak wall - destroy it. Move right until you stop and raise up the map. On the left there will be a turn on the bridge leading to the chest with the artifact. Just above, in the wall on the right through the hole, the trunk with the last iron skull is visible. Take it if it turns out (it is possible to make a mistake when the character cannot go to the chest).
At the end of this route, find another lever and pull it.
So you will collect the second bridge, which will be able to continue the journey.
On the last arena, it will be necessary to fight with two noble and the giants, then pick up the runestone.
Reward for the fulfillment of the quest:
The legendary accessory "Yarngraipr".
Long bow warrior Vanov.
Runa Isa.
7000 blood.
26,000 gold.
3800 wood.
780 iron.
Chapter 10.2. Union in fire
In this scene quest, first move forward. The fact that the giants do not touch you is not a mistake. First you must chat with the representative of Surth. But after a conversation, the battle will begin with him - now all the mobs on the location of your enemies.
Return back to the portal to kill the previously missed giants that are needed by an additional quest.
So, you need to go through the following additional tasks:
Find 3 iron skulls.
Kill 20 fiery giants.
Destroy 10 idols of trolls.
Unfortunately, I managed to find only 9 out of 10 idols. If you know where the tenth is located, then definitely inform the comments.
In the screenshot of green circles, idols of trolls, red - chests with iron skulls are marked.
There is one nuance - 18 fiery giants are up to the last arena. But on the last arena, contrary to all previous missions (where in the transition to the arena, additional goals disappear) you will need to fight with two bosses - giants. They will be counted in the task. We will not specify on the map.
Locked location, pay attention to various characters on the walls. In the screenshot above you see the designation - a yellow circle. He points to a place with a puzzle. Before you the wall and four round toggle with images. You need to rotate the tumblers so that they formed four different characters that you can see on the walls of this location.
If you exhibit correctly, the passage will open. You will get to the precious chest, inside which lies the legendary ring of dispersion. Very valuable and useful subject!
Get to the place where a pit with Looy is. There are three levers from it. If you didn't touch anything (otherwise, download the last save), then, nimmering three levers from the bottom-up on the map from 1 to 3, click on them in the following order - the second, first, second, third. Must be formed a bridge.
Reaching the locked grille, climb on the hill and pull the lever.
Kill two fiery giants, and then take the Sindri hammer.
Reward for the fulfillment of the quest:
The legendary talisman Baldra.
Bead penetration.
Rune Dagaz.
7400 blood.
22,700 gold.
4100 wood.
820 iron.
Chapter 11. Battle for Carlion
In this mission, you will have to fight exclusively, but still without additional tests can not do:
Find 3 iron skulls.
Kill 5 cardinals.
Kill 3 Ettinov-commembers.
At the beginning of the mission, you destroy 3 out of 5 cardinals. After the gates open, go through them and protect the wizard, killing another cardinal.
Returning back, you will come up with the bishop of the sky. You will not kill him! All you need to do is move towards the fortress, to the image of the head (last isna). But at it is not worth a hurry! Climb the steps and go through the open gate. There will be several imperials, among which there are Cardinal - kill him! One test performed.
Here, right at the bottom, look for the second chest with an iron skull. Go through the gate on and find the third, the last chest with an iron skull, on the grass on the right (in the previous mission there was still a trolley). Inside him lies the legendary crown of the Allbian.
On the way to the right place you will see etta-champion. Kill it if you want to execute the quest, and then go to the last arena.
After the cat scene, you will need to kill the Simulta. Avoid fiery balls and green clouds on the battlefield. Take closer with the boss and attack it. As soon as a green barrier appears on the enemy, drop away and wait for its disappearance. Periodically, small goblins will appear on the battlefield.
The final. Eternal well
Before you go to this task, prepare carefully because it is the last. Remember also that as soon as you defeat in battle and rains the completion of the final cat scene, all your progress will be half destroyed. All saving will be deleted, but at the same time your pumped character will remain.
With the beginning of the "new game +" you will lose all the collected items, but you can play the character of the level on which they stopped.
The fight with the grimnir will consist of two stages. At the first stage you are fighting with a conventional giant, which has a huge supply of health. Do all the same as in battle against him like. Do not forget to periodically get up on an orange circle to warm up.
At the second stage, the grimnir will turn into a huge terrible monster. Damage to him in such a state can be only one way: periodically the boss is embroidered to the ground with hand. From the ground, the tentacles begin to cut out. You must attack these tentacles! That's the whole secret.

 The knowledge base for the game is loyalty: knights and princesses
 Mining and accumulation of energy in Klondike
 Gifts Wot: Where to find and how to get a gift in World of Tanks?
 Mining and accumulation of energy in Klondike