Program for determining a broken sound card. The sound on the computer disappeared: what to do. Checking the lower limit of the range
Before you suspect a broken sound card on your computer, carefully inspect the existing PC connectors for external damage. You should also check the performance of the subwoofer with speakers or headphones through which sound is played - try connecting them to any other device. Perhaps the cause of the problem lies precisely in the equipment you are using.
It is likely that reinstalling the Windows operating system, whether it is 7, 8, 10 or the Xp version, will help in your situation, as the necessary settings could simply go wrong.
Let's move on to checking the sound card
Method 1
The first step is to deal with the device drivers. For this you need:

After that, the drivers will be updated and the problem will be solved.
Also, this procedure can be carried out if there is an up-to-date version of the software on a removable media. In this situation, you need to install by specifying the path to a specific folder.
If the audio card is not in the device manager at all, then go to the next option.
Method 2
In this case, its complete diagnostics is required for the correct technical connection. You need to do the following in a particular order:

Please note that this option is only suitable for discrete components that are installed as a separate board.
Method 3
If, after visual inspection and checking the speakers or headphones, they turned out to be in working condition, and reinstalling the OS did not bring any results, we move on:

After the sound card test is completed, the system will inform you about its status and if it turns out to be inoperative, you will understand this based on the results.
Method 4
Another option is how to quickly and easily check a sound card on Windows OS:

Thus, we will start diagnosing sound problems on the computer.
The program will offer you several options for problems, and also indicate the connected audio devices. If , the diagnostic wizard will allow you to quickly identify it.
Method 5
The third option, how you can check if the sound card is working, is the following:

In the tab "Driver" and "Details" you will receive additional data on the parameters of all devices installed on your PC, both integrated and discrete. Also, this method allows you to diagnose problems and quickly identify them through software verification.
Now you know how to quickly and easily check your sound card in several ways. Their main advantage is that for this you do not need online access to the Internet, and all procedures can be carried out on your own, without contacting a specialized service.
More details in this video
The earliest computers played only simple beeps. The appearance of the first sound cards was immediately highly appreciated by gamers. At this time, the modern sound quality provided by sound cards on a PC is to the liking of most music lovers. So, what is a sound card or sound card - this is a device that allows you to work with sound on a computer. The drivers installed on the sound plateau are responsible for the sound quality. To install drivers, you need to know which sound card is installed on your PC. Let's figure out how to check which sound card is installed on your computer.
Determine the sound card model
To determine the sound plateau or card, you will need: a computer, the PC Wizard program, the sound card itself, and Internet access. So, let's look at ways to accurately determine your card:
- Sometimes the sound card model is determined without additional use of any programs. To do this, in the "Control Panel" you need to launch the "Device Manager". In the group "Sound, game and video devices" you need to select the line "High Definition Audio capable device", right-click on it and go to "property". In the "Details" tab, select "Hardware ID" from the list. Next, the line "Value" is selected and copied to any search engine. Based on the search results, you will be shown all the information about the sound card model. Unfortunately, you can not find information on the Internet about all types of sound cards.
- This is a more reliable method that requires the use of one of the programs designed for this. You can use: AIDA64, SiSoft Sandra, PC Wizard, HWiNFO32, and other utilities of your choice. To do this, you need to download the program and install it on your PC.
Next, run the program and go to the "Hardware" tab where you click the "Multimedia" icon. Opposite "Device Audio" is usually indicated by the model of the sound plateau. By clicking this item, you will see the characteristics of the sound card and information about the manufacturer.
Health check
When you return home and find that no sounds are coming from your computer, you will definitely wonder how to check the sound card is working. For this, it is carried out: testing of speakers, connecting wires, as well as the sound card itself.
- First of all, the main wire that goes from the sound card to the speakers is checked. The wires directly leading to the speakers are also checked for malfunction. To do this, you can connect, for example, an MP3 player, as well as any sound reproducing device to the speakers. The presence of sound means that the speakers are working.
- The health of the sound card can be checked by booting the operating system and selecting the "Properties: Audio Devices and Sounds" applet. Then click "Start" and select "Control Panel". The Sounds and Devices window will open in front of you, in which you need to uncheck the box, if it is there, from the Mute Sound applet.
- Let's see how to check the operation of a sound card by setting its properties. To do this, in "Start"Select "Control Panel". Next, click on the item with the name of your sound card, and select the tab that will test the sound signal.
Now you know how to check the sound card on your computer.
On a computer or laptop. Such a problem can be associated with either missing or damaged drivers, or an inoperable sound card. In any case, even to reinstall sound drivers, you need to know the sound card model. There are several ways to determine the model of a component part. Read also: Where to download and how to install sound drivers on Windows 10?
Programmatic way to determine the model of a sound card
You can find out the sound card model on a PC running the Windows 7 operating system and higher using standard tools: using the Device Manager and the DirectX Diagnostic Tool. In the first case, to determine the sound card model, perform the following steps:
- Click "Start" and right-click on the "Computer" icon and select "Properties".
- In the new window, click "Device Manager".

- In the dispatcher, we need a branch "Audio audio inputs and audio outputs".

- However, it should be noted that the data in this section is not always displayed correctly.
The definition of the sound card through the DirectX Diagnostic Tool is as follows:
- Press "Win + R" and enter "dxdiag".

- A new window will open. Go to the "Sound" tab. By the specified code, you can find the model of the sound card.

- However, again, this method is not 100% accurate. Therefore, if you want to know exactly the model of your device, you will have to install additional programs. Among the software we recommend PC Wizard and Everest.
Determining the sound card model using the first program is as follows:
- Download and run the program on your PC.
- The program will open. Click on the "Speakers" icon. The "Device Audio" parameter is exactly the model of the sound card.

You can determine the sound card model using the Everest program in the following way:
- Download and install the software on your PC.
- Go to the "Multimedia" branch and select "Audio PCI / PnP".

Physical way to determine the model of a sound card
This method is more suitable for stationary PCs, since disassembling a laptop and searching for a small part can be difficult and lead to damage to components. To physically find out the sound card model, perform the following steps:
- Remove the side cover of the system unit.
- We are looking for a small chip on the motherboard. It might look like this. Near it there will definitely be a power stabilizer for the sound chip.

- Also, the sound card can be built-in, then it will be located near the audio inputs and outputs and look like a small board.

- In any case, the chip will contain information that is necessary to find suitable drivers.
For other ways to determine the model of a sound card, see the video:
Hello dear readers of the site, today I will start writing articles on the right choice of hardware for your computer. And today I will touch on the topic of choosing the right sound card. And I will also tell you how to test it with a special program. ladies instructions for the program RightMark Audio Analyzer, and you can also download this wonderful program with a Russian interface for free.
How to choose a sound card for a computer
Of course, it is not logical to start writing from a sound card, but recently, I bought sound card I was also interested in this topic.
Sound cards differ in connection method (their connectors) and of course their support and quality.
Types of sound cards.
Let's see first What are the types of sound cards?

1. Internal sound card, built into the motherboard at the very bottom, usually a PCI Express slot, but before sound card selection better clarify.
Usually this video card is bought by the majority. You don't need more if you have custom acoustics. For good acoustics, it is better to choose another sound card, because. there may be slight interference.

2. External Sound Card connected with a special cable that eliminates electrical interference. This sound card will expand your sound as much as possible, and you can also connect it to a laptop and connect already serious equipment.

3. This sound card eliminates interference due to the external unit. It has additional gadgets, in the form of connectors and regulators. It is also possible to install it for convenience in the case of the system unit.
Sound card connection types
PCI - A common slot on your motherboard.
PCI-E (PCI-Express) - This type is more advanced and has more bandwidth.
USB - Connector for external cards.
FireWire (IEEE 1394) - For connecting external sound cards, as well as to increase bandwidth.
PCMCIA, or PC Card, - Usually used in laptops to use various peripherals.
ExpressCard - Replacing the PCMCIA (PC Card) connector, for more bandwidth.
Conclusion: If you have a regular desktop computer, then buy a regular built-in sound card, with regular speakers. There will be no difference in sound between an ordinary and an expensive card! A fancy sound card may be needed only if you need some kind of support or some additional connector. And in other cases, you will only spend extra money.
If you have special equipment and you are professionally engaged in sound, then you should think about choosing a more functional and high-quality sound card.
Also, if you have the opportunity to test the card, or if you have already bought a card, I suggest using RightMark Audio Analyzer.
The next question I asked myself was whether it was possible to test a sound card with a program. Searched and searched and found sound card test program in Russian. But the program will not be relevant for those who are not seriously involved in sound. If you are a regular user, with a regular computer and equipment, you should not bother. But if you are still interested in the capabilities of your sound card, then read on.
Her name RightMark Audio Analyzer, now I will show it and give a brief instructions.
By the way, I have specially prepared this program for you and offer to download it for free.
After launching it, a window will open. To start, let's put the Russian language. This is done simply.
Go to the tab Display-Language-English
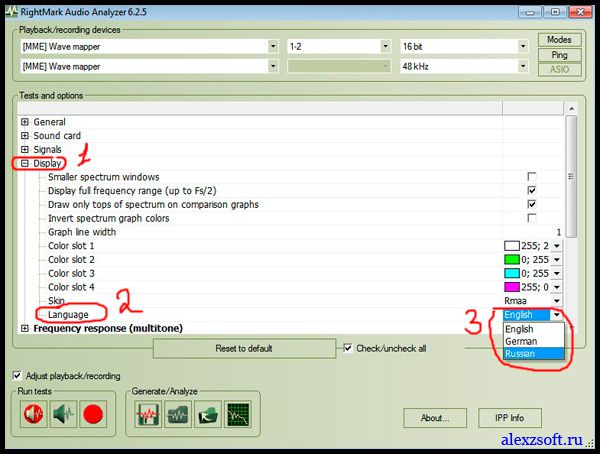
will appear RightMark Audio Analyzer program with Russian interface.

1. By pressing the mode button, you can check which modes are supported by your sound card.
2. There are sound card tests where you can test playback and recording, or separately. The program will display the configuration of your sound card. If you're not serious about sound, don't worry about it.
3. Generation and analysis, will allow you to make several analyzes of your sound card.
Of course, it is not complete, but it is very easy to work in the program for an experienced music lover, to explain what decibels are, etc. not worth it.
And for a normal user, I think it's understandable how to choose the right sound card And it's not worth spending extra money. And for people who are seriously involved in music, I think the program will be useful, as well as my small instructions for RightMark Audio Analyzer.
User guide
O program
Programs a RightMark Audio Analyzer designed to test the quality of analog and digital paths of any audio equipment - sound cards, portable mp3 players, home CD/DVD players, as well as acoustic systems. Testing is carried out by reproducing and recording test signals that have passed through the studied sound path using frequency analysis algorithms. For those who are not familiar with the measured technical parameters, the program gives a conditional verbal assessment.
Mode s testing
The RMAA program can t be used to test various parts of the sound card as well as other sound devices. Here are some basic options for using the program: . Testing e output (playback) of the sound card Dl For this testing, you need to have a high-quality reference sound card that will be used for recording. Before testing, the output of the tested sound card is connected to the input of the reference one. RMAA reproduces the test signal through the output of the tested sound card and analyzes the result recorded through the input of the reference card. It is assumed that the reference card introduces practically no additional distortions into the signal (compared to the output of the tested card). . Testing e input (recording) of the sound card Dl For this test, I also need to have a high quality reference card that will reproduce the test signals. The output of the reference card is connected to the input of the card under test. RMAA reproduces the test signal through the output of the reference card and analyzes the result recorded through the input of the tested card. This assumes that the reference card outputs a virtually undistorted signal (compared to the input distortion level of the tested card). . Testing e of the complete sound card circuit (the sum of recording and playback distortions) Dl I this testing do not need additional equipment. The only requirement is the ability of the tested sound card to work in duplex mode. For testing, you need to connect the output of the tested sound card (for example, “line out” or “spk out”) to its input (for example, “line in”). The disadvantage of this test is that it is impossible to determine exactly by the result whether certain fixed interferences belong to the output or to the input of the sound card. . Testing e digital inputs and outputs of the sound card Ka Oddly enough, often the digital inputs and outputs of a sound card work not only as a receiver and transmitter of a digital signal, but also introduce some distortion into the signal. To test digital inputs and outputs, you can use the same three uses of RMAA that have already been described for analog signals. . Testing e external real-time audio devices Dl I'm testing an external sound device and need a reference sound card. The output of the reference sound card is connected to the input of an external device, and the output of the external device is connected to the input of the reference sound card. RMAA passes the test signal through an external device (playback and recording are provided by the reference sound card) and analyzes the result. This assumes that the reference card does not significantly distort the signal (compared to the level of distortion of the external device). . Testing No other audio devices (analogue/digital output of DVD/CD/MP3 player) in asynchronous mode Dl I'm testing other audio devices in RMAA has an asynchronous test mode. It allows you to write a test signal to a WAV file, then perform any operations with this WAV file, and finally analyze the result from the WAV file. Consider 2 examples of using asynchronous mode.o Testing e analog/digital output of CD player
The WAV file generated by the program is written to a CD. It is then played back by a CD player and recorded with RMAA in standby mode. o Testing No analog/digital output of MP3 player generated The WAV file is compressed into MP3 with the highest quality and uploaded to the player. Next - the file is played and recorded RMAA in standby mode.
interface per user
AT The current version of the program has a multi-window interface. When launched, the main window of the program appears. At the top is a selection of playback devices (upper list) and recording (lower list). Sampling modes are also located there - sampling rate and bit depth. These settings also affect the data saved to the WAV file for testing external devices.

"Wave mapper" is the currently selected Windows sound device in Control Panel/Multimedia.
The Modes button launches a test to check whether drivers support all possible sampling modes. Ping - check if the current mode is supported. Mode support does not always mean correct operation in this mode.
The Properties button opens the ASIO device diagnostics and configuration window. Only available in RMAA PRO version.
The tree-like list below contains the program settings (regular font) and the test list (bold font).
Changing test options is possible only in the RMAA PRO version.
The Reset to defaults button returns the values of all parameters to the default position.
General e test settings
General
Save resulting WAV files - save e file with the results. Used for debugging and detailed analysis of results in third-party programs. Disabled by default.
Analyze noise and distortion only in 20 Hz - 20 kHz range- turn on the audio range filter, similar to the standard AES17. It is used to obtain results comparable with the passport data of the tested products. Enabled by default.
Normalize amplitude of test signals before analysis- autonormalization of results by amplitude. It is used for comparability of measurement results of devices with different signal levels. Most important when testing AC'97/HDA codecs and MP3 players. Enabled by default.
sound card
Use WDM drivers - WDM driver model is used in modern operating systems. Enabled by default. Disable if using Windows 9x and VxD drivers.
Mono mode- mono mode. Removes the second graph from the spectrum, which can be useful when testing acoustics. Disabled by default.
Signals
Calibration tone and sync tone frequency - selection of a test tone for adjusting the signal level. A useful option when performing a speaker test. The default is 1000 Hz.
THD test signal, IMD test signal- settings of test signals in the corresponding tests. The default settings are shown in the screenshot. It is not recommended to change.
display
Smaller spectrum windows - this setting reduces the size of spectrum windows. Useful for screens with a small diagonal.
Display full frequency range (up to Fs/2)- display the full range of frequencies, up to half the sampling rate. Affects the generation of HTML reports.
Draw only tops of spectrum on comparison graphs- building only the maximum values for the displayed points of the spectrum. The option allows you to better see the relative position of the spectra when comparing.
Invert spectrum graph colors (for printing)- changes the background color from black to white, for printing on a printer or for printing.
Graph line width- thickness of lines on charts.
Color slot #-Choosing the color of the chart from the palette.
Test speaker systems
Test s Frequency response (swept sine) and Total harmonic distortion (set of tones) designed for testing acoustic systems. Acoustic testing algorithms are specific, so it is recommended to use the tests for their intended purpose.
Thorough frequency response test- in the frequency response test mode with a logarithmically increasing sine, a longer test signal is used.
subwoofer test- only the low frequency range is tested. The calibration signal also has a lower frequency.
Plot THD in swept sine test- builds a graph of distortion in the frequency response test.
In the settings of the second test, by sorting through sinusoids that increase in amplitude and are constant in frequency, the number of test frequencies and the range of amplitude changes are indicated.
Settings and levels
It's clear that o Recording and playback levels greatly affect the level of noise and distortion in the circuit under test. Therefore, before testing, it is desirable to adjust the levels so that the test results are the best. You can test several times and adjust the levels to achieve the best results.
InstructionsIdlIsettingsandlevelthandmodeinworksskartCreativeavailableadlIdownloadInaofficiallymwebsiteeprogramss
http://audio.rightmark.org/download_rus.shtml .
Let's consider the most typical level setting when testing a complete circuit (DAC + ADC) of a sound card, when the “line out” output is connected to the “line in” input.

- In the sound card mixer, only the “wave out” and “master” outputs must be enabled for playback. Only the “line in” input should be enabled for recording. For the most accurate results, turn off all equalizers, 3D effects, etc.
- It is desirable to set the “wave out” levels on playback and “line in” on recording to their default positions. These are usually middle to high positions.
- Launch the RMAA program, select the necessary devices for playback and recording in the sound card settings and enter the level adjustment mode (“Adjust I/O levels” button).
- The sound card level setting will begin. In this case, a signal with an amplitude of -1 dB will be passed through the circuit under test. Adjust the record and playback levels in the mixer (exact match is not required, a difference of 1 or 2 dB is perfectly acceptable). It is recommended that you first try to adjust the levels with just one knob: the “master”. If this fails, then you can also move the “wave out” and “line in” controls. When adjusting, it is necessary to ensure that there are no non-linear distortions in the spectrum of the input signal, the displayed spectrum window.
Select the required test types in the main program window and click the “RUN TESTS!” button. After testing is completed, you can view the results in the “Test results” window or run tests that have not yet been run.
View p results
AT the “Test results” window contains information about all tests performed
The window is divided into 4 slots (4 vertical columns), each of which can store the results of one set of tests. Thus, it is possible to simultaneously load the test results of four devices or four device modes, including the test files themselves generated by the program.
For each test, a brief numerical result is displayed in the window. A more detailed report of the test results can be obtained by right-clicking on the numerical result.
The vertical row of buttons to the right of the numerical results allows you to view the spectrum plot for the corresponding test.
The “Select” buttons below the slots allow you to select multiple slots to compare results.
File open and save buttons allow you to load or save the result set to a SAV file for later viewing. The SAV file saves all report details and spectrum graphs.
The HTML report generation button allows you to generate an HTML file with test results or with a comparison of results from several slots. The HTML report includes all detailed reports and graphs.
windows about the spectrum

Controls:
Approximation
Removal
Toolbar elements:
- Anti-aliasing graphics. Eliminates the aliasing effect on the screen.
- Swap graphs - draws the right channel in the background, and the left channel in the foreground
- Setting display options.
- Saving the graph in a graphic file on disk.
- Scale: Log/Linear/Mel - scale: logarithmic, linear, melodic
Mouse control:
Left button - selection of a horizontal fragment of the chart and its approximation.
Spectrum analysis
Spectrum analysis is an advanced spectrum analyzer for arbitrary WAV files.
Clicking opens a standard WAV file selection dialog. It can be, for example, a generated and recorded non-standard signal that is not in the list of tests. Spectral analysis options:
 The spectral analysis of the file is performed in blocks of “FFT size”, with the spectrum averaging over the entire file. If you want to analyze the spectrum of only part of the file, then it must be cut in an external audio editor and saved to a separate WAV file. Supports work with 16 and 32-bit WAV files and a wide range of sampling rates. FFT size- FFT block size in samples. The number of frequency bands of the spectrum (bins) depends on this, i.e. detail of the frequency representation of the signal (important for signal analysis in the low-frequency region). The higher the FFT size, the longer the signal should be. The minimum time in seconds can be calculated using the formula FFTsize/Fs. Resolution is the width of one "frequency band" of the spectrum. For convenience, the frequency resolution is automatically calculated for the current sample rate. Zero padding- complementing the signal with zeros before taking the spectrum. Allows you to draw the spectrum a little more accurately (this leads, as it were, to the interpolation of the spectrum in frequency). FFT overlap-overlapping FFT windows in time (as a percentage of the window width). More overlap results in slightly better spectrum averaging over time.
 FFT window-shape of the weight window. A compromise between sidelobe suppression and peak broadening.
Kaiser window beta-Kaiser window parameter, adjusts the degree of sidelobe suppression. If there are high peaks in the spectrum, you can increase it to 13 -15, if there are no high peaks, you can leave it alone or lower it to 5 - 7.

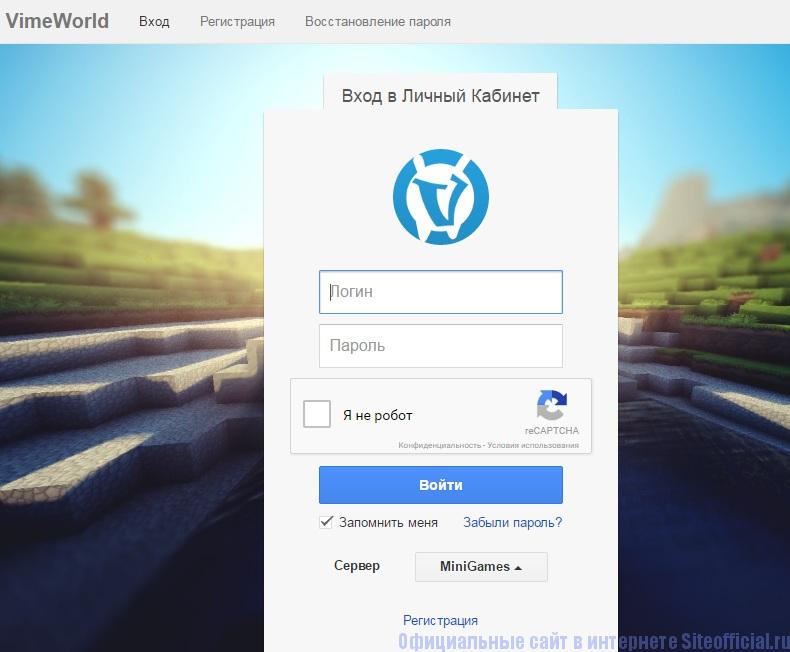 Vime World personal account
 Joint games with a child Joint games for children
 Download Love Games - Vampires for android v
 Mafia 2 passage 11. Passage. Balls and beans