How to solve a rubik's cube by layer-by-layer method. What are Rubik's cube formulas. The benefits of playing with Rubik's cube
So, you got acquainted with the Rubik's Cube 3x3x3 puzzle and you liked it. But how to learn to collect a cube, or even better to collect it faster, you do not know yet. Especially for you, beginner puzzle lovers, I am making this instruction, which will not only help you learn how to solve the Rubik's Cube, but also do it in less than 1 minute (in the future, it is planned to create an instruction for those who want to solve the cube in less than 30 seconds).
Let's start with what you can do here, this is especially true for those who want to collect the cube quickly, and the old cube does not allow doing this for technical reasons =) ..
The most common 3x3x3 cube assembly technique is the Jessica Friedrich technique. This technique breaks down the Rubik's cube assembly into 4 stages. And at the initial assembly level (with a speed of up to 1 minute), there are not so many formulas to learn. I will try to make the instructions clear and contain all the information you need.
To begin with, briefly about the assembly stages.
Stages of solving the Rubik's cube

1. We collect the cross. The task of this stage is to place 4 cubes in their places around the white center (many people use white as the main color when assembling, you can use any).
2. In the method of Jessica Friedrich, at the second stage, the first 2 layers are immediately collected ( F2L - first two layers). But for a beginner puzzle assembler, this will be quite difficult, so we will look at how to do this step in 2 steps, simplifying the task a little.

3. Assembling the yellow side of the cube ( OLL - orientation of the Last Layer). At this stage, we collect the yellow side of the cube. The assembly of this stage, even with advanced speedcubers, is not always performed using one formula. We will look at how to assemble the yellow side in a few steps.

4. The last stage of the cube is called Permutation of the Last Layer (PLL). At this stage, you need to place the correct corner and edge cubes in the last third layer of the puzzle.
Well, now we pass from theory to practice.
So, let's start assembling the cube. For the convenience of learning, please remember that the cube must be kept with the white center down, and yellow up!
The cube starts with a cross on the base side, which is usually white. In this manual, white will be the main... This stage is carried out completely intuitively, there are no formulas here, but there are typical situations that are worth remembering to speed up the assembly.
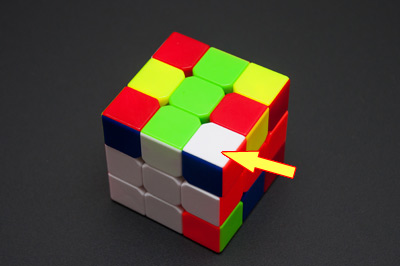
Important! Putting together not just a white cross on the white side. Each edge cube has two colors, and it must match with two centers, with white and one of the other four colors (in the photo you can see how the orange-white and green-white edges coincide with the orange and green centers).
1. Check the side with the white center for the presence of white edges. If they are, then simply rotating the bottom layer of the cube can match this edge with the second center. See how to do this in the video below. Let me remind you that you need to collect the cube with the white center down!
2. If you have already completed the first step of this step, turn your eyes to the top of the cube (the side with the yellow center). If there are white edge cubes near the yellow center, then it is easy enough to place them in the desired place on the main side (with a white center). To do this, rotate only the top layer to match this edge with the second center (orange, red, green or blue), while turning the side on which the center and the edge coincide to face you. After the edge coincides with the additional center, you need to rotate the front face two times so that the white color is not at the top of the cube, but at the bottom (where the white center is). See the illustrative application in the video below.
3. All other situations are solved by lifting the cube with the white side up (the side with the yellow center) and turning down to the white center as in step 2. Below is a video with illustrative examples.
I propose to assemble the first two layers in two steps. After assembling the white cross, our task is to place four corner cubes in place, followed by four more edge cubes.
Like the assembly of the cross, this can all be done extremely intuitively.
Placing corner cubes in the first (bottom) layer
For ease of perception of the information, I will demonstrate how to place the corner cubes.
To put the corner blocks in place you need to learn one technique, which among speedcubers is called "bang-bang". The formula for this technique looks like this R U R 'U'. read here.
In the video, I examined 4 situations that arise during the installation of corner cubes.
 The corner cube looks with the white side to the right (keep the cube with the white center down). We carry out the form U'F'UF
  The corner cube looks with a white face to the left (keep the cube with the white center down). We carry out the URU'R 'form.
  The corner cube looks with the white face up (keep the cube with the white center down). We carry out the shape R U R ’U’ R U R ’U’ R U R ’U’ (three pith-puffs) The corner cube is in its place, but inverted (we keep the cube with the white center down). We carry out the shape R U R 'U' (one bang-bang), after which the corner cube will be on top (on the side with a yellow center). From this position, we carry out one of the formulas described above.
 After setting all the corners in place, the cube should look like this:

Installing edge cubes
After you have placed all the corner cubes in the bottom layer, our task is to place the edge cubes in place. After that, the F2L stage will be completed.
The installation of edge cubes is performed using one formula and its mirror execution. Before executing the formula, the main thing is to set the edge cube in the desired place, this is done by rotating the top layer.
The edge cube should be set so that the color of the side edge matches the color of the central cube of the middle layer.
1. If after that the edge cube is to the left of its place, we carry out the formula URUR ’U’F’U’F.

2. If the edge cube is to the right of its place, then we perform the mirror formula U'L'U'L UFUF '.
3. There are cases when the edge cubes are not in their places, or in their places, but at the same time they are inverted. The above formulas will help lift the edge cube to the top layer, after which you can easily place it in the right place.
After assembling the first two layers, you need to assemble the side with a yellow center, this stage is called OLL. In this case, our task is simply to collect the yellow side, at this stage it is not at all necessary that all the cubes are in their places.
We look at the video how to install edge cubes when assembling the first two layers
1. Corner
After you have completed the first two layers, the yellow side of the cube may look like this:


But in practice, during the assembly process, other combinations may fall out. Let's consider how to get out of all these situations using universal formulas.
Our task is to make a corner from yellow cubes. After assembling the first two layers, you can see completely different combinations of yellow cubes at the top, but most often we get either a corner or nothing. Nothing means that neither a corner nor a cross nor a fish fell out. The images show several possible combinations that may be before the assembly of the corner.
It is very easy to assemble the corner. We carry out the formula: F RUR'U ’F. After completing the formula, you will receive one of the many combinations that are possible when assembling an OLL that contains a corner. Let's move on to the next step.

2. Cross
The cross can be assembled using one formula, but only at the stage of the assembled corner. There can be many combinations based on a corner, but to assemble a cross you need to know only one formula. So, before assembling, you need to take a cube so that the corner vectors are looking: one at you, the other to the left (in fact, as in the picture above). Then we carry out the formula: RU BU'B ’R’. As a result, you will get one of the combinations based on the cross:

 After that, you can proceed to assembling the fish.
3. Fish
We need a combination of fish in order to collect the entire yellow side with the help of one formula. In fact, after assembling the cross, the same formula will help you make a fish, and after a fish, completely OLL.
For this operation, there is a universal formula that will help us - RU'-RU-RU-RU'-R'U'-R2 (mirror version on the left: L'U-L'U'-L'U'-L'U- LU-L2). In the video, I tell in what cases which formula to use.
2. Arrangement of corner cubes
In the video, I show you how to place corner cubes in two of the most common cases.
The formula for case one (the formula follows from the position shown in the video): R'U2RDR'U2RDR'U2RDDR'U2R
Formula for case 2 (the formula follows from the position shown in the video): R'U2RD2R'U2RD'R'U2RD'R'U2R
These formulas are easier to learn intuitively than just memorize them.
The famous puzzle, which consists of several colored sectors combined into one cube, appeared in 1974. A Hungarian sculptor and teacher decided to create a study guide to explain group theory to students. Today this toy is considered the best-selling toy in the whole world.
But, success came to this puzzle only when the German entrepreneur Tibor Lakzi drew attention to it. He, together with the inventor of games Tom Kremer, established not only the release of cubes, but also organized the promotion of this puzzle to the masses. It was thanks to them that competitions in the speedy assembly of Rubik's cubes appeared.
By the way, people who are engaged in such an assembly of this puzzle are called speedcobers ("speed" - speed). It is not difficult to guess that the high-speed assembly of the "magic" cube is called speedcubing.
Rubik's cube structure and rotation names
In order to learn how to assemble this puzzle, you need to understand its structure and find out the correct name for certain actions with it. The latter is important if you are going to find instructions on how to assemble a cube on the Internet. Yes, and in our article we will call all the action with this puzzle, according to the well-established expressions.
A standard Rubik's cube has three sides. Each of which consists of three parts. Today there are also 5x5x5 cubes. The classic cube has 12 edges and 8 corners. It is dyed in 6 colors. Inside this puzzle is a cross, around which the sides move.
At the end of the cross, a square with one of six colors is rigidly located. Around it, you need to collect the rest of the squares of the same color. Moreover, the puzzle is considered completed if its color is collected on all six sides of the cube.
IMPORTANT: In the original puzzle, yellow is always opposite white, orange is red, and green is blue. And if you disassemble a puzzle, and then put it down incorrectly, then this can lead to the fact that it will never be able to be assembled.
In addition to the centers of the cube, the corners are the constant components of this puzzle. Each of the eight corners has three colors. And no matter how you change the position of the colors in this puzzle, the composition of the colors of the corners in it will not change.
IMPORTANT: Rubik's Cube is assembled by placing the corner and middle sectors in accordance with the colors of the central sectors.


Now that we understand the construction of this puzzle, it's time to move on to the names of the sides and rotations and their designations in the specialized literature.


In the process of solving a Rubik's cube, it may be necessary not only to move the sides, but also to change the position of this object in space. Experts call these movements interceptions. It is shown schematically as follows:

IMPORTANT: If only a letter is indicated in the cube assembly algorithm you have found, then we change the position of the side clockwise. If after the letter there is an apostrophe sign “’ ”, then rotate the side counterclockwise. If the number "2" is indicated after the letter, then this means that the side must be rotated twice. For example, D2 ′ - rotate the bottom side counterclockwise two times.
Simple and easy way to assemble: Instructions for children and beginners
The most detailed assembly instructions for beginners are as follows:
- In the first stage of the assembly of this popular puzzle, we start with the correct cross. That is, from the fact that on each side of the cube there will be the same color of edges and centers.
- To do this, we find the white center and white edges and collect the crosses according to the diagram below:


- After the above steps, we must receive the cross. Of course, the cross will not be correct the first time, and you need to slightly transform the resulting version. If executed correctly, it will be enough to simply swap the ribs with each other.
- This algorithm is called "bang-bang" and is shown in the diagram below:

- We proceed to the next step of the puzzle assembly. Find a white corner on the bottom layer and place a red corner above it. This can be done in different ways, depending on the position of the red and white corners. We use the bang bang method described above.


- As a result, we should get the following:

- We begin to collect the second layer. To do this, find four edges without yellow and place them between the centers of the second layer. Then spin the cube until the center color matches the color of the face element.
- As with assembling the previous layer, you may need one of several options to achieve this goal:


- After we have successfully completed the previous step, we move on to assembling the yellow cross. Sometimes, he "gathers" himself. But this happens very rarely. Most often, the cube at this stage has three options for the arrangement of colors:


So, the yellow cross is assembled. Further action in solving this puzzle comes down to seven options. Each of them is shown below:


In the next step, we need to collect the corners of the top layer. Take one of the corners and put it in place using the U, U 'and U2 motions. This should be taken into account. So that the colors of the corner are identical to the colors on the layers below. When using this step, keep the white cube towards you.

 Next build step
 - The final stage of the cube assembly is the assembly of the edges of the top layer. If you did all of the above correctly, then four situations can arise. They are solved very simply:

The fastest way. Jessica Friedrich's method
This puzzle assembly method was developed by Jessica Friedrich in 1981. It is conceptually the same as most of the known methods. But, it focuses on assembly speed. Thanks to this, the number of assembly steps was reduced from seven to four. To master this method, you need to master "only" 119 algorithms.
IMPORTANT: This technique is not suitable for beginners. It should be studied when your cube assembly speed becomes less than 2 minutes.
1. At the first stage, you need to collect a cross with side faces. In specialized literature, this stage is called "Cross"(from the English Cross - cross).
2. At the second stage, you need to collect two layers of the puzzle at once. They call him "F2L"(from the English First 2 Layers - the first two layers). To achieve the result, the following algorithms may be required:


3. Now you need to collect the top layer completely. You should not pay attention to the sides. The name of the OLL stage (from the English Orientation of the Last Layer - the orientation of the last layer). To assemble, you need to learn 57 algorithms:


4. The final stage of the cube assembly. PLL (from the English Permutation of the Last Layer - arrangement of the elements of the last layer in places). Its assembly can be done using the following algorithms:


Rubik's cube assembly scheme 3x3 in 15 moves
Since 1982, when the competition for the high-speed assembly of the Rubik's cube appeared, many fans of this puzzle began to develop algorithms that will help to correctly arrange the cube sectors with a minimum of moves. Today, the minimum number of moves in this puzzle is called "God's Algorithm" and is 20 moves.
Therefore, it is impossible to collect a Rubik's cube in 15 moves. Moreover, a few years ago, an 18-move algorithm for the assembly of this puzzle was developed. But, it can not be used from all positions of the cube, therefore, it was rejected as the fastest.
In 2010, scientists from Google created a program with which they calculated the fastest algorithm for solving a Rubik's cube. He confirmed that the minimum number of steps is 20. Later, from the parts of the popular construction set, the Lego Mindstorm EV3 robot was created, which is able to assemble a Rubik's cube from any position in 3.253 seconds. He uses in his "work" a 20-step "Algorithm of God"... And if someone tells you that there is a 15-step cube assembly scheme, do not believe him. Even the power of Google is "not enough" to find it.


How easy it is to solve the Rubik's cube: Video
Even if we assume that the record holder was very lucky, then the world ranking table based on the average of five results leaves no doubt: if more than 80 people fit on average in 12 seconds, they obviously know something. In this brief overview, I will try to reveal the secrets of high-speed assembly. I'll make a reservation right away that after reading this article you will not become champions: here are only highlights and links to more detailed information. In addition, even after learning the method completely, you will need long training sessions to achieve good results. But you will get a good idea of how this is done, and if you want, you will know where to go next. I think, with enough perseverance, after several months of training, many will be able to achieve an average result in the region of 30 seconds.
I will refer primarily to the SpeedSolving Wiki and Badmephisto. So let's go.
CFOP method
The most popular speed cube method is the CFOP method, aka Jessica Friedrich's method, who developed and popularized it, although other people contributed as well. If everything is done correctly, on average, the cube can be collected in 56 moves (alas, not in twenty). There are other methods with which you can get good results: Petrus, Roux, etc. They are less popular and for the sake of brevity we will limit ourselves to considering the CFOP method.CFOP is the name of the four build stages: C ross, F 2L, O LL, P LL: 
- Cross - assembling a cross, four edge cubes on the bottom;
- F2L (First two layers) - assembly of two layers - lower and middle;
- OLL (Orient the last layer) - the correct orientation of the cubes of the top layer;
- PLL (Permute the last layer) - placement of the cubes of the top layer.
Cross - cross
 The goal of the stage is to correctly place four edge cubes on one of the faces. Anyone who knows how to collect the cube somehow can cope with this, but collecting the cross in a few seconds is not so trivial. According to the rules of the competition, before the assembly, you are given 15 seconds to study the combination (inspecting), for which at least you need to find these four edge cubes, and it would be nice to compose a complete sequence of moves in your head. It has been proven that assembling a cross on a preselected face always requires no more than eight turns (a 180 ° turn is counted as one), and eight are extremely rare, and seven infrequently (the average is a little less than six). In practice, it takes a lot of training to quickly learn how to find the optimal sequence.
 You can select a face for assembling a cross in different ways. The most popular way is to always collect it on the same face (often white). Then you know exactly the relative position of the colors at all stages of the assembly, which makes the process easier. Some people pick the edge that is easiest to pick first. On average, this saves one turn, but you constantly have to rearrange to a different arrangement of colors. A compromise option is also used - to collect one of two opposite faces (say, either white or yellow), then the set of colors of the side faces does not change.
The main trick of assembling the cross is that it must be assembled relatively. For example, if you collect a cross on a white facet and a white-blue edge cube is already on it with white color towards the white center, then it is not so important for you whether the blue side of this cube is aligned with the blue facet. It is enough to place a white-green cube on the opposite side, and white-red and white-orange on the left and right. During the assembly process, you can twist the white face as you like, and at the end, in one motion, immediately align all the lateral centers with the cubes of the cross. It is only important to remember the exact order of the colors on the cube: if you look at the white facet, then blue, red, green, orange go clockwise (behind - yellow).
Professionals collect the cross on the bottom edge. For beginners, this seems difficult, since it is almost impossible to see what you are collecting, but this gives a great advantage when moving to the next stage: you do not need to spend time turning the cube, and during the process of assembling the cross you can notice the arrangement of the cubes needed to assemble the F2L and outline a plan for further assembly.
Some advanced cross assembly tricks are described in this video.
F2L - first two layers
 Perhaps the longest stage, the purpose of which is to completely collect two layers: a layer with a cross and an intermediate layer. Basically, you need to place eight cubes in place: four corner layers on the bottom and four ribbed sides in the middle layer. Unlike the assembly methods for beginners, a pair (column) of a corner and an edge cube is assembled immediately (that is, you need to collect four such pairs). Depending on the initial placement of the cubes of the pair, you need to apply one or another algorithm (sequence of turns). There are more than 40 such algorithms in total, you can just memorize them, but almost all of them are deduced intuitively. There are two simplest cases when a pair gathers in three movements:

Two more cases mirror these. All others need to be reduced to one of these four. This requires a maximum of 8 moves, that is, in total, no more than 11 moves per column are required. Perhaps you will not find the most optimal way, but if you first learn to intuitively collect any combination at least somehow, you can then look at individual cases in cheat sheets.
The main difficulty of the stage is to quickly find paired cubes. They can be in 16 different places: 8 places in the last layer and 8 in columns. The columns are more difficult to view, and the fewer columns you have collected, the more chances that the uncollected ones contain the cubes you need. If you didn’t pay attention to the blocks for F2L when assembling the cross, you can waste a lot of time when you go to this stage just searching. It is also not always wise to start with the first found pair: perhaps it is assembled with a long algorithm, and if you start with another, then in the process the first will be rearranged into a more successful combination.
OLL - orientation of the last layer
 At this stage, the cubes of the last layer are oriented so that the last (in our case, the yellow) face is collected. It doesn't matter that the cubes do not actually stand in their places: we will deal with this at the last stage.
 There are 57 different initial situations, each of which has its own assembly algorithm, from 6 to somewhere up to 14 moves. It is necessary not only to learn all these algorithms, but also to quickly identify which one needs to be applied at the moment. Here's an example of one of the OLLs: 
On the left, the picture shows the initial situation up to rotation (it is assumed that we are collecting the yellow edge). To apply this OLL, the location of the yellow squares must coincide, not only on the top face, but also on the side ones (we ignore the squares of the other colors). It is not always necessary to match the cube completely with the scheme, you just need to match enough squares to distinguish it from other combinations. On the right are two algorithms (it is more convenient for someone to do one, for someone else) in standard notation, below the OLL number and the probability of its falling out. Almost all of them come up with a probability of 1/54, some with a 1/108 probability and two with a probability of 1/216 (including the lucky combination when the OLL came together on its own).
For beginners to memorize 57 combinations, it may seem like torture, so a simplified but slower version was invented - 2-look OLL. In this case, the OLL is divided into two stages, the cross is assembled first, and then the corners. Here you need to memorize only 10 algorithms (3 for the cross, 7 for the corners). Having gained experience in 2-look OLL, you can slowly take up the study of the full set. In this case, 2-look will come in handy in any case: firstly, they are all in the full set (say, if the cross assembled by itself, then the full OLLs coincide with the 2-look OLL for corners), and secondly, if you come across more unfamiliar OLL, you can go back to 2-look.
PLL - rearrange the last layer
 The final stage of the assembly is to arrange the cubes of the last layer in the right places. The approach is approximately similar to the previous stage, but there are fewer combinations and algorithms, only 21 (13, if we count mirror and reverse as one). On the other hand, they are somewhat more difficult to identify, since here you need to take into account different colors, and the colors on the diagram may not coincide with your colors (up to cyclic permutation):
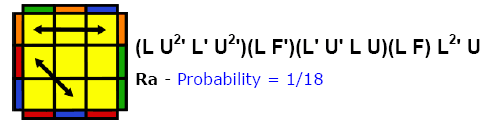
The arrows indicate the cubes that are rearranged by this PLL. The probabilities of most combinations are 1/18, occasionally 1/36 and 1/72 (including the lucky chance when nothing needs to be done).
Again, a simplified version is proposed - 2-look PLL, when the corners are first placed (two combinations), and then the centers (four combinations), they are quite easy to learn.
Cube and grease
Even if you study this method perfectly, you will not achieve good results with a bad die. The edges of the cube should rotate easily with the push of one finger, while it should not be too loose. The layers should hang on springs so that one layer, not completely rotated, does not interfere with the continuation of rotation in the other direction (within reasonable limits, of course). At the correct cube, the central squares can be pulled out and tightened the bolts that are under them. It is difficult to find a good cube in ordinary stores, it is recommended to order on the Internet, for example,.For best results, the cube should be lubricated. Sometimes the grease comes with the cube, or is purchased separately. Silicone grease, available from auto dealerships, is suitable.
Dice rotations
Rotating the entire cube in your hands (and not individual faces) takes a significant amount of time, so when assembling it, they try to avoid it as much as possible. For example, at the F2L stage, it is sometimes easier to collect a column in the corner farthest from you, without seeing it, than to turn the cube with this column towards you. At the OLL stage, in order to rotate the cube in the same way as in the algorithm diagram, it is enough to rotate the upper layer, and not to rotate the whole cube - this is faster (the position of the upper layer relative to the lower ones is not important at this stage).Look ahead - looking ahead
After completing the next stage, you must move on to the next one without pause. While you are automatically performing the next algorithm, your head is free. Use this time to find the cubes that are important for the next step and figure out which algorithm you will need to use next.Fingertricks
Also, the key to significantly speeding up assembly is fingertricks, skillfully using all fingers to rotate. Some commonly used combinations are lightning fast, 5 turns per second or more if you use your fingers correctly. Note: it is not always faster to make a shorter algorithm; may be. that you have to make awkward turns. BadMephisto has several videos about fingertricks, for example, about F2L.Practice
Without long training, nothing will come of it. Get ready that the cube will have to be collected thousands of times.Tags: Add Tags
Do you know which toy has earned the title of the most sold in the world? No, not the beauty of Barbie or even Lego. The absolute leader of sales is considered to be a much more intelligent thing - the Rubik's cube. This year the colorful puzzle of Hungarian origin celebrates its 41st birthday. For four decades, millions have tried to conquer it. And today we will show you a way to solve a "Rubik's cube" using only two movements and one little secret.

In 1980, a mailing list for Rubik's Cube fans opened. Since then, thousands of puzzle connoisseurs, including a dizzying number of mathematicians, engineers and programmers, have joined forces to find "God's algorithm": a way to collect a cube in the minimum number of moves. In July 2010, Palo Alto programmer Thomas Rokicki, mathematics teacher from Darmstadt Herbert Kotsemba, mathematician from the University of Kent Morley Davidson and engineer at Google Inc. John Detridge proved that each Rubik's cube configuration can be solved in no more than 20 moves. A current record - 4.94 seconds... Well, the method described below does not guarantee a speedy solution. But why not test the theory in practice?


Just rotate the left edge.

Now rotate the top face.

Repeat these two combinations one after the other. How many times? Until you collect it!

Video demo this method has already collected over 14 million views. Of course, there were a lot of dissatisfied in the comments who didn't manage to solve the puzzle. Maybe they just didn't repeat the combination long enough?
Have you noticed how rapidly the cube faces "fly" in the hands of professionals? It turns out that there is a little trick here. To speed up the process, you need to use ... a lubricant! Liquid silicone will do.


Rotate the edges of the cube to the position shown in the photo.


 Lures in Pokemon GO: about the features of the application Where to get lure modules to attract Pokemon
 Cool nicknames for fortnight
 Primal World with Stonies Primal PC Games
 Endless War - play online