Vikings wolves of midgard where to find the anvil. Artistic one-handed hammer "Mjelnir". Quest: "The Iron Fist"
In the top-down action RPG Vikings: Wolves of Midgard, you can choose a character from one of five classes. Each of them is associated with one of the famous Scandinavian Gods:
- Tyr is the one-armed God of War. Accordingly, the character will fight with one-handed weapons, but with the use of a shield to use the gifts of Tyr.
- Loki is the God of deceit. A character of this class will be able to use active and passive skills when using dual weapons (two one-handed axes, swords or hammers) or without it at all.
- Thor is God, armed with a hammer, spewing out lightning and thunder. The character will be able to use the gifts of Thor only when using two-handed axes, swords or hammers.
- Skadi is the Goddess of the Hunt. Passive and active perks can only be used when using a bow.
- Odin is the God of knowledge, poetry, war, witchcraft, dwelling in the halls of Valhalla. His gifts can be used by a character wielding a staff.
If you start the game with characters of different classes, then their main differences will be the gift tree and the weapons used. In the window of characteristics (parameters), almost everything is identical, with the exception of indicators related to damage, etc. They change only for the reason that the character uses a different weapon. As for the reserves of health, stamina, etc., they are the same for all heroes.
Gift system
You can see the gifts of all characters in the corresponding window. Initially, each hero is given 1-2 available skills, while the remaining 18-19 remain locked. As you level up your character, you can unlock new skills.After the skill is unlocked, you will receive a certain bonus from it - active or passive. The size of this bonus depends on the level of activation of the perk. Each gift can be of the first, second, or third level. In the description of the gifts, you can see what bonuses it gives and what level of the character should be in order to automatically increase them.
For example, the Rage of Tyr gift is active and grants 4, 8, or 12% critical strike chance in rage mode. In this case, to activate the first, second and third levels, you will need to raise the level of the character to 1, 5 and 10, respectively.
The best gifts of Tyr
The character has three active and 18 passive gifts. At the same time, two active perks are initially unlocked - "Tyr's Fury" and "Shoulder Strike". As a result, we recommend focusing on increasing health, armor, critical chance and its value.In the first half of the tree, you should definitely take a bunch:
Critical hit chance.
Critical damage.
Firstly, you will increase the chance of inflicting such damage, and, secondly, you will increase this damage. Further, we recommend taking in general cases:Health.
Armor bonus.
Furious Critical Strike.
Strength is in weakness.Loki's best gifts
Loki has 6 active and 15 passive gifts. At the same time, two active skills are initially available - "Loki's Fury" and "Throw into battle".Critical damage.
Strength is in weakness.
Blood bonus.
Attack speed.
Death blow.
Stealing life.The best gifts of Thor
Thor has 6 active and 15 passive gifts. Initially, there are two active ones - "Thor's Fury" and "Excision".Bloody rage.
Gift of Rage.
The defense is furious.
Magician's wrath.
Long rage.
Healing rage.
Chain Fury is one of the best perks in the game!The best gifts of Skadi
Skadi has 6 active and 15 passive gifts available. Initially, you can use Skadi's Fury and Kick.Chilling blow.
Skadi boots.
The art of shooting.
Aura of rage.
Frost attack.
Here you can also add perks related to critical damage or other effects on enemies (such as knockback).Odin's best gifts
In total, Odin has 6 active and 15 passive gifts. At the beginning of the game, "Thor's Fury" and "Flamethrower" will be available.Playing as a character of this class seems to be the hardest of all. The fact is that you can only get incredible benefits if you not only wield a staff, but also wear fabric armor, which has the least protection. In this case, choose the following perks related to this armor, defense and runes:
Health bonus.
Strong fabric.
Rune Collector.
Odin's Fortitude.
Odin's loyalty program.
Father's invulnerability.
Skin of the Allfather.
Of course, it is worth taking "Might of the Allfather" and perks related to crits and rage - but only in the second place!
It means to be cruel and cold-blooded. In this game, you will kill hundreds of wolves for their hide, perform bloody sacrifices, attack neighboring settlements in order to obtain resources, and send thousands of warriors to Valhalla.
Kill, sacrifice, rob ...
The game, by virtue of its genre, is similar to Diablo, but it cannot be called a copy. The uniqueness of the product is given not only by the setting, but also by some gameplay features. There are no classes as such in the game. Instead, when creating a character, you will be offered a choice of five gods, each of which will endow the hero with an individual fighting style, special skills and bonuses. For example, the well-known god Thor will improve the possession of two-handed weapons, while Loki will allow you to create all kinds of dangerous traps. This system throughout the game shows itself from a pretty good side, without causing the feeling that somewhere it already happened, although it was similar in other games.
While the game tries to be different from the benchmark Diablo isometric RPG, Vikings: Wolves of Midgard is in many ways very similar to the Blizzard product. You also need to take tasks, kill hundreds of enemies, knocking out gold and objects from them along the way, and in the end get to the boss, a meeting with which always ends in a fight. With the bosses, by the way, the hero always has a pretentious dialogue in the style - “I came here to pick up your supplies. Give me everything or die ".
The boss fights themselves cannot be called unique, but they still bring some variety. Pressing one attack button will only be required on a simple difficulty level, and already on an average one will sometimes have to think about which skill to use against the enemy and where is his weak point.

Sometimes in dialogues with characters there is a very high-quality humor that complements the harsh atmosphere. The hero can make a witty joke, allowing you to forget that this guy, without remorse, kills thousands of creatures, moving towards his goal.
The elements are not subject
Character leveling takes place by analogy with other Diablo-like games, only instead of experience there is blood, and you need to level up with the help of altars. By the way, they can also be improved by opening new branches of abilities. The process of pumping the hero itself is simple, but due to the inconvenient and slightly crooked interface, at first you can get a little confused. The controls may also seem inconvenient at first, but after several hundred killed enemies, you can still get used to it. It is worth noting that the situation on the gamepad is drastically different - it is comfortable to play from the first minutes of the passage. It is immediately felt that the developers wanted to simplify the controls, making it convenient for those who play on the console.

Of the interesting features in Vikings: Wolves of Midgard, it is worth highlighting that the character is subjected to various elements. Here he cannot run in a thirty-degree frost in only his pants and at the same time not feel the cold. If you do not approach the fire for a long time, the character can freeze and die, and therefore you need to run around some locations not thoughtlessly and quickly. This element gives the game a certain freshness and peculiarity.
The combat system in the game allows you to perform various combo attacks, combining abilities and passive skills into a killer set. From time to time, the hero will effectively finish off the enemy in the Slow Mo style. It looks like what can be seen in the games of the Batman: Arkham series, only the detail of drawing in such moments is clearly not enough. Sometimes it is simply not clear which part of the body the hero cuts off from the enemy.
Very often in battles it is necessary to use a somersault, which at the same time spends energy points. As soon as you begin to learn all the mechanics of the combat system, most of the enemies become harmless, although at high difficulty levels you still have to sweat.

As for one of the most important elements of any isometric RPG action, namely loot, there is a lot of it here. Items can have unique properties, and in some you can insert runes for additional effects. In Vikings: Wolves of Midgard, there are even set items that can be created by collecting each part of the item beforehand. Of course, in the game you can "cook" yourself the legendary hammer Mjolnir, which is a plus in itself.
Become a Viking
The missions in the game are not very diverse. As a rule, we are sent to someone to rob or kill, which is boring after a few hours of play. At the end of some tasks, there is some non-linearity that allows you to choose what to do with the captured settlement - to plunder everything and get the maximum resources or show mercy and fish out other bonuses. This does not affect the plot much.

The storyline, by the way, in the game is at a fairly mediocre level. The story revolves around the salvation of the world, which rests on the shoulders of the Ulfung clan. You will play as the jarl of this clan, who has a number of subordinates, as well as his own chambers with a throne and trophies obtained during clashes with bosses. The in-game story is presented in text format. To learn about the plot, you need to read in detail the dialogues with the characters and listen to the narrator. Unfortunately, there are no spectacular level videos in the game, which is not surprising, given the different budgets of these products.
The artificial intelligence of enemies is primitive. Opponents do not try to somehow bypass the hero or surround him, striking him from behind. Instead, they often clump together, making them easier to kill. The feeling of challenge arises mainly not because of the thoughtfulness of opponents, but because of their banal superiority in numbers.
Locations in the game are non-linear and, as a rule, have several routes, although they are not remembered for anything special. The product looks pretty good graphically. It has everything that most gamers love - a lot of blood and dismemberment. At the same time, the character design is rather meager. Only a small part of the enemies are remembered for their appearance, while mostly opponents look somehow gray and boring. Enemies clearly lack elaboration of details.

The soundtrack in the game is excellent. You want to turn up the soundtracks louder, and listen to them merging into the atmosphere. There are a lot of tracks, and each of them is unlike the other, which pleases the ear with a variety in musical terms, without departing from the general theme.
Fortunately, the developers have completed the gameplay with puzzles. There is nothing extremely thoughtful here, but their very presence enriches the gameplay and allows in some situations to take a break from the continuous battles and think about a solution.
In addition to solo playthrough, Vikings: Wolves of Midgard has a co-op. Thanks to this, you can play the game together with a friend - this does not critically affect the balance, and the interest from the passage is many times greater. The cooperative mode, unfortunately, works only via the Internet, and therefore it will not work to play together locally.
Summing up the results in general, the game fully justifies the expectations placed on it. It has an impeccable soundtrack, good graphics, a cooperative mode, as well as a great setting, which the developers managed to beat correctly. What Vikings: Wolves of Midgard lacks, except for the variety of quests, in-game cinematics for presenting the plot, and more sophisticated artificial intelligence. Despite the downsides, the product should appeal to fans of such RPGs and Scandinavian mythology.In this article, we will take a closer look at the passage of Vikings: Wolves of the Midgard: how to find iron skulls, all artifacts, go through additional tasks and many other nuances of the game.
Walkthrough Vikings: Wolves of the Midgard. Village
In this location, you will spend time between missions, improving your hero, pumping skills, buying new weapons and selling various loot. First you have to upgrade the altar on the left side. At the expense of blood, you will increase the level of your hero every time.
Chapter 1. Ambush on Jotun
Each mission has a main and several additional tasks. In the first chapter, you will be asked to find three skulls and kill 30 goblins (Tomte). There are exactly the same number of goblins in the location as stated in the task. Just walk around the location and kill all opponents.
Several tips for the game, including controls, objects of the surrounding world, etc.:
- Attack - LMB.
- Roll - "Space".
- Movement - WSAD.
- Try to break everything you see - this is how you will find wood and gold, later - iron.
The beginning of the passage of the game in the video:
Moving forward, keep to the right side of the screen to find the first chest with a skull.
After killing a large enemy, again go to the right side of the screen and find a barely visible chest with a second skull behind the fence.
Learn about healing totems, and later about altars. Press the Tab key to heal.
Follow the markers, kill enemies and save Heldebrand. Having done this, in a few steps to the top of the location, find the chest with the third skull. Helga will be in the upper left corner of the map - kill the tomte and return to the main door.
Chapter 2 walkthrough Vikings: Wolves of the Midgard. End of Yokula
At the bottom left of the screen, you can see a gradually filling circle - this is rage. It's best to save it for the final part of the episode, when you have to fight Yokul.
Video walkthrough of the second mission:
For additional targets, you need to find 3 skulls, kill 2 Jotuns and destroy 10 idols.
Skulls are hidden inside gold chests, while ordinary ones contain other loot. In total, at the location you will find 4 chests of gold color. One of them is not so easy to get to - it is located on a distant rock, the path to which is possible only if the bridge is raised.
On the Jotuns, everything is simple - while exploring the location, you will definitely find both of them.
To get to the chest on a separate rock, you need to lift the bridge. The bridge is raised by activating ALL levers - a total of 5 of them. Inside the chest is the first part of the Skadi Bow artifact.
THE NOTE. In the game you can find and collect 4-5 artifact weapons. Each of them is divided into 3 parts. They are hidden in the location. Some you can find without any problems, others can only be found if you are careful.
Each of the five levers is hidden inside tall towers, behind wooden planks in a niche. It is not so easy to notice, but if you know what they look like, then the task will be much easier.
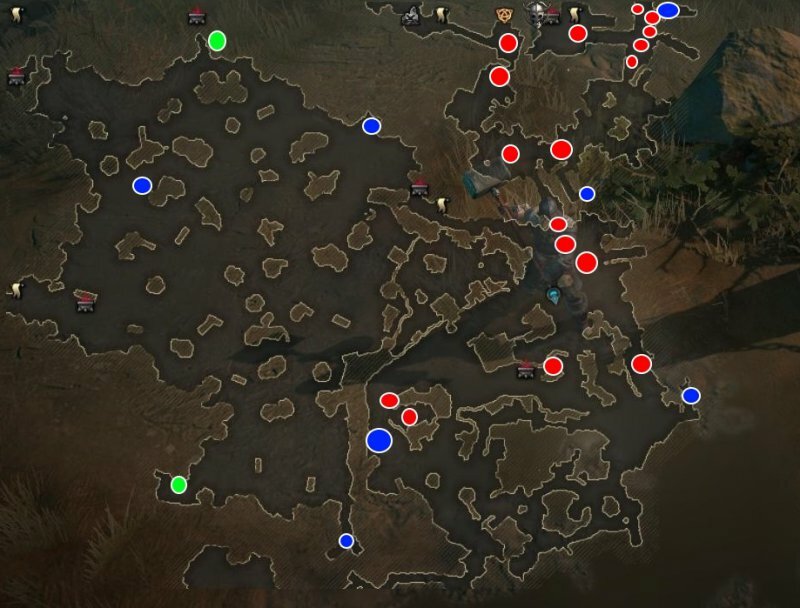
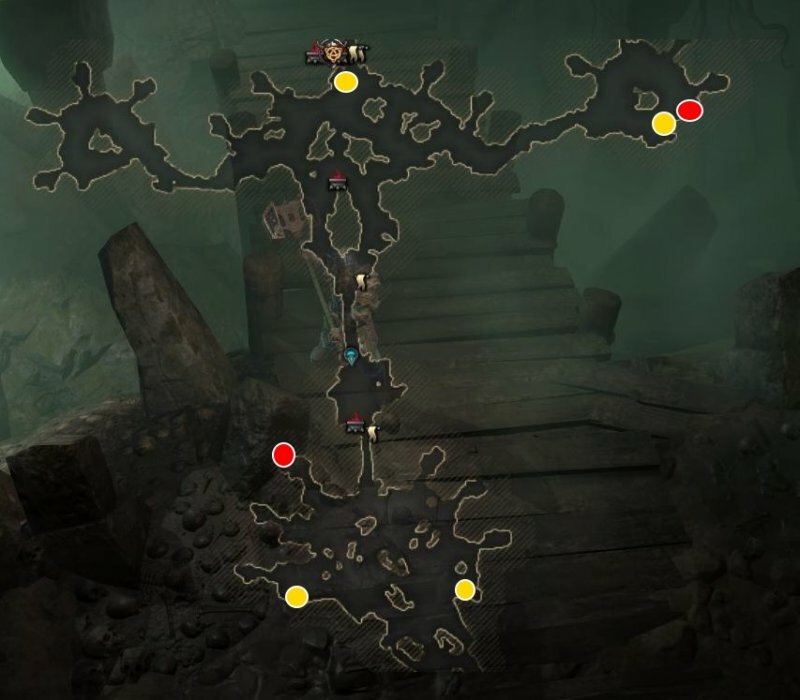
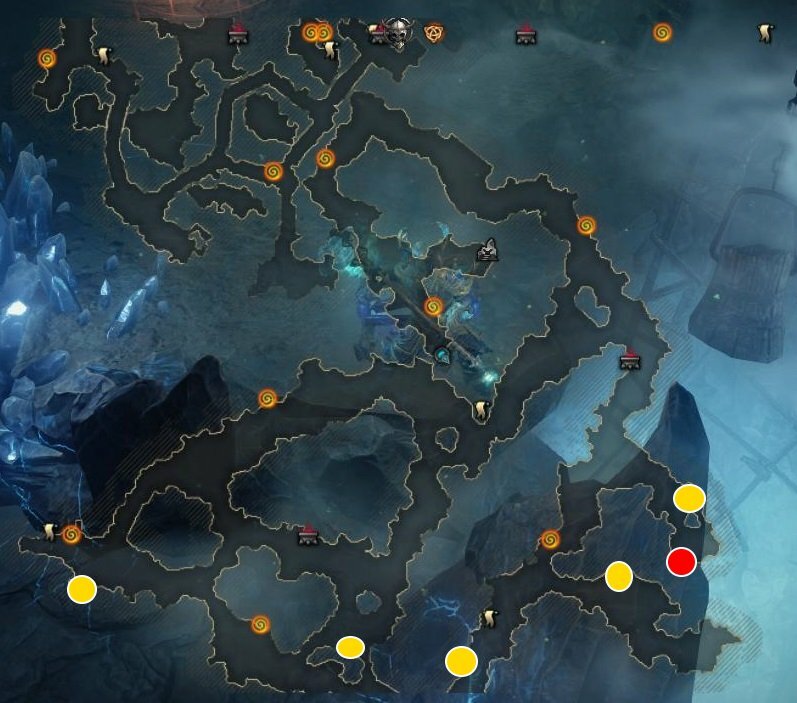
Check out the map below:
End of Yokula Card
Bonfires are marked with yellow dots on the map, at which you can warm up.
 End of Yokula card (part 2)
 - Blue - Jotuns.
- Green - chests with skulls.
- Blue markers are Yokula's idols.
- Black ones are levers.
- Red - a gold chest with a piece of "Luka Skadi".
Inside the cave, you will find a battle with Yokul. The boss creates ice spheres that explode in certain places on the location. It is quite easy to recognize them. If you hit the place of the explosion, you will freeze for a few seconds.
Remember to stand on the yellow circles to keep warm. Hit Yokul's throne - this is the only way to kill the boss. After the throne is destroyed, hit Yokula.
Chapter 2. Old enemy
You will be asked to find 3 skulls, kill 15 hounds and destroy 10 Svanung banners. You can also find a chest with the legendary Gusli accessory.
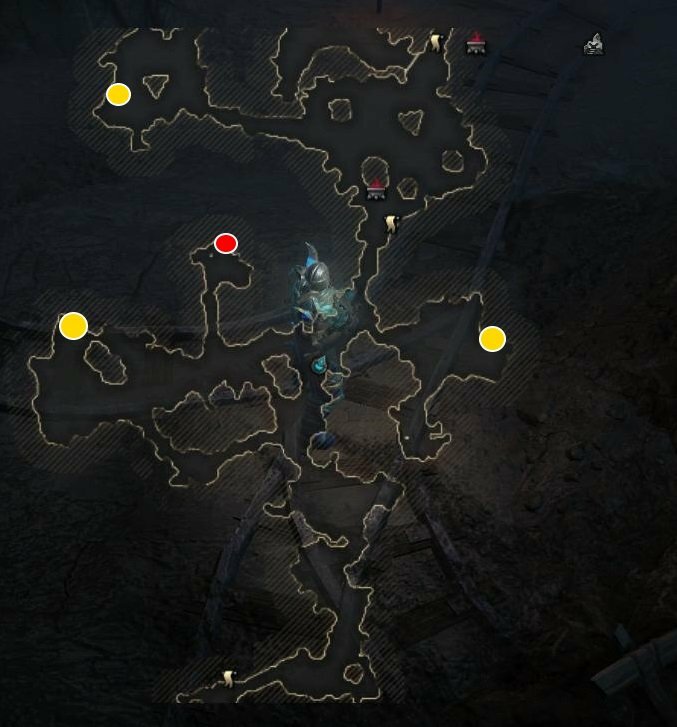
First of all, check out the location map:
 Old Enemy Map
 - The green ones are the banners of Svanung.
- The red markers are the skulls.
- Blue are hounds.
- Yellow - chest with "Psaltery" (look in the grass).
Run to the left in the story and meet new enemies. Opponents with shields are dangerous opponents if you don't know how to act against them. Here you need to either run back, or wait for them to release the shield in order to carry out an attack. If you freeze the enemy holding the shield, you still have to attack him exclusively from behind.
Examine the gate, which will be locked. Follow the marker to the left to the swamps. Destroy the temple to get to the territory of the settlement. Follow the jarl's house and kill him after you destroy the spearmen. At the end of the battle, you will be able to make a choice - pick up 5000 gold at a time or get 1000 each time you complete a mission.
Chapter 3 walkthrough Vikings: Wolves of the Midgard. Fangskar Horror
Interact with the drakkar (boat) to start the quest. For additional targets, you need to kill 320 fenwaites, destroy 30 huts (Tomte hats) and find 3 skulls.
Fenwives are enemies that appear in the water. There will be more of them than you need to kill. Just
You will find 4 or 5 Tomte huts before entering the cave. The rest will be inside it. There are 31 huts in total, when you need to destroy 30. Be careful and you will succeed!
Skull chests: two of them will be outside the cave. But first, kill Grindan. When the goblin jumps, roll to the side, otherwise you will be stunned. From time to time you will have to fight with ordinary tomtes, while Grindan will hide in the shadows. After destroying it, you will receive a part of the artifact - the handle of the Lavatein.
After killing the enemy, go through the gate and go to the left side. There will be water here. Enter the water and kill the fenwights. At the end you will find a chest with a skull. The second chest is located closer to the right side of the map, on the other side, but not far from this place. Again, you will have to enter the water, kill the fenwights and search the chest.
It is impossible to get inside the cave - the path is closed. But in reality, everything is quite simple. You see various symbols on the stone, which blocked the way inside. Remember them. There is one disc on the left side of the entrance, and three more on the right. On these discs, from left to right, you need to set the correct combination of symbols.
Go left inside the cave and kill the Troll to get the legendary Sviagris ring.
The chest with the third skull is hidden inside the cave. Just follow to its upper left.
When you complete all the tasks, then follow the marker to Grindil, Grindan's mother. Dodge her techniques and try to destroy the totems that appear as soon as possible (they will constantly heal Grindil). When it disappears, deal with simple enemies, trying not to stand in green circles.
In the end, you must win.
Village
A rune smith named Frakki will appear in the village. The runes found through the blacksmith can be installed in weapons with empty slots. To do this, go to the upper left of the village. Helda will appear here. If you talk to her, you can pass the tests. The more waves you stand, the better the prize will be.
Chapter 3. The Iron Fist
Additional objectives include finding 3 skulls, killing 20 female warriors, and destroying 10 banners.
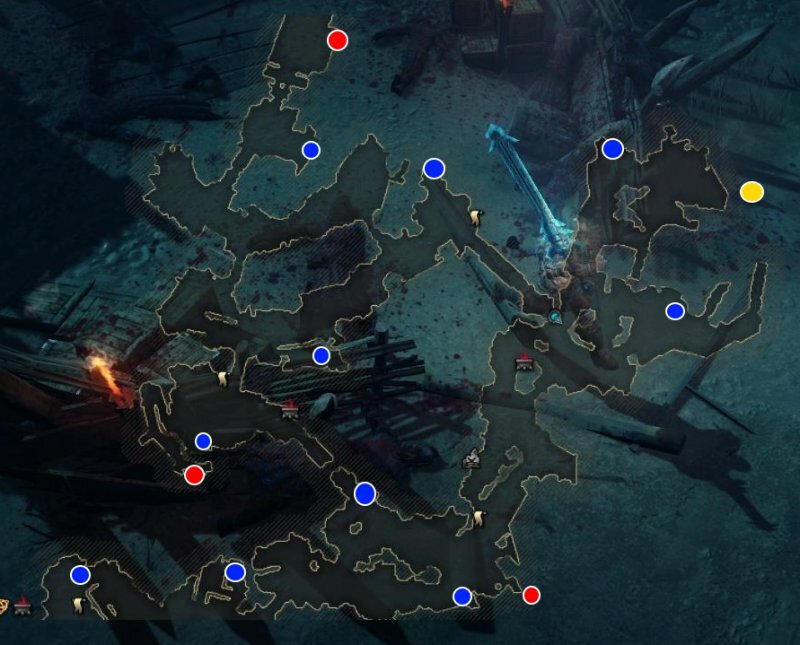
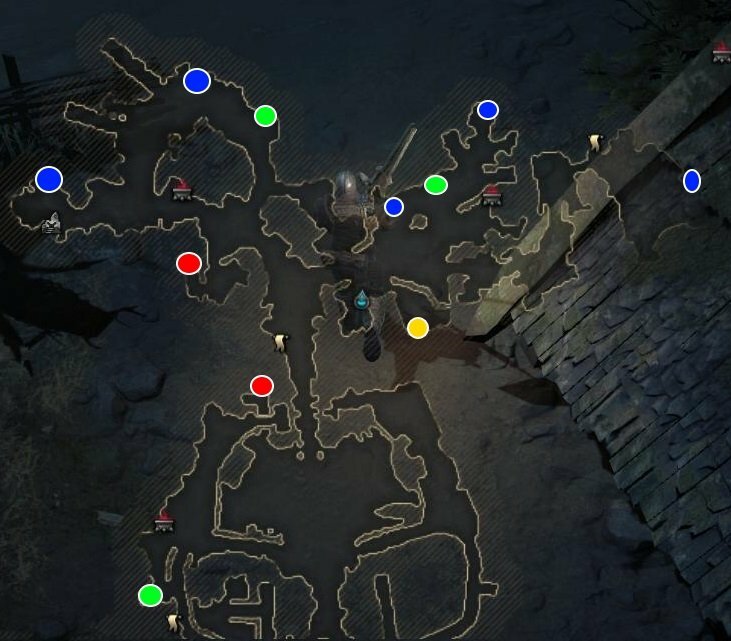
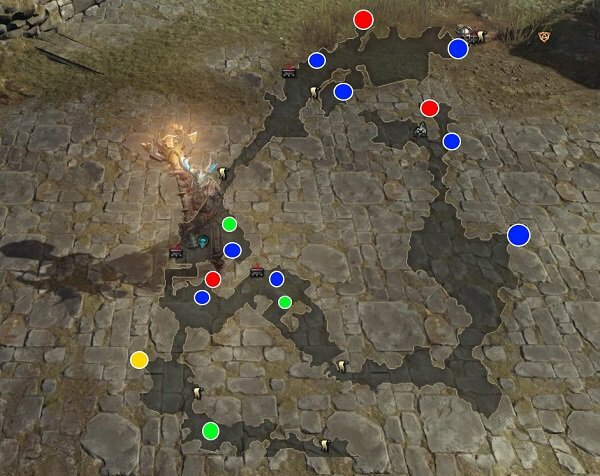
See it all on the map:
 Iron Fist Card
  Iron Fist card (part 2)
 - The green ones are the skulls.
- Red markers - warriors.
- Yellow - a chest with a legendary talisman.
- The blue ones are the banners.
The first skull chest is hidden at the top of the swampy area. There will be a path inside the alcove that is difficult to see.
In the story, go to the gate, which will be locked. Kill opponents and move left to the swamps. Deal with the enemies and make your way even further to the left to find a snowy area. There is only one bonfire here. Therefore, first clear the location, step by step, returning to the fire to warm up.
You will find the entrance to the cave. Inside it, talk to the trapper and carefully go around the thorns. Climb onto the wooden structure in the background, but don't rush to go anywhere. The legendary talisman can be found here. Find the three glyphs depicted on the wall to the right. As it seems, there was once a bridge here. Memorize glyphs. Find in the background, at the top, a wall with an active point. Use it to get to another part of the cave.
Go to the closed door. There are combinations of four symbols above it. Enter it on the stone discs on the left side. Follow the log corridor. There will be a stone disc behind each of them. Enter on three discs the combination that was mentioned earlier when you first entered the cave.
Entering the code is completely optional. But if you do, you will receive the Hel talisman. Go to the room that has opened and get useful items from the chest, including the talisman. Deal with the enemies and go back. Now you need to defeat the boss - the Iron Guard.
Choose equipment that will increase your fire protection. Even if we are talking about an ordinary ring that gives 10%. It will be better than the legendary one, which gives more, but different protection.
The Talisman Hel will allow you to deal damage to the enemy with dark energy, since ice and fire are useless here. Among other things, Hel restores your health. Attack the enemy and dodge to the side. Beware of his fiery breath. Run back often, as the Guardian periodically explodes. There will be iron fingers nearby - they need to be destroyed.
Having won, you will again be able to decide the fate of the settlement - 250 iron immediately or 50 after each mission.
Chapter 3. Revenge
In the lair of the giants, you need to complete the following side quests - find 3 skulls, kill 9 witches and destroy 15 idols.
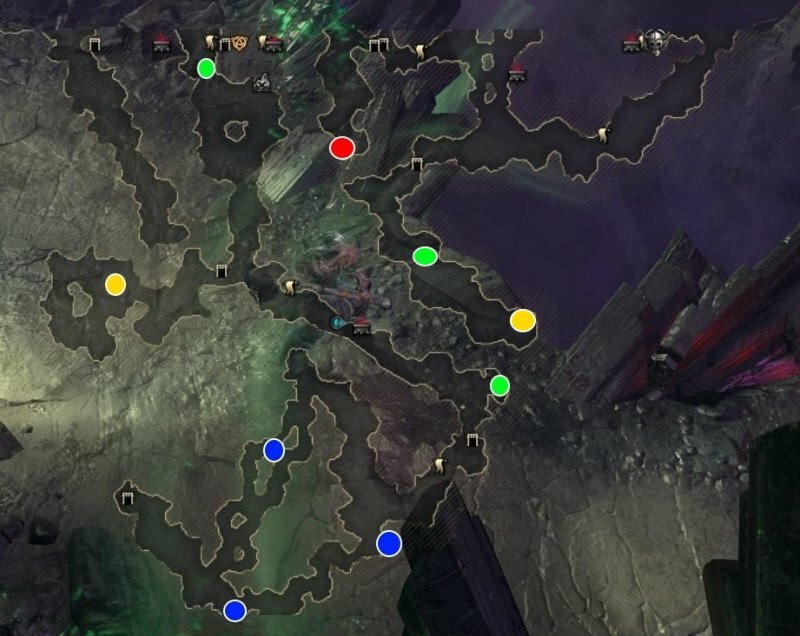
At the location of all this, no more, no less:
 Revenge card
 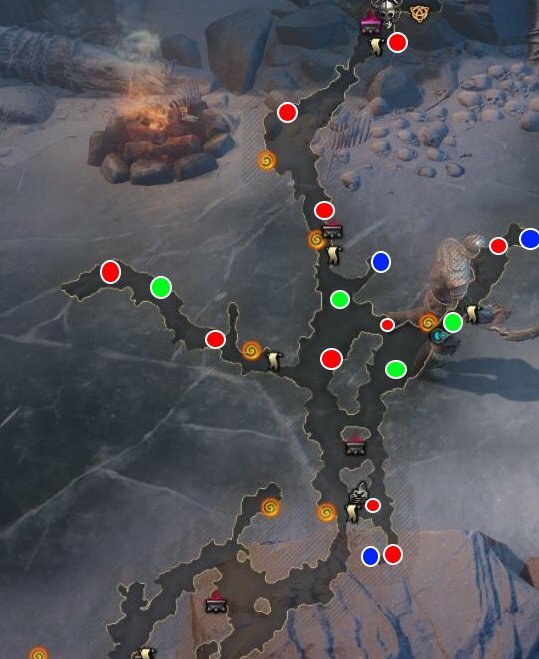 Revenge card (part 2)
 - The blue ones are the skulls.
- Green markers are witches.
- Reds are idols.
In this mission, you can find 2 pieces of artifacts. Once in the troll cave, follow closer to the left side of the screen. Soon you will find a passage that will lead to a dead end. There will be a strong witch with protection from darkness. Deal with her to get a piece of the artifact from the Mjelnir hammer.
You will find a part of the Priven artifact shield after the cave. After leaving it, move along the left path and find a left turn on the side. Roll up and closer to the top of the screen, find the passage hidden behind the log. Destroy the logs and take the enarms from the "Priven" shield from the chest.
The plot part is easy to go through! Kill the trolls and move to the boss. When you leave the cave, you will have to solve the puzzle with the levers. Just flip the levers to move the lava to the buckets next to it (down).
This will lift the stone and fight Scully. During the battle, keep to the edge of the location and wait for Scully to run towards you. Dodge using a dash and then hit the boss 2-3 times. Run back and repeat. It will be easier for archers.
Chapter 4 walkthrough Vikings: Wolves of the Midgard. Paired runes
For additional targets - 3 skulls, 10 elite soldiers and 10 carts.
You will find elite soldiers without much effort - just clear every corner of the location. They are all hiding in an open area - there will be nothing secret here.
Finding carts and a chest with skulls will be more difficult. The hardest thing is to find the third chest, which, as it turns out, will most likely be the first for you. There is a chest inside the jarl's house, in which you will appear as soon as the quest begins. Just go to the wall on the right and find a chest with a skull.
The second chest is located inside the fortress - there will be a single bridge leading to the top of the wall. There is a chest there. Find the last skull near the coast in the lower right part of the map.
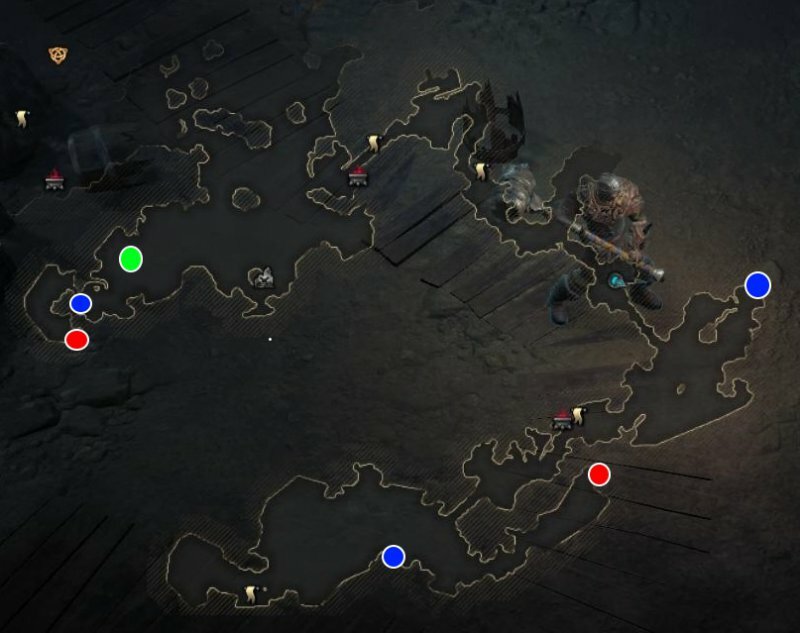
Take a look at the map:
 Paired Runes Card
 - Red markers are chests.
- The blue ones are the carts.
On the territory of this location, you can also find the fourth chest, inside which lies Heimdall's talisman. With its help, you can scare the enemy and inflict damage with dark magic. When you get out of the village and get to the shore, then follow to the upper right of the map. Find a pier with a ship. Go up the ladder to the ship and take the talisman from the chest.
In the story, kill the enemies and move to the marker. Follow back to take the passage. Go to the catapults and destroy them. Then go to the boss and kill him. This is a simple contender. The only difficulty can be that he wields a shield and summons a golden boar.
Chapter 4. Bishop's Gambit
For additional objectives, you need to find 3 skulls, destroy 10 carts and kill 15 priests. We suggest that you familiarize yourself with the map:
 Bishop's Gambit Card
  Bishop's Gambit Map (Part 2)
 - The red markers are the skulls.
- The blue ones are the carts.
- Green are priests.
There will be no artifacts or legendary items at the location.
Follow the inside of the cave, go down to the traps and find the pit. Click on it to talk to the trapper. You can decide whether to help him or not. Go to the swamp and follow the marker. After talking with the witch, you will turn into the Iron Guard. Destroy everything in your path and destroy the gate.
After defeating, talk to the Witch and take the runestone. The following tasks are waiting for you behind the portal.
Chapter 5 walkthrough Vikings: Wolves of the Midgard. Tunnels and Trolls
You need to complete 3 goals - deal with 10 Jotuns, destroy 8 idols and find 3 skulls.
First, study the map below:
 Tunnels and Trolls Map
 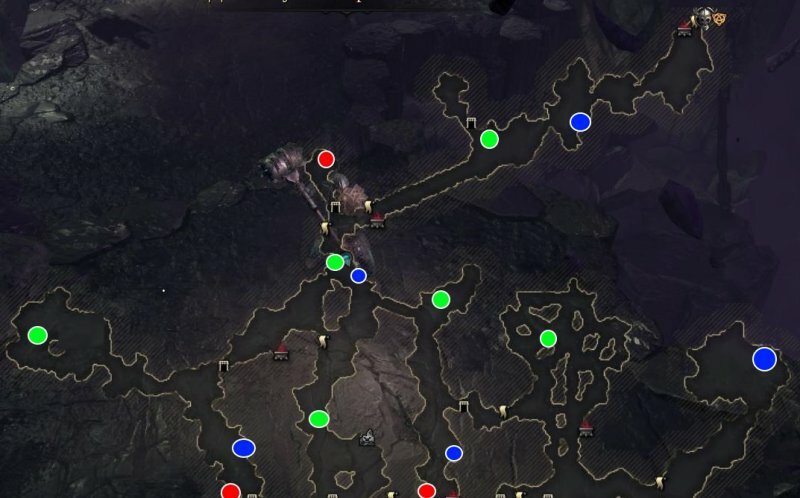 Map "Tunnels and Trolls" (part 2)
 - Green - Jotuns.
- Blue markers are idols.
- The red ones are the skulls.
- Finally, during the mission, you will have the opportunity to find two legendary items - yellow markers.
To get the first item, deal with the troll (yellow marker in the left corner of the map). It won't be easy to win, but you will receive the legendary ring of the Nibelungen as a reward. As for the legendary talisman Hoder, look for a chest marked with a yellow marker.
In the story, go from one control point to another. Rotate the mechanism clockwise to open the way further. Go to the marker, passing into the cave in order to remove the poisonous effect.
The gate will be closed. The mechanism from them is broken and you will have to go in search of three parts. First, go left and inside the cave, deal with Jotun. The first part will be dropped from it. The rest of the parts will also drop from the Jotuns. By the way, these Jotuns are marked on the map with green markers.
After opening the gate, go to the boss. Grindil will fight you again. Deal with her using the same tactics, not forgetting about the totems. After the victory, the Jotun Anvil will appear in your village. It allows you to improve the gunsmith and blacksmith. After the quest, it will be possible to make deals with the merchant.
Chapter 5. Flotnar - Liberation of the Flotnar clan
Side objectives are the search for 3 skulls, the rescue of captives (five cells, not five people) and the destruction of 5 temples (one might say, totems or idols).
Check out the map below:
 Flotnar Card
 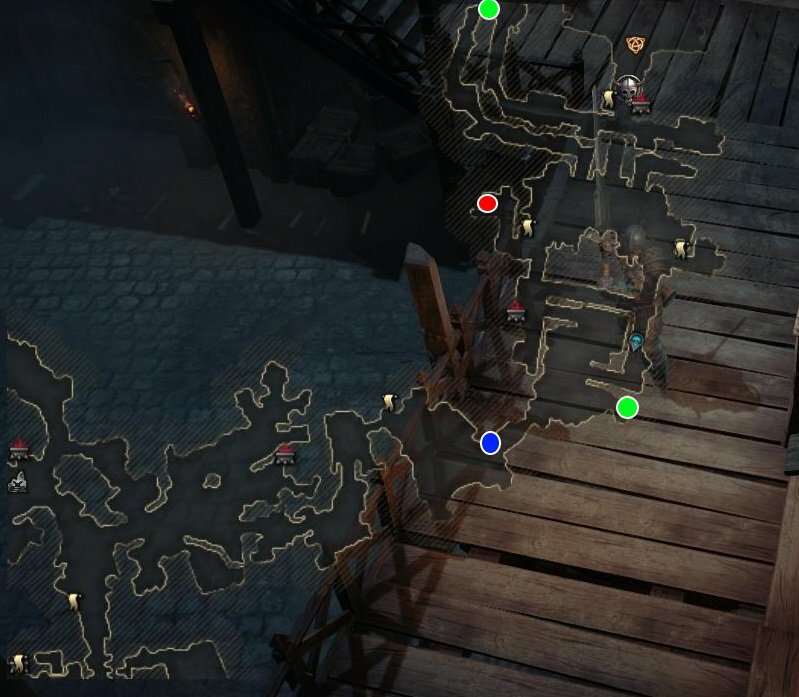 Map "Flotnar" (part 2)
 - The green ones are the temples.
- Red markers are chests.
- Blue are captives.
In the story, go along the coast and kill ordinary and giant crabs. By the way, the latter are a kind of opponents with shields. Go to the gate to make sure it is closed. There is an ascent to the wall on the left side. The same is located on the right side of the gate. Both paths will lead to two guns - shoot these guns at the gates to destroy them.
There is a chest in the village with the legendary Odin's talisman. To find it, find a crack in the fence, destroy it and climb the hill. Chest by the building on the left. Four of the five cells will be located behind the destroyed gate. But it is more difficult to open the fifth cell - go to the right and pull the lever located at the corner of the building (in any case, the location is indicated in the screenshots above).
The third skull chest is located near the boss area. When you are told that you need to raise the grate, then do not rush. Approach the wooden platform on the left side where the chasm is, and then pull the lever. A second platform will appear on which there will be a chest.
Having got to the locked grate, go to the left side and climb up the wall. There will be a lever at its end on the right side. Pull on it to raise the grate.
Go to the courtyard and kill three enemy squads. Take a moment to destroy the ballistas. When you kill everyone, the mission ends with a conversation with Fardine.
Chapter 6 walkthrough Vikings: Wolves of the Midgard. Castra Ignis - Viking Robbery
Side targets - 3 skulls, 5 giant crabs and 10 towers.
Examine the map below:
 Viking-Style Robbery Card
  Viking-style robbery card (part 2)
 The red markers are the skulls.
The green ones are crabs.
Blue - towers.
During the execution of the task, you can find two artifacts. There is only one cave in the location! Inside it you will find a closed grate. You need a key to open it. The rusty key (as it is called) lies in the chest located on the boat. After leaving the cave, go up, keeping to the right side (water). Here you should notice a boat tied to a stick. Destroy this stick (pole) and wait for the boat to moor to the pier. Go to it and take out the key from the chest. Return to the cave, open the grate with the key and take the Lavatein blade (artifact) from another chest.
The second artifact - the "Priven" shield cone, is located at the Crusader, whom you will meet if you study the left side of the map.
In the story, go through 4 posts and kill the enemies. After lifting the bridge, step back and turn right. The path will lead you to the cave. Use the portal to get to another cave. Go to the battlefield.
During the fight, when you kill all the enemies, the game may freeze - nothing will happen. If so, then reboot and die in the arena, losing to the troll. Load the last save and defeat the enemy this time. The mission should complete automatically.
Chapter 6. Ring of Sigurd
Side quests - 3 skulls, 30 whites, 6 menhirs.
Menhirs are structures made of stone, somewhat similar to idols. There are more whites at the location than you need to kill, so they are not considered in the screenshots below:
 Ring of Sigurd Card
  Ring of Sigurd Map (part 2)
 - The red markers are the skulls.
- Yellow - menhirs.
There is a secret path on the map that leads to a difficult enemy. For defeating him, you will receive a part of the artifact - the shoulders of the Skadi Longbow. As part of the passage, the mission is divided into three stages.
Each of them will ask you to find a way to open the passage through the mound. Usually we are talking about a code combination that is entered on stone discs. This is the type of puzzle you should be familiar with.
In the first stage, two discs are located on the left side of the aisle, and the other two are on the right. The combination is set from left to right, as usual.
At the second stage, everything is the same, there will simply be more empty trenches.
At the third stage, you will not only have to remember the correct combination, but also pay attention to the position occupied by certain symbols on the disks.
For example, if earlier the arrow was pointing up all the time (just opposite the arrow it was necessary to put the correct symbol on each disk), now it will be pointing down. The position of the symbols also changes.
And here is the correct solution in turn from the left drive to the right:
- The "arrow" is at the bottom of the disc (that is, if you leave the arrow up, it will point up, but in combination - down).
- The letter F is at the top.
- The X is at the bottom.
- | X | on right.
After that, fight Sigurd. Try not to linger in the circle for a long time, otherwise you will receive damage from dark energy.
Chapter 7 walkthrough Vikings: Wolves of the Midgard. Simul - Camp of Fire
Side quests - 3 skulls, 15 priests, 10 temples. Check out the map:
 Fire Camp Map
  Fire Camp Map (part 2)
 - The red markers are the skulls.
- Yellow ones are temples.
You will find priests in any case if you kill all the enemies you meet on the way.
The first chest is in a niche inside the cave, covered with boards. The other two skulls are hidden inside buildings boarded up by boards on the territory of the fortress.
In the forge you will see a gate with two bolts. There is the first lever on the right. After activating it, go left and follow above to get to the left side of the gate. Here you will find the second lever. Go to the other gate and go down and to the left where the wooden wall is. Shoot the ballista to destroy the gate. While dodging the white circles, hit the Bishop at the moment when he has no protective barrier.
Chapter 7. Simul's Lair
Side targets - 3 skulls, 3 menhirs and 3 defender doors.
You will meet the doors in any case, but on the map below their location is still indicated. The first chest is hidden - there is a slab with a shimmering hole on the corner of the stone wall. Destroy it and take the skull from the chest.
And here's a map of the area:
 Lair Simul Map
 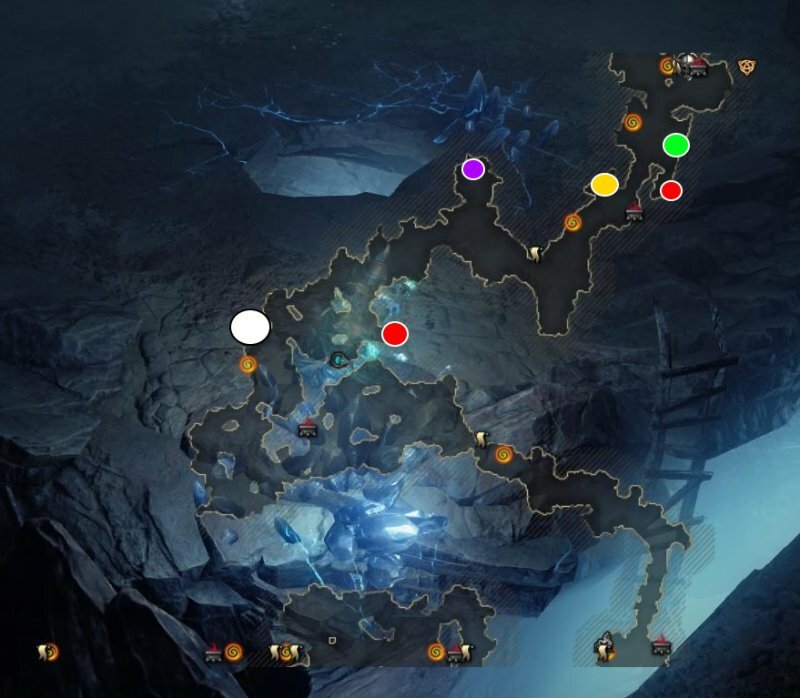 Lair Simul Map (part 2)
 - White - a chest with the legendary "Braga" talisman, which puts opponents to sleep.
- Green - doorways.
- The red markers are the skulls.
- Yellow - menhirs.
- Purple - a chest with an artifact ("Gyungnir" blade).
To get to the artifact, you need to remove the stone pillars. You can click on each of them to raise and lower. You need the correct combination, which is visible at the beginning of the location. After killing the door, you can find white sticks on the wall, and some of them will be crossed out.
From left to right, you need to highlight the following columns - 2, 4, 5, 7.
Chapter 8 walkthrough Vikings: Wolves of the Midgard. Imperial Navy - Knife in the Dark
Side objectives - 3 skulls, 20 Tomte huts, 5 jarls.
The location will have exactly 20 huts, so we will mark it. The last one is hidden behind a large door.
To find all the huts, at the beginning, go up to the right. There will be two caves here. The right one is deaf, but through the left one can go right through. There will be a total of 11 huts in both caves! If you find less, then study them carefully.
You will also go through 3 more caves - without fail, if you move along the markers. There will be 6 more huts. Already 17.
The two penultimate huts are not in caves, so we have indicated them on the map below.
You will destroy the last hut after the large door is opened. To find it, at the beginning of the location, go upstairs and go to the left, through cave. It will have a large locked door. Behind it are hidden a hat and a chest with an artifact - the handle from the Mjelnir hammer.
In order to open the large door, you will need to find 4 levers. There are the same number of caves on the map, and in each of them there is a lever. This cave is no exception!
The first skull is hidden behind the boards inside the rock, the second - behind the stone in the cave, the third - in the water near the altar, which increases the level of the character.
The legendary golden ax is hidden in a chest guarded by a crab. See the map:
 Knife in the Dark Card
 - The red markers are the skulls.
- The blue ones are the huts.
- The green ones are the labels.
- Pink is a chest with a golden ax.
- Purple - four levers and a door.
Chapter 8. Path to darkness
Side targets - 3 skulls, 20 trolls, 10 menhirs.
 Map "Path to Darkness"
  Map "Path to Darkness" (part 2)
 - The red markers are the skulls.
- Yellow - menhirs.
Inside the cage, which is at the end of the location, there is a chest with the Salt talisman. It is marked with a purple marker on the map above. To get it, you need to solve the puzzle with the levers that are scattered around the map. The numbers on the map indicate the levers you need.
How to use the levers (if you haven't managed to "wind" anything yet): 1, 2, 3, 2, 4, 5.
Chapter 9 walkthrough Vikings: Wolves of the Midgard. Albion - The Lost Clan
Side targets - 3 skulls, 10 banners, 15 fenwights.
Look for Fenwights in those places of the map where flowers are visible. There are more of them than you need.
The first chest is the hardest to find - it is well hidden. Found inside the house on the left side of the barrow, above your spawn point.
Map attached:
 Lost Clan Map
 - The blue ones are the banners.
- The red markers are the skulls.
- Yellow - Druid with Tyr's talisman.
Chapter 9. Hide and Seek
Side quest - 3 skulls, 30 huts, 15 draugs.
There are exactly as many huts and draugs as stated in the task.
In the middle of the location, you will find a grave with levers and slabs. Pull the levers in the following order - X, F, | X | to open the grave. Kill the draug and take the Vidar talisman.
After you cross the river by boat, find another puzzle with more levers. Number like this:
 Puzzle with levers
 If you didn't do anything, then activate the levers in the following order: 3, 1, 8, 7, 1, 5, 3, 5, 4, 7, 2, 5, 6, 8, 1, 4. As a reward you will receive a part of the shield " Priven "(artifact).
Chapter 9. Siege of Carlion
Side quests - 3 skulls, 8 carts, 3 ballistae.
See the map:
 Siege of Carlion Map
 - The blue ones are the carts.
- The red markers are the skulls.
- The green ones are ballistae.
- Yellow is a legendary weapon.
The legendary weapon is hidden at the very beginning of the location, behind the boards on the left.
Attack Arthur while fighting Arthur and Guinnever. This will scare the woman and the fight will end. Both characters will survive!
Chapter 10. Moroka with Giants - Plain of Souls
Side quests - 3 skulls, 30 trolls, 7 menhirs.
The last chest is hidden in a burial mound behind the wall on the right side (visible through a crack).
You can find 2 artifacts. The first drops from the Noble Frost Giant, and the second is found inside the barrow with levers. Find a pit with spikes and follow to the right of it. Hit the vertical beam to form a bridge. Go around the territory and go to the chest with the artifact.
Chapter 10 of Vikings: Wolves of the Midgard walkthrough. Union on fire
Side quests - 3 skulls, 20 giants, 10 idols.
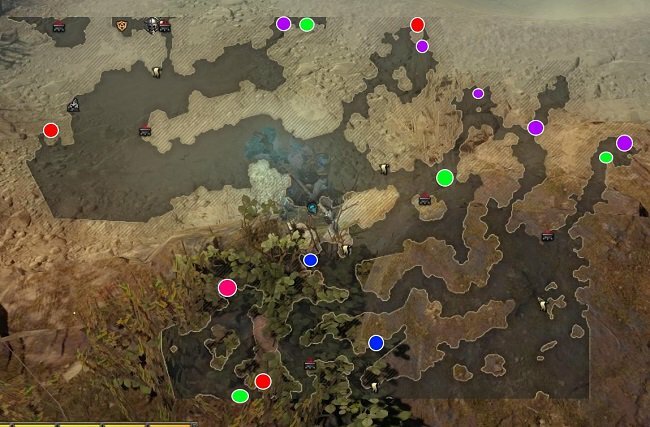
Location map:
 Alliance on Fire Map
  Union on Fire Map (Part 2)
  Union on Fire Map (Part 3)
 - Red markers are chests.
- Green are idols.
There are 18 giants in the location, while the remaining two are bosses.
The symbol wall opens with the correct combination. Moving towards it, examine the walls and stones, memorizing the sequence of symbols.
If set correctly, the passage will open. You will reach a precious chest, inside which lies a legendary ring of dispersion. A very valuable and useful item!
Where you need to open the bridge, number the levers from "1" to "3", starting with the bottom. Pull them in the following order - 2, 1, 2, 3.
Chapter 11 Vikings: Wolves of the Midgard walkthrough. Battle of Karlion
Side quests - 3 skulls, 5 cardinals, 3 ettins.
Three cardinals will be at the start of the quest. The fourth you will kill while protecting the wizard outside the gate. Go ashore and destroy 2 ettins. There is a chest with a skull on the right side. You can find the rest of the items without any problems.
Chapter 12. The Eternal Well - Dear Ice and Fire
This quest is very simple, including the side objectives. There will be two huge opponents - ice and fire giants. For their destruction you will receive two artifacts - from the Skadi bow and from the Lavatane ax.
The final. The Eternal Well
The battle with Grimnir is divided into 2 stages. In the first, you are fighting an ordinary giant, doing everything that was taught before. In the second stage, it will already be a big monster. You won't be able to deal damage, but you can win. You should not attack the boss itself, but those tentacles that appear from the ground.
Life experience tells us that first impressions are the most important, even if not always correct. If the game cannot capture the player in the first 30 minutes, if it is boring and annoying with plagiarism from the very beginning, then it is unlikely that some self-respecting gamer will continue playing. Such a product is trivially difficult to take seriously, you quickly forget about it.
However, our world is contradictory. If you look at a mediocre gaming product from the other side, give it a second chance, pay attention to other aspects, then it may suddenly turn out that everything is not so bad. Vikings - Wolves of Midgard personally reminded me of such cases.
The hack'n'slash genre has never delighted with innovation. Everything is so bad that among the people all the games of such people are called in honor of one famous horned demon. It is not strange - it is difficult to somehow turn the genre of endless grinding and come up with something new. But this is not a reason for laziness - progress should not stand still.
Games Farm, the developers of Vikings - Wolves of Midgard, are well aware of this and, using all their accumulated experience with the Action-RPG genre (they had previously worked on the expressionless Shadows: Heretic Kingdoms), decided to experiment.
The very juice of hack'n'slash always lies in the combat system. Here Vikings - Wolves of Midgard is seriously different from all its fellow genres in many details and trifles. In hack'n'slash, you always have to kill entire armies of almost harmless dummies that are not able to give at least some rebuff to the player. But our client has a different opinion on this matter - any battle with a more or less serious group of enemies can be fatal if you act carelessly. And if you also set a difficult level of difficulty, then each battle will become a real test. Hardcore lovers will have a place to roam, for sure.

Vikings - Wolves of Midgard was clearly inspired by Dark Souls. This is felt in many of the game's mechanics. Enemies do a lot of damage, so you need to dodge somersaults all the time. The health restoration system also migrated from there - there is a healing bank with a limited number of charges and wells scattered around the map, where you can replenish an empty bottle.
In addition, Vikings - Wolves of Midgard is made with an emphasis on playing on a gamepad, so the classic control of the CM is rather unusual compared to other representatives of the genre. It is quite adequate, but the experienced nephalem can feel obvious discomfort in the first minutes of the game. You also need to get used to climatic conditions - if you run on the winter map, then from time to time you will have to warm up by the fire, and everything is in that style.

Separately, all this is a trifle, but in the aggregate it makes Vikings - Wolves of Midgard a rather fresh product, one might even say original. However, everything is far from perfect. The game has a rather small number of interesting abilities and skills (they are tied to the type of weapon, just like in Victor Vran), monotonous enemies and an annoying crafting and trading system.
Oh yes, the crafting system. Searching for the best artifacts and endless mathematical analysis is almost the sweetest pastime for fans of the genre. But in Vikings - Wolves of Midgard it is implemented very badly. There is no interesting system for creating items or improving them further. Everything is extremely simple, from that to terribly boring. Sometimes this system just breaks all interest in the game. A case of life: buildings here need to be improved, investing a huge amount of resources in order to be able to make the best equipment. One day I decided to spend money and improved the forge, and then crafted an elegant spear with excellent characteristics. Satisfied, he went to the drakkar to go on a story mission. It turned out that for the further passage of the campaign, you need to improve the ship by investing an astronomical amount of resources. I, being without a shisha in my pocket, was forced to go on boring grind missions and perform monotonous tasks several times in a row to build this damn drakkar. There shouldn't be such incidents.

The game has problems with another aspect of no small importance for the genre - multiplayer. When my valiant companion @ILYA and I were sent to conquer the northern tribes, our main enemies in the end were not the foes, but the game itself. The terrible internet connection system raises questions and a lot of abuse. Instead of a game, we got a slideshow, and the hard difficulty level incredibly turned into an easy one. In addition, a one-to-one cooperative campaign repeats a single one. In general, if you decide to play, then play alone - do not repeat our mistakes.
Vikings - Wolves of Midgard can grab the attention of gamers with its setting. The adventures of the horned demons of Midgard always excite the blood of the audience, which is why the image of a stern bearded Viking is so popular in the gaming industry. At first glance, with the narrative and atmosphere, everything is fine: the Vikings are there, they are all shouting something about Thor and Odin, everywhere there is snow, wolves. But the developers went further and mixed so much that the plot became difficult to take seriously. Here you will have a repetition of the feat of Beowulf, and the army of trolls, goblins with giants, and the approaching Ragnarok, which, according to the laws of the genre, must stop the player. The invaders from the South - the Roman Empire, mowing under the crusading army led by bishops - evoke the most affection. It feels like plot development hasn't progressed beyond the starting brainstorming session. It is worth noting that all this does not prevent Vikings from being an atmospheric game with a pleasant authentic soundtrack. Ragnar Lothbrok would approve.

The biggest cognitive dissonance is caused by the protagonist (or heroine). We, the players, are accustomed to being given control by some super strong characters capable of fighting a huge number of enemies alone. The main character of Vikings, Wolves of Midgard, is different from everyone else - he knows that he is incredibly strong, and he constantly boasts about it. He taunts his enemies, mixes their name with filth, simply because he can. In battle, he always shouts out to horror self-confident phrases, like: "I am invulnerable!" or "All will fall before me!" He knows that his every breath, step and gesture changes the vector of times and the future of the whole world. Tell him that his allies would not interfere with his tribe, and he will only laugh in your face and go to kill and rob potential friends. The main character loves himself so much that it feels like he is already planning to build a temple in his honor. The Viking counterpart of Duke Nukem is terribly funny and charismatic. True, unfortunately, the customization of the hero is not encouraging - there is too little choice of available hairstyles and face types.
Walkthrough Vikings: Wolves of Midgard.
Chapter 1. Ambush on Jotun.
After creating a character and choosing his class (God), start a new game in Vikings: Wolves of Midgard, confirming one of the four difficulty levels (in our case - "Warrior"). By the way, when creating a character, you can activate the Valhalla mode - in this case, your first death will lead to the death of the main character (you have to create a new one - no saves).
During the mission, you need to kill 30 Tomte and find 3 iron skulls.
Move across the location, killing enemies. Just click on them with LMB. Use the rolls to dodge. To roll, press "Space" or W, S, A, D. Stamina is consumed.
Destroy wooden barrels and carts as you move through the village to collect gold and wood.
Do not rush to move through the location. Follow closer to the right edge of the screen to find the first chest with an iron skull (1/3) inside.
After meeting the first giant, keep to the right side of the map. Behind the fence near the trees is a barely visible second chest. Open it to get an iron skull (2/3).
The healing system in the game is unusual: you use one of the healing totems that you can find or buy from merchants. Each totem has a certain amount of charges and effectiveness. After you use Heal (Tab), the number of charges will decrease by one unit. These charges can be restored at the healing altar.
By the way, you will find the first such altar on the left, on the territory of the village. Use it after destroying several Tomtes. From the altar, go down and to the right to the marker. Save Heldebrand from Tomte. The man will join your squad! Just above its original location is the third chest - an iron skull (3/3).
Go to the upper left corner of the map to save Helga from Tomte. Together with the two characters, return to the altar of healing, climb the steps and go through the door that opponents previously tried to break down.
Reward:
Runa Algiz.
Blood 200.
Wood 30.
Gold 220.
Iron 7.
Chapter 2.1. Dangerous neighbors.
After talking with Welund, go to the left side of the map and find the altar. Donate 200 units of blood to level up. The character level in the game is raised exclusively in this way.
End of Yokula
Follow the gate in the upper right corner of the map and go to the desired location. So the next task will begin.
You will have three additional challenges:
Find 3 iron skulls.
Kill two Jotuns.
Destroy 10 Yokul Idols.
At this location, you can freeze. A blue bar gradually fills under the health bar in the lower left corner of the screen. If it becomes full, then you will start taking damage. To avoid this, you will need to periodically stand by the fires - they are marked on the map with yellow markers.
Idols of Yokul are marked with blue circles, chests with skulls are green, the levers for raising the bridge to the fourth precious chest in the location are black, the location of the Jotuns is light blue, the chest with an artifact is red.
Thus, destroy the idols and Jotuns, collect the skulls from the chests, find and activate the five levers and take the artifact.
Follow the marker into the cave and get ready for battle.
How to defeat Yokula in the ice cave?
The fight is pretty simple. In its first part, Yokul will create ice spheres and explode them at the points indicated on the location. You need to avoid these points if you do not want to remain frozen for two seconds.
Stand on the yellow circles periodically to keep warm. When killing wolves, do not forget to attack the throne of Yokul, on which he stands. After the destruction of the throne, attack Yokula himself, who, by the way, can go down to you and before the destruction of the throne. We recommend attacking the throne in rage mode in order to destroy it faster.
Talisman Skadi.
Rope belt.
Rune Hagalaz.
550 blood.
620 gold.
90 wood.
20 iron.
Chapter 2.2. Old enemy
In this task you have to capture the Svanung village and kill their Jarl (boss). This settlement is an impregnable fortress, so you have to work hard to find the entrance inside.
Additional mission tests include:
Search for 3 iron skulls.
Murder of 15 Hounds.
Destruction of 10 Svanung banners.
As always, the map does not show you where you need to look for all these items. And since the location is even larger than in the quest "The End of Yokula", the necessary items are very easy to miss.
In the screenshot below, you can see the designations of the test items: red circles - chests with iron skulls, blue circles - the location of the Psars (13 of 15, the other two are obvious), green circles - the location of the Svanung banners, the yellow circle - a chest hidden in the grass, inside which there is an accessory "Gusli".
As for the passage of the location as such, then you need to go to the left side. You can destroy small wooden barricades, as well as towers with archers. Here opponents will appear who actively use shields - you need to act differently against them: either run back and wait for them to open up, or wait for their attack without doing anything, or roll over to them behind them. Even if you decide to freeze the enemy, do not forget that the shield will protect him from attacks from the front.
The iron gate will not open, so move on to the swamps on the left. A little higher and to the right there will be wooden rubbish, which you can destroy and get to the territory of the fortress. So get to the place of transition to the house of the Svanung Jarl.
How to kill Jarl Svanung?
The boss will not offer you anything supernatural. First you have to kill two spearmen with shields. Do this without wasting your energy.
As always, it is advisable to stock up on energy before the start of the battle so that you can activate the "Rage" mode.
Warriors are marked with red circles, chests with iron skulls are green, Yarnung's banners are blue, and a talisman chest is yellow.
One of the iron skull chests is located at the top of the swamp. There is a small passage inside the alcove, which is invisible in the usual location. Be careful.
As for the passage of the plot, then you will first need to get along a linear route to the gate, which, by the way, will be locked. Several strong enemies are waiting for you in front of the gate, so look for the altar of God nearby in a round square.
Go left of the gate to the swamps. After destroying all opponents, make your way to the left to climb the snow-covered hill.
Be careful here, because there is only one fire, plus the distances are long and you can easily freeze.
Get to the cave and go inside. After warning the Yarnung trappers, carefully go around the spikes and climb the wooden scaffolding against the wall in the background. Do not hurry! If you want to find an additional talisman that will be very useful in the battle with the boss of this location, then pay attention to the three glyphs applied to the wall to the right, where there is no bridge. They will need to be entered on stone slabs familiar to you.
There is an interaction point on the wall in the background - click to destroy stones and open a passage. Get to the locked door, above which you can see a four-digit code. Enter it on the stone slabs to the left.
Note. This code is optional, since you do not need the door on the right, but if so, then you will deprive yourself of the opportunity to get the Hel talisman.
Go to the opened room, take the loot from the chest, including the new talisman, and then kill the enemies.
Go back and down. You just have to make your way through the village, where there will be even more enemies. And after you a fight with the boss awaits.
How to kill the Iron Guard?
This enemy is much stronger than all the previous ones.
You can see the following designations: blue circles - chests with iron skulls, red circles - troll idols, green circles - witch trolls.
In addition, at the location you can find one piece from two artifact items - a sword and a shield.
When in the troll cave, keep to the left. At the top there will be a passage leading to a dead end. Here you have to fight one of the troll witches with a high HP reserve and immunity to darkness. After killing her, you will get the pommel of the artifact one-handed hammer "Mjelnir".
As for the part of another artifact item, the shield, after leaving the cave, go along the left path and take the first turn to the left. To the side, towards the top of the screen, there will be a hidden passage. Destroy two logs and open the chest to find an enarm from the Priven artifact heavy shield.
The passage of the location itself will not be difficult - you just need to break down obstacles on the way, kill huge trolls (using the Hel talisman) and advance to the boss.
When leaving the cave, you will need to solve a simple puzzle - using the levers on the left and right, move the lava flow to the buckets nearest to them. The stone will go up.
How do you kill Scully?
The mechanics of the fight are extremely simple - Scully either runs up and tries to knock you down, or jumps up when you are nearby to stun, or attacks with sweeping movements of her club. In addition, boulders will fall on top of you.
In addition, at the location there is another chest with another talisman, which is called "Talisman of Heimdall". It scares targets and deals darkness damage. To find it, when you leave the territory of the settlement and find yourself at the coast, then go up and to the right. Find the pier here and go to the ship, where the chest is located.
In the first case (marker on the left side of the map) you will need to kill a huge troll with more than 13,000 HP. This is not easy to do, so prepare for battle by collecting Rage Energy. As a reward, you will receive the legendary ring of the Nibelungen.
In the second case, you just need to search the fourth precious box on the map. It will contain Hoder's legendary talisman.
Based on the quest, move to the checkpoint and turn the mechanism clockwise to open the passage. Follow the goal, periodically peeping into the caves to bring down the poisoning.
The next gate will be locked and the mechanism broken. You need to find three parts of the mechanism. First go left and in the cave kill Jotun, from which the first part will fall out. Looking ahead, we note that all three parts fall out of the Jotuns (which are targets in one of the challenges). Either way, go through the markers and kill the enemies, collecting all the details.
Unlock the gate and follow the boss of the location. Grindil will again dare to check on you. Do the same as last time - attack, dodge, destroy healing totems. When Grindil is invisible, avoid the green circles while dealing with the trolls.
After winning, you will receive a reward and an anvil of the Jotuns. With this anvil, it will be possible to improve the gunsmith, and thanks to this, the blacksmith who makes things.
Upon returning to the village, a surprise awaits you - the merchant has already laid out his goods and is ready to cooperate with you.
Quest reward:
Loki's legendary talisman.
Barbarian idol.
Runa Ingvaz.
2900 blood.
9100 gold.
1300 wood.
270 iron.
Chapter 5.2. Flotnar - Liberation of the Flotnar clan
In this task, you will be asked to complete the following tests:
Find 3 iron skulls.
Rescue prisoners from 5 confinement cells.
Destroy 5 Van temples.
All these objects are shown in the screenshots below: red circles are chests, blue circles are prisoners, green circles are temples of the Vanir.
As for the passage itself, you first have to walk along the coast, destroying crabs. Giant sand crabs are worth killing in the same way as warriors with shields.
But that is not all! At the location, you can find two pieces of artifact equipment.
Pay attention to the iron grate in the only cave on the location (not counting the last one with a portal). To open this grate, you need a key. You will find the rusty key inside the chest, which is located on the boat tied to the shore.
Destroy the pole to make the boat sail to the right. Then remove the rusty key from the chest and return to the metal grate. Click on it to open it. After killing opponents, you can get the blade of the artifact two-handed ax "Lavatane" from the chest.
Another piece of artifact gear is the prive artifact heavy shield shishak. To find him, you need to kill the Crusader, whose location you can see in the screenshot below (The Crusader has already been killed, but he was in the place where the character is).
As for the passage of the game directly, here you should go through four guard posts and clear them of enemies. When the bridge is lifted, then go back a little and go to the right. Get to the cave entrance. Use the portal to move to another cave and go to the Last Arena.
ATTENTION! There may be a bug here - you kill all the mobs, but nothing happens. In this case, just go to the main menu and load the last save - it will be in front of the Last Arena. Enter the Final Arena and die at the hands of a huge troll. When you do this, the same save will be automatically loaded. Go to the Arena and this time kill all the enemies. As soon as the last mob is dead, a window will automatically appear announcing the end of the mission (you will see a reward).
Quest reward:
Legendary belt of the great blacksmiths.
Imperial mace.
Runa Ingvaz.
900 blood.
10,300 gold.
1500 wood.
300 iron.
Chapter 6.2. Sigurd's Ring
In this mission you need to take away his ring from Sigurd. Looking ahead, we note that, unlike Odin's ring, the protagonist will give Grindil this item without options.
Three challenges will be available to you:
Find 3 iron skulls.
Kill 30 whites.
Destroy 6 menhirs.
Stone structures are raised under the menhirs - something in the spirit of troll idols, etc.
Skull chests are marked with red circles, and menhirs are marked with yellow ones.
In addition, at the location you can find a secret passage to a strong enemy, by defeating which you can get the second part of the "Skadi Big Bow" artifact - shoulders.
As for the passage of the mission itself, it consists of three stages. At each stage, you will need to open a passage to the next mound. To do this, approach the overlapped transition and memorize the combination of characters (as usual).
In the first case, two stone discs will be on the left, in secluded niches, and the other two - on the right. So from left to right and set the correct combination.
In the second case, everything is the same, just there will be more of these niches.
In the third case, everything will be more complicated. You need not only remember the code combination, but also pay attention to the position of the characters in this combination. For example, if before the arrow was up, this time it is directed down.
The same applies to stone discs - if earlier it was necessary to display symbols at the top of the discs, now the discs will be fully open and they need to be rotated so that the required symbols (in the correct order) are directed correctly.
The solution will be as follows (on the map, move from one disk to another disk from left to right): an arrow at the bottom of the disk, F at the top of the disk, X at the bottom of the disk, | X | on the right side of the disc. If you do everything right, the passage will open.
After collecting all the items, go to the Last Arena.
How to defeat Sigurd?
To destroy this boss, you have to act carefully. First, Sigurd does not leave the center circle. Secondly, when you stand on the circle, the darkness scale under the health scale begins to fill.
The first chest with an iron skull is hidden in an alcove inside the cave, behind wooden planks. The other two chests are hidden in the corner inside the wooden plank buildings on the fortress grounds. Their location is shown in the screenshots above.
There are no artifacts or legendary items in the location.
In the story, move to the forge, where there will be a gate closed by two bolts. On the right side of the gate, find the first lever, then go left, and climb up so that you are on the left side of the locked gate, at the top. There will be a second lever here.
Get to the next closed gate, go lower and to the left, onto the wooden wall. There is a ballista here. Shoot the gate from it to destroy it and open the passage for yourself.
It remains to get to the Bishop of the Seas.
How to kill Bishop of the Seas?
The fight will be quite simple - avoid the white circles on the ground, attack the Bishop when there is no protective sphere on him. The enemy does not have much HP, so the battle will not last long.
Quest reward:
Legendary mascot of Njord.
Eir's honor.
Runa Evaz.
3800 blood.
12,800 gold.
1900 wood.
380 iron.
Chapter 7.2. Simul's Lair
Use the portal in your settlement to start this story quest.
You will be asked to complete three additional challenges:
Find 3 iron skulls.
Destroy 3 menhirs.
Kill 3 door defenders.
The first chest with an iron skull is on the left side of the arena, where you will meet the first guardian door. The first menhir is also located there.
But the chest is hidden from view. Note the corner of the stone wall for a slab and a small, blue-shimmering hole. Destroy the stone slab to find the first chest. This is perhaps the most difficult of all Iron Skull chests at this level.
The screenshots below indicate the location of all other objects and objects: red circles - chests with iron skulls, yellow circles - menhirs, green circles - defender doors.
In addition, you can see a white circle that indicates the location of the chest with the new Legendary Braga talisman. He is able to lull enemies.
Finally, a purple circle marks the place where the chest with the next artifact is located - the blade of the two-handed staff "Gyungnir".
To get to this chest, you will need to remove several stone pillars from the path. As you interact with each bar, you turn its backlight on or off. Thus, you need to highlight the necessary stone pillars to open the passage.
Red circles are chests with iron skulls.
Blue circles - two tomte huts (hats).
Green circles - label tomte.
Purple circles - four levers to open the door. The fifth in a row indicates the location of the door itself.
The pink circle is a chest with the legendary one-handed Golden Ax.
Quest reward:
Legendary ring "Geramfil Stone".
Eyre's generosity.
Rune Hyera.
3000 blood.
16,800 gold.
2400 wood.
500 iron.
Chapter 8.2. Path into darkness
This storyline quest is carried out in order to be able to upgrade the forge and armorer to the fourth level.
You will be prompted to complete the following additional challenges:
Find 3 iron skulls.
Kill 20 cave trolls.
Destroy 10 menhirs.
Unlike the previous missions, you will not experience problems with finding iron skulls, since they are, in principle, located in open locations and are not hidden under boards, stones, etc.
In addition, we will not indicate the location of the cave trolls on the map, since you will still have to kill them all. If you don't, then just go through all parts of the map - the trolls will automatically appear in the right place.
In the screenshots below, red circles indicate chests with iron skulls, and yellow ones - all menhirs. Most of the problems are connected with the search for menhirs.
Please note that the menhir indicated on the map at the intersection of the upper and lower tiers is at the bottom, when exiting the arch, closer to the edge of the map.
In addition, towards the end of the location, you will notice a locked cage with a precious chest inside. Looking ahead, we note that the chest contains the "Talisman of Salt", inflicting fire damage in the amount of 550%. The same chest with the talisman is marked with a purple circle.
If you need it, you'll have to solve the levers puzzle.
Puzzle with levers
The location has several levers that open and raise the grates. Take a look at the screenshot above for the map. On the map, numeric designations: the numbers indicate the leverage you need.
And the correct sequence of using the levers will be as follows (if you did not touch anything): first, second, run through the first to the main hall, where the orange safe zone is located, third, second, fourth. Go to the fifth lever, as the passage to it should now be open.
The task of the main plot is simple: head to the indicated place, destroy three crystals in order to go further, find the desired mob and take the guardian key from him, and then open the passage to the boss for them.
In the battle with the boss, Wild Dverg, proceed in the same way as with regular doors. The only difference is that he has stronger attacks and a significantly increased HP reserve. To wake up the boss when you find yourself on the location, you will need to destroy the crystal.
Quest reward:
Odin's Robe Cloth Armor.
Dverga ax-pick.
Rune Isa.
4800 blood.
18,200 gold.
2700 wood.
550 iron.
Chapter 9.1. Albion - The Lost Clan
In this task, you will need to walk around the location, get to the locked gate and follow even further in order to bypass the fortress through the cave.
For additional goals, you will be offered:
Find 3 iron skulls.
Destroy 10 Hrafnung Banners.
Kill 15 Fenwights.
Fenwights can be found mainly in two places of the location, similar to a mound overgrown with grass and flowers with high stone slabs. There will be more than 15 of them.
If two chests with iron skulls are not so difficult to find, then the third one, which chronologically is actually the first, was well hidden by the developers. Look for him in the house to the left of the mound, up from your spawn point.
Red circles mark chests with skulls, blue ones - Hrafnung's banners. The yellow circle is a Druid, destroying which, you will receive the Tyr's talisman.
In addition, you can find Tyr's talisman at the location. To do this, you will need to kill one of the Druids - the item will drop from him.
At the end of the battle, you will need to defeat a group of barbarians, and then the imperials with shields. They must be handled carefully, as they inflict enormous damage up close. Once you destroy them, you will have to defeat King Arthur. Basically, here you just need to dodge in time, avoiding his powerful attacks, and then counterattack. Opponent has resistance to stun.
Quest reward:
Fafnir's Armor.
Worn Crystal Mail.
Rune Isa.
5900 blood.
21,000 gold.
3100 wood.
630 iron.
Chapter 9.2. Hide and seek
This story quest will be quite lengthy, largely due to the huge location. You will be prompted to complete the following additional tasks:
Find 3 iron skulls.
Destroy 30 Tomte Hats.
Kill 15 Draugs.
There will be a limited number of tomte hats, as well as draugs at the location. It will not be easy to find and destroy the draugs, but if you explore all corners of this level, you will definitely come across them.
One of them is a draug warrior who will need to be awakened by solving a puzzle. See screenshot below.
There are four levers here. You need to pull them in the following order (if you haven't pulled anything before):
Lever near X.
Lever near F.
Lever near | X |.
At the beginning of the location, if you do not know that, you can go past a niche hidden by boards with a chest, inside which lies the legendary two-handed hammer "Gambantane". Its location is indicated on the map.
In the story, move to the marker, destroy the gate and kill the enemies behind the next doors. Next, you will need to make a choice which way to go. But regardless of this, you will have to go both to the cave on the shore and along the left path. If you go first by the way of Arthur, you will still stop in front of the magic gate.
Thus, talk to Mindir. Go to the indicated cave, killing enemies, and then find out that Bellatrix, according to the wizard, still loves Arthur. This love is mutual, therefore, in the event of the death of Gwinnever (aka Bellatrix), Arthur will be saddened. You need to somehow use this fact!
Return to Arthur and follow his path. After collecting all the items and destroying the ballista carts, go to the Last Arena.
Fight with Bellatrix
At the start of the fight, Bellatrix will cast a spell on Arthur. He will fight against you along with the girl. You have two options - either kill Bellatrix (Gwinnever), or attack Arthur, being careful not to hurt Bellatrix herself. You will not kill Arthur, but on his last HP, the battle will end and Gwinnever will ask for mercy.
Regardless of your choice, the storyline will continue the same way. It's just that in the first case, Arthur will be saddened by the death of Bellatrix, and in the second - because of the witchcraft magic that was imposed on him (and Bellatrix will go to your dungeon).
Quest reward:
Freya's new mascot.
Worn Crystalweave Armor.
Runa Mannas.
5900 blood.
24,000 gold.
3600 wood.
730 iron.
Chapter 10.1. Moroka with Giants - Plains of Souls
ATTENTION! In this story mission, you can find two parts of different artifacts at once, and if you were careful and collected all the others earlier, then both of these weapons can already be made. But more about everything.
You will be asked to complete three additional tasks:
Find 3 iron skulls.
Kill 30 trolls.
Destroy 7 menhirs.
As for the chests with iron skulls, we will show the location of ALL, but with one caveat: the last chest is inside the barrow, where you will need to interact with the levers. This chest is visible through a gap in the wall, but the character doesn't want to go there for some reason. Perhaps this error will be fixed by the developers later.
The first part of the artifact that you can find is the staff of the two-handed staff "Gyungnir". To find this artifact, you will need to destroy the Noble Frost Giant. After his death, the desired item will be dropped.
Note. You can now collect weapons. To do this, in the "Bag" section of your inventory, double-click on the "Gyungnir" staff. A picture of this staff should appear. If this does not happen, the game will freeze. In such cases, it is recommended to complete the mission, and collect weapons to gather in your own village.
To find another part of the artifact, namely the knob of the artifact one-handed hammer "Mjelnir", you will have to look around the barrow with levers. When you come to the pit with spikes (you will have to push the panels with the levers to make the passage further), then go to the right of it. A part of the wooden bridge stands in an upright position. Hit it to knock over the bridge and provide a passage to the chest located to the right.
Note. To collect "Mjellnir" you need to do the same. If the game freezes, then collect it after completing the quest.
The walkthrough itself is not difficult, but you will need to sweat in the barrow with levers. So, as soon as you find yourself in place, then break the wall on the left. Here, after killing enemies, pull the lever.
You will see how part of the bridge extends. The bridge is behind the wall. And on this wall there is just a weak point on which you can hit. Do so to get to the other side (this place is closer to the healing bowl).
Activate one more lever and go along the already finished bridge. At the end of the path, a third lever is waiting for you, which pushes the plates on another bridge (a spike pit, to the right of which there is a vertical bridge - it must be overturned in order to get to the chest with the artifact).
After that, go back and go right. There will be a bowl of healing. There is a weak wall below it - destroy it. Move to the right until it stops and climb up the map. On the left there will be a turn to the bridge leading to the chest with the artifact. A little higher, in the wall to the right, through the hole, you can see a chest with the last iron skull. Take it if possible (there may be a mistake when the character cannot go to the chest).
At the end of this route, find another lever and pull it.
So you will collect the second bridge over which you can continue your journey.
At the Last Arena, you will need to fight with two noble frost giants, and then pick up the runestone.
Quest reward:
Legendary accessory "Yarngreipr".
Longbow of the Van warrior.
Rune Isa.
7000 blood.
26,000 gold.
3800 wood.
780 iron.
Chapter 10.2. Union on fire
In this story quest, move forward first. It is not a mistake that the giants do not touch you. You should first chat with a Surt representative. But after talking with him, the battle will begin - now all the mobs in the location are your enemies.
Return back to the portal to kill the giants you missed earlier, which are needed for an additional quest.
So, you need to complete the following additional tasks:
Find 3 iron skulls.
Kill 20 fire giants.
Destroy 10 Troll Idols.
Unfortunately, I only managed to find 9 out of 10 idols. If you know where the tenth is, then be sure to let us know in the comments.
In the screenshot, green circles indicate troll idols, red - chests with iron skulls.
There is one caveat - 18 fire giants are located before the Last Arena. But in the Last Arena, contrary to all previous missions (where additional objectives disappeared when moving to the Arena), you will need to fight two bosses - giants. They will be counted in the assignment. We will not indicate them on the map.
Moving around the location, pay attention to the various symbols on the walls. In the screenshot above, you can see the designation - a yellow circle. He points to the location with the puzzle. In front of you is a wall and four circular toggle switches with images. You need to turn the tumblers so that they form four different symbols that you can see on the walls of this location.
If set correctly, the passage will open. You will reach a precious chest, inside which lies a legendary ring of dispersion. A very valuable and useful item!
Get to the place where the lava pit is. There are three levers on the side of it. If you did not touch anything (otherwise, load the last save), then, having numbered the three levers from bottom to top on the map from 1 to 3, click on them in the following order - second, first, second, third. A bridge should form.
After reaching the locked grate, climb the hill and pull the lever.
Kill the two fire giants and then take the Sindri Hammer.
Quest reward:
Baldr's legendary mascot.
Penetration belt.
Runa Dagaz.
7400 blood.
22,700 gold.
4100 wood.
820 iron.
Chapter 11. Battle of Karlion
In this mission, you will have to fight exclusively, but still you cannot do without additional tests:
Find 3 iron skulls.
Kill 5 Cardinals.
Kill 3 champion ettins.
At the beginning of the mission, you will destroy 3 of the 5 cardinals. After the gate opens, go through it and protect the wizard by killing another cardinal.
Returning back, you will face the Bishop of Heaven. You won't be able to kill him! All you have to do is move towards the fortress, towards the image of the head (The Last Arena). But don't be in a hurry! Climb the steps and go through the open gate. There will be several Imperials, including the Cardinal - kill him! One test completed.
Here, on the bottom right, look for the second chest with an iron skull. Go through the gate further and find the third, last chest with an iron skull, on the grass on the right (in the previous mission there was also a cart). Inside it lies the legendary crown of the All-Father.
On your way to your destination, you will also see a champion ettin. Kill him if you want to complete the quest, and then go to the Final Arena.
After the cut-scene, you will need to kill Simul. Avoid fireballs and green clouds on the battlefield. Get close to the boss and attack him. As soon as a green barrier appears on the enemy, run away and wait for him to disappear. Small goblins will periodically appear on the battlefield.
The final. The Eternal Well
Prepare carefully before embarking on this mission, as it is the last one. Remember also that as soon as you win the battle and wait until the end of the cutscene, all your progress will be half destroyed. All saves will be deleted, but at the same time your pumped character will remain.
With the start of New Game +, you will lose all collected items, but you will be able to play the character of the level where you left off.
The fight with Grimnir will consist of two stages. In the first stage, you are fighting an ordinary giant, which has a huge supply of health. Do everything the same as in the battle against his kind. Remember to get up on the orange circle periodically to keep warm.
In the second stage, Grimnir will turn into a huge, terrible monster. There is only one way to damage him in this state: from time to time, the boss sticks to the ground with his hand. Tentacles begin to creep out of the ground. You must attack these tentacles! That's the whole secret.

 Satellite map of Eurasia
 How to remove black bars on the sides of the screen: three ways to solve the problem
 Working in Unity3d: The Basics of Making Games Creating a Game Scene
 How to develop it, how to sell it and why you need it at all Indie game with a zero budget