Dragon Age: Inquisition - crafting armor and weapons. Dragon age: Origins - armor sets The best longswords in Dragon Age: Origins
In this article, I would like to note the very existence and location of unique armor sets in the game.
Kits
Ancient elven armor (+5 defense per set)
Armor in ruins in the Bressilian Forest. The armor itself is in the sarcophagus.
Helmet in the Eastern Bressilian Forest. In order to get it, you need to exchange it with the hermit. If you kill the hermit before this, you can forget about the helmet.
Gloves in the destroyed temple, following the quest with the urn.


Boots boots can be found in Lotheringa, but due to a bug, unfortunately, they may not exist.

Juggernaut Set (+3 Strength and Constitution per set)
The entire set is located in the Bressilian forest gloves, helmet and boots in the graves (when the grave is activated, undead crawl out of it). The armor is in ruins behind a closed door, which is opened through a ritual.
Armor

Helmet

Gloves

Boots

Diligence Set (+5 willpower per set)
Armor in the temple of Andraste, according to the quest with the urn. Found on the corpse of the knight in the right passage.

Gloves in Orzammar, in the Guardians' library, in a closed chest.

Boots bought in Redcliffe from a blacksmith after saving his daughter.

Legion of the Dead Set (+3 damage and constitution per set)
In dead ditches on deep paths. The helmet is on the pedestal, in the same place as the key. The remaining parts lie in sarcophagi throughout the location.
Armor

Helmet
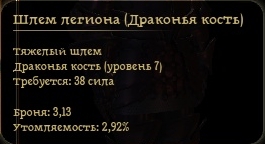
Gloves

Boots

Effort Set (-10% fatigue per set)
Armor according to the quest in the Deep Paths, it is removed from the Uterus.

Helmet in order to find this helmet, you need to go to Teig Educan with the dog. After talking to her and sending her on a quest, she will bring back the “winged helmet of the crusader.”

Gloves quest of free prospectors. Having collected all the stones, the location of their treasure will be marked on the map - in that chest there will be gloves.
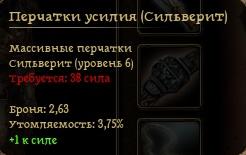
Boots can be purchased in Dusty Town.

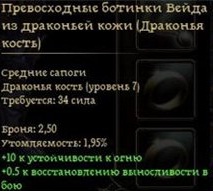
High Dragon Sets
After killing the High Dragon and receiving scales from its carcass, you can choose from Wade to make one of three types of kits:
Medium (-25% fatigue, +5 defense per set)
Armor

Gloves

Boots
Heavy (-20% fatigue, +5 defense per set)
Armor

Gloves

Boots

Massive (-15% fatigue, +5 defense per set)
Armor

Gloves

Boots

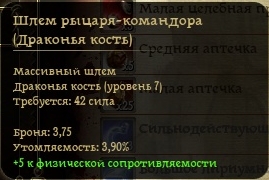
In addition, there is also a two-piece set that does not provide any bonus when worn at the same time. This:
Knight Commander Helmet it can be found in three copies: during the quest “Evil” in the Denerim Elvenage (in the last room of the shelter); in the Vault on the second floor of Redcliffe Castle; can be purchased from Cesar after completing all the Ravens' missions.
Knight Commander Armor can be bought from the marauder in front of Orzammar.

Incomplete armor
Body
Templar Armor drops from the enchanted templar in the Tower of the Circle of Mages.

Shadow of the Empire from a merchant in the Common Halls of Orzammar.

Armor of Divine Will can be purchased from Ruka in the Ortan taiga.

Villain's Attire in Wade's store (Denerim).

Avon the Great's Chainmail same with Wade.

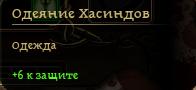
Hasind Robe given for the quest “Hasinda Way Sign”. It could also be in the Dalish store.
Witch's Robe can be purchased from Curiosities of Thedas (Denerim).

Robe of the First Sorcerer After completing the quests, Ravens can be purchased from Cesar.

Lord Master's Robe Drops from the leader of the slave traders in Denerim Elvenage.

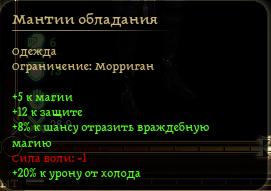
Mantle of Possession on Morrigan's quest.
Reaper Clothes in Curiosities of Thedas.

Head
Templar Helmet drops from the enchanted templar in the Tower of the Circle of Mages.

Thick Qunari Helmet Dropped by a bandit leader in Lothering.

Red's Helmet given for saving Redcliffe from the undead, if no one from the militia died.
Farsightedness Dropped by a High Dragon.

Very tight helmet Sold by Varathorn.

Helmet for two-wire drops from Jarvia. Also found in Jammer's stash.

Damage Dropped by a Garlock General during the Siege of Denerim.

Flagbearer's Helm chest in Fort Drakkon on the first floor during the siege of Denerim.

Kamenai's visor Sold by Gorim in Denerim.
Free Scout Helm dropped from Taoran in the final quest of the Blackstone Volunteers.

Griffin Helmet Gray Warden vault in Denerim.

Freedom Fighter Hood corpse on the 4th floor of the Circle of Mages Tower.

Hood with cameo drops during the quest “Five Pages Four Magicians.”

Sorcerer's Hood in a chest on the lower level of the ruins (Bressilian Forest).
There are two ways to get very good equipment almost immediately after the Haven sandbox. Eh, I’m writing this instead of a long-planned guide to crafting. Or instead of describing my adventures on the way to Cassandra's heart. But what has grown has grown. So, right off the bat, let’s move on to the first method - obtaining excellent recipes almost immediately after occupying Skyhold by investing precious inquisitorial perks.
This method is absolutely honest, but requires serious costs. You will have to spend as many as 3 inquisitorial perks - study them in the Forces branch - Mage/Rogue/Warrior Schematics. This will give us diagrams of the top weapons and armor of the 2nd tier - the blue Masterwork ones. With such equipment, even if we craft it from tier 1 materials, it is quite possible to run up to level 16. Why until the 16th? But just about this below.
In the meantime, let's talk about the disadvantages of the 1st method. The main problem is that to open the drawings we will not only have to spend as many as 3 perks, but also that before that we will have to invest 4 perks in Forces. True, by this time we will already have two Hinterland agents - Lord Berand and Clemence. But anyway, the first two will in any case have to take Massache's Method (+5% experience for killing an enemy in battle, very useful and just as the very first perk) and Underworld Knowledge (+50% experience for reading books and additional . options when talking with the "underground"). That is, no freedom of maneuver, whether you want it or not, and the first 5 perks are strictly distributed.
The second, but no less significant drawback is that these weapons and armor will faithfully serve us until level 18. And then we will have to change them to more advanced ones. On the other hand, the period from level 10 to level 18 will take at least a couple of days. But as many as 3 perks that could be used for much less peaceful purposes... In general, a brief description of the 1st method is over as a class.
Hissing Wastes - Tomb of Fairel
 Let's continue, so to speak, from afar. There is such a location Hissing Wastes, on the strategic map looks like Stop Venatori Activity in the West, opening it costs 20 Power. There we are guaranteed to find the best schemes for military and thieves' weapons - the blue ones of the 3rd tier. And, in addition to this, if we come there at level 16+, we will not only be able to find these schemes, but also simply farm countless resources of the 3rd tier - on rifts and just monsters.
 In addition, the merchant in the canyon sells the best simple (not rare) designs for armor, bracers and leggings for all classes (by the way, according to rumors, if you take the Short List perk, then blue versions of these armor will also appear on sale, but I only got one). It will be worth all the money you earn by level 16, or even more. But believe me, they are really worth it. However, it was a saying, I’m actually starting to tell tales.
We smoothly move on to the second method, which is not entirely honest, however, does not violate any in-game laws. You can come to Hissing Wastes immediately after it opens. And it’s quite possible to accumulate 20 Power by level 8, even without going through the completely sandy Hinterlands. The question is, what should characters who have not yet shaken the Hinterland sand off their feet do in the High Level location? Here's what:
Get schematics for the best weapons
- Get several unique rings (for example +10% Attack), if desired - an unlimited number of them
- Dig up as much as you have patience for, Nevarrite and Volcanic Aurum (tier 3 metals)
- And also pick all sorts of herbs, which, however, we won’t really need for now
Here are the characteristics of the weapon schematics (they are actually the best in the game):
Serpent's Rage- one-handed axe. Damage 204/276, slots: Damage: 17 Metal, Offense: 6 Metal, Utility: 4 Metal, Offense: 4 Metal. Found in a tomb northeast of Statue Camp. In total, 31 metals are needed for crafting; in additional slots, Everite (+ to attack) or Nevarite (chance to stun on impact) is desirable.
Serrated Greatsword- two-handed helmet sword. Damage 215/289, slots: Damage: 22 Metal, Utility 8 Metal, Utility 6 Metal, Offense: 6 Metal. Found in a tomb in the canyon. In total, crafting requires 42 metals.
Dual Curved Blade- a dagger, hits the area. Damage 251/341, slots: Damage 11 Metal, Utility 5 Leather, Utility 3 Leather, Utility 3 Leather. Found in a tomb in the southwest of the map (Burial Grounds). To craft a pair of daggers, you only need 22 metals, absolutely any metal.
Spiked Longbow- onion. Damage 128/172, slots: Damage: 22 Metal, Utility: 8 Leather, Offense: 6 Leather, Offense: 6 Cloth. Found in a tomb near Sand Crags Camp. Also, 22 metals for crafting.
Unfortunately, there is no diagram of a magic staff, but if the magician in your glorious team is engaged in support and control, then this is absolutely insignificant at this stage. Well, unfortunately, there is no point in giving the characteristics of the Legion of the Dead armor. Firstly, it is only suitable in one case - if there is a dwarf warrior in the party. Considering that the only gnome is the mafioso Varric (who is by no means a warrior), we can only assume that this armor is intended exclusively for your GPG gnome. By the way, secondly, neither bracers nor leggings can be added to this armor.
In addition to the patterns, we will find the following jewelry:
- Superb Ring of Attack (+10%)
- Superb Ring of Critical Damage (+20%)
- Superb Ring of Guard Penetration (+20%)
- Superb Ring of Bleeding (+10%)
- Superb Belt of Melee Defense (+10%)
What does it take to get all this wealth at (ridiculously) levels 8-10? But just a thief with the Stealth skill (preferably upgraded), and a fast horse (and not the original nag). We will go around all opponents, taking advantage of our speed advantage. And where it’s impossible to go around, our valiant thief will sneak in. So, let's go to the next post, otherwise this one has already grown.
Like any self-respecting modern RPG, Dragon Age: Inquisition also includes crafting armor and weapons. Unlike the first part, here crafting is not limited to inserting runes - now we are given the opportunity to create a thing from scratch, choosing the appearance, type, material, which gives the necessary bonuses and improvements. Although the runes also remain, where would we be without them? In general, in my humble opinion, crafting is done dullly and not interesting, like everything else in this sad game, there are a lot of opportunities, but running around collecting all this junk is not very fun.
Sketches of weapons and armor
At the very beginning, to create items, upgrades or runes, you will need sketches of these same items, upgrades and runes. Where can I get them? In chests, from merchants, missions at headquarters, sometimes even from bosses. Sketches are displayed in the list of items available for crafting; they can be used as much as you like and, best of all, they do not take up space in your inventory.
There are only 3 levels of sketches in the game. The higher it is, the more cells there will be in the item, the better quality and with more bonuses it will be possible to create the item. Level 1 sketches require the presence of 2 cells, level 2 - 3 cells, level 3 sketches - 4 cells.
The crafting system here is logical - heavy armor will require a large amount of metal, a little less leather and rarely will you need fabric, but for a mage's robe it's the opposite. For swords and weapon hilts, you need a base, as well as a leather or fabric braid and the like.
There are 4 types of cells in total: the main one, which determines the basic parameters, and three additional ones, the set of which may vary depending on the sketch. Namely:
Damage— the main cell for weapons, determines damage per second depending on the material, as well as the type of elemental attack of the staff.
Attack— an additional slot for weapons and weapon upgrades. Depending on the material, it adds bonuses to attack types or the likelihood of imposing status effects on the enemy.
Armor— the main cell for armor, determines the level of armor depending on the material and protection from physical damage in melee.
Protection- additional slot for armor and armor upgrades. Depending on the material, it adds resistance bonuses from elemental, ranged and magical attacks, as well as the likelihood of retaliatory bleeding or additional health.
Support— an additional cell for all types of items. Depending on the material, it adds stat points (dexterity, magic, etc.).
For upgrades of any level, only two additional slots are always available; upgrades can only add bonuses and/or stat points, but not damage or armor level (the exception is Bianca).
Types of improvements and crafting
Armor
There are 3 types of armor available for crafting (light, medium and heavy), as well as helmets of each of the three types. For almost all types of armor, two upgrade slots are available: bracers and leggings (the exception is special armor like the Elven Guardian Robe or the armor of the Legion of the Dead). Improvements are created separately, but according to a similar principle.
Sometimes ready-made improvements can be found in chests or received as a reward for completing a mission at headquarters. Improvements can also be removed from dropped items and placed on others.
Weapon
In Dragon Age: Inquisition there are even more types of weapons than armor, and with improvements they are not so simple.
|
Weapon type |
Slots |
Name |
|
One-handed - swords |
Long sword hilt |
|
|
One-handed – maces, hammers, axes |
One-handed handle (shaft) |
|
|
Two-handed - great swords |
Great Sword Hilt Great Sword Head |
|
|
Two-handed – large axes and hammers |
Two-handed handle (shaft)Pommel |
|
|
Magic staves |
Staff tipStaff hilt |
|
|
Daggers/daggers |
Dagger hilt/Handles for dual blades |
|
|
Bow handle |
Separately, it is worth mentioning Bianca, since the weapon is unique. You can increase damage control and characteristics only with the help of improvements. Bianca has 3 upgrade slots available - Shoulders, Sight, Handle. The main cell is available for the shoulders, which increases damage control, there is also one support cell for the handle, and one attack cell is available for the sight. Although when I completed the game somewhere in the middle, Bianca was many times worse than mediocre bows...
Crafting materials
To create weapons and armor in the game there are 3 types of materials: metal, leather and fabric, in turn they are further divided into 3 levels. The higher the material level, the higher the armor level or bonus indicator. The type of armor also varies depending on the material.
Metal
Metal is found using the search button (or a keen eye) in caves and on mountain slopes in the form of small clusters of several types of each per location. In the Emerald Graves in the Argon Shack you can buy Perfect Chandelier, obsidian and pyrophyte, and Sero Colored Glass is sold in Skyhold from a merchant from Orlais.
Level 1 metals
Level 2 metals

Level 3 metals

Leather
Leather is obtained from killed animals of a certain species. You can buy almost all types of level 1 leather from the merchant in the Hinterlands (Crossroads), and in the Dalish camp in the Sacred Plains you can buy needleback leather, phoenix scales and ram leather.
Level 1 skins

Level 2 skins

Level 3 skins

Fabrics
Fabrics drop from slain enemies. Silk, semi-velvet and cotton can be bought in Val Royeaux.
Level 1 fabrics

Level 2 fabrics
Excellent things
You will have the opportunity to create excellent things in Skyhold after inviting the enchantress (mission at headquarters). When creating an item, a separate slot for an excellent item appears, right above the main one. Ordinary materials will not work here. For an excellent item, you need metals, leathers or fabrics touched by the Shadow that come across randomly during collection, as well as special finds like a dragon tooth or iron bark. Only one unit of such material can be inserted into a cell, but filling it is not required.
Special materials provide a short-term ability, such as Walking Fortress, Unbreakable or Shadow Cloak, a chance to gain a bonus to focus accumulation or heal up to 15% of health on a killing blow. Possible bonuses are generated randomly, and there are many of them.
Dragon Age: Inquisition - crafting armor and weapons was last modified: May 5, 2015 by admin
The choice of weapons and items in Dragon Age: Origins is very large, despite the lack of the usual crafting system. It is successfully replaced by ready-made sets of armor and one-piece weapons. Among ordinary things, sometimes there are unique ones, which most often have enhanced characteristics. Separate pages in the Code are devoted to the stories of their occurrence. Weapons and armor are sold from merchants in various parts of the world - Denerim, Orzammar, Lake Calenhad and Brecilian. The cost of things varies depending on the value. The most valuable specimens can cost several dozen gold coins, but all costs are more than recouped. High-quality weapons with special effects allow you to resist strong opponents.
Weapons can be stored in a chest on Soldier's Peak after installing and completing Guardian Fortress. Over time, an understanding comes of which weapons deserve attention and which are just ordinary trash that can be used for the time being, for lack of a better one. Each character in the squad is allowed to have two sets of weapons - the main one and the spare one. The set is selected by pressing the [/] key.
The best longswords in Dragon Age: Origins:
- Oath Keeper(strength: 15; damage: 8.40; +1.5 to armor penetration, +10% to received healing effects, 1 slot for runes) - for completing all tasks from the notice board in Lothering.
- Power of Asturian(damage: 8.40; +2 to damage, weakening of the creatures of darkness, +1 to armor penetration, 1 slot for runes) - Gray Guardians of Asturian.
- Green Blade(strength: 19; damage: 9.10; +10 to resistance to the forces of nature, +6 to damage against animals, 1 slot for runes) - the key to the chest on the second floor is with Bevin (the boy from the closet in Caitlin’s house in Redcliffe ). High levels of the “Influence” skill will help convince.
- Saw sword(strength: 19; damage: 9.10; +1 to damage, +1% to the chance of a critical strike in melee) - in the sarcophagus in front of the entrance to the hall of the Mistress of the Forest in the lair of werewolves in the ruins of Eastern Brecilian.
- Duncan's sword(damage: 9.60, +3 to willpower, +3 to cunning, +2 to restore stamina in battle, +4 to damage against creatures of darkness, 2 slots for runes) - a rebel ogre on the battlefield from the “Return” add-on to Ostagar."
- Maric's Blade(damage: 9.80, +0.75 to restore health and stamina in battle, +6 to damage against creatures of darkness, weakening of creatures of darkness, 2 slots for runes) - Kaylan’s chest in the royal enclave from the Return to Ostagar add-on.
- Spellweaver(battle mage, damage: 10.50; +5 to magic, +1 to mana recovery in battle, +10% to the chance to reflect hostile magic, +3 damage from electricity, 2 slots for runes) - sectarian overseer in a large northern hall in the caves of the cultists on the way to the Sacred Urn of Andraste.
- Imperial Blade(strength: 27, damage: 10.50; +2 to damage, +3% to the chance of a critical strike in melee, +6 to attack) - a small room in the Tevinter warehouse in the Elvenage after meeting with Denera.
- Overlander's Honor(strength: 31; damage: 11.20; +20 to resistance to spirit magic, +6 to damage against the dead, 3 slots for runes) - on the Deep Paths.
- Slashing Blade(strength: 31; damage: 11.20; +2 to armor penetration, +6 to attack, +3 cold damage, 3 slots for runes) - dead adventurers.
- Starfang(strength: 31; damage: 11.90; +3 to agility, +3 to damage, +2.5 to armor penetration, 3 slots for runes) - from the blacksmith Mikael Dryden from Soldier's Peak.
Best Shields in Dragon Age: Origins:
- Havard's Shield(strength: 22, defense: 4.00, fatigue: 3.36%, deflection of arrows and projectiles: 4.50%, +4% chance to reflect enemy magic, chance to dodge projectiles) - ogre on top of Ishala Tower .
- Kaylan's Shield(strength: 32, defense: 4.00, +1 to armor, chance to dodge projectiles) - a garlock from the front line behind the kennel from the Return to Ostagar add-on.
- Shield of Eamon(strength: 22; defense: 4.00; +6 to defense, +25 to endurance) - chest, storage on the top floor of Redcliffe Castle.
- Shield of Redcliffe's Chosen Warriors(strength: 32; defense: 4.00; +1 to willpower, +3 to defense, +15 to electrical resistance, +2 to attack) - for saving Earl Eamon.
- Shadow Wall(strength: 38; defense: 6.00; +3 to defense, +20% to received healing effects, +1 to recovery of stamina in battle, +25 to stamina) - after solving the mystery of the adventurers.
- Shield of Hou(strength: 38; defense: 6.00; +12 to defense, +10 to resistance to fire and cold, -2 to willpower) - chest, treasury in the estate of Earl Denerim before descending into the dungeon.
- Portable bastion(strength: 36; defense: 6.00; +1 to strength, agility and constitution) - Bodan Feddik in the main camp of the detachment.
- Duncan's Shield(strength: 38; defense: 6.00; +3 to willpower; +6 to defense, +1 to recovery of stamina in battle) - a secret vault of the Gray Guardians inside the trading warehouse behind the Curiosities of Thedas store in Denerim. Riordan tells how to get inside in Earl Eamon's room before, if you show him the Gray Warden documents found during the liberation of Queen Anora from the estate of Earl Denerim.
Best greatswords/greatswords in Dragon Age: Origins:
- Flat sword Hasind(strength: 20; damage: 12.10; +1% to melee critical strike chance, +1 to armor penetration) - chest, south central island with wolves behind the destroyed arches, on the side of the temple dome in the Korcari Wilds.
- Stan's sword(strength: 22; damage: 13.20; +1 to willpower; +1.5 to armor penetration, +12 to attack, 1 slot for runes) - after completing.
- Yusaris(strength: 34; damage: 16.50; +20 to fire resistance, +10 to damage against dragons, 2 slots for runes) - after defeating the Circle of Mages in the tower on Lake Calenhad.
- Sword of Summer(strength: 34; damage: 16.50; +20 to physical resistance, chance to knock the target down, 2 slots for runes) - Mrs. Coutren at the exit from the estate of Earl Denerim or in front of the Assembly of Lands hall.
- Ageless(strength: 34; damage: 16.50; +4 damage against darkspawn, +0.25 to stamina recovery in battle, weakening darkspawn, bloody mess, increased hostility and intimidation indicators) - solve the puzzle with the Throne of Orzammar in Orzammar royal palace. To do this, we approach the throne, activate it, a new entry “Locked in Stone” will appear in the Codex. We send two companions to the southwestern part of the room, stand on two tiles in the form of arrows near the wall, a characteristic sound (grinding) should be heard. We send the fourth companion into the hallway and stand on the round floor plate. Then we activate the throne with the main character. The satellites must remain in their places. Lightning will flash in the hall and a dragon will appear. We kill him and take the sword.
- Starfang(strength: 38; damage: 18.70; +3 to strength, +2.5 to armor penetration, +8 to attack, 3 slots for runes) - from the blacksmith Mikael Dryden from Soldier's Peak.
The best hammers, axes, maces and axes in Dragon Age: Origins:
- Clumsy verse(strength: 27; damage: 9.00; +2 to damage, happy, +10% to the chance of a critical hit or backstab, +4 to damage against dragons, 2 slots for runes) - pull out of a stump in the “Strange” location forest" during a chance encounter while moving across the global map to the Brecilian forest after eliminating D. by order of K. The advertisement is taken from an innkeeper with connections in "The Bitten Nobleman of Denerim."
- Ax of Temperance(damage: 9.00; +1.5 to armor penetration, +15% to the chance of a critical hit or backstab, 2 slots for runes) - Earl Rendon Howe in the dungeon of Earl Denerim’s estate.
- Wesiall(strength: 31; damage: 9.60; +2 to strength, +5% to the chance of a critical hit in melee, +1 to restore stamina in battle, +10% to the chance of a critical hit or backstab, + 2 damage from nature forces, 3 slots for runes) - Bodan Feddik in the main camp of the squad.
- Forge Master's Hammer(strength: 32; damage: 12.60; +25 fire resistance, +6 attack, 2 slots for runes) - genlock master of the anvil in the Dead Moats.
- Sacred Hammer(strength: 34; damage: 13.50; +2 to willpower, +10 to psychic resistance, +4 to damage against the dead, 2 slots for runes) - a vault in the southern wing of Banna Franderel’s estate in Denerim. .
- Triana Hammer(strength: 34; damage: 13.50; +4 damage against creatures of darkness, 2 slots for runes) - Belen, for his support during the resolution of the issue of the throne of Orzammar.
- Ax of Vaskhot(strength: 32; damage: 14.00; +1 to strength and damage, +2 to willpower, 2 slots for runes) - harlock general in the Trade Quarter of Denerim captured by the creatures of darkness.
- Hasinda Crusher(strength: 38; damage: 14.40; +3% to the chance of a critical strike in melee, -5 to attack) - sold by Farin at Frosty Pass in front of the doors of Orzammar.
- Great Hasindian Mace(strength: 38; damage: 14.40; +5 damage, +2.5 armor penetration, +0.5 stamina recovery in battle, +75 stamina, 3 slots for runes) - sold by Gorim from Denerim shopping district.
The best bows and crossbows in Dragon Age: Origins:
- Fox bow(agility: 26; damage: 7.50; chance of dodging projectiles) - weapon rack, storage on the top floor of Redcliffe Castle.
- New moon(agility: 30; damage: 8.00; +2 to willpower, +10 to resistance to the forces of nature, +1.5 to armor penetration) - Varathorn from the Dalish elf camp in the Brecilian forest.
- Wolfboy(damage: 8.40; +4 damage against the dead, +8 damage against beasts) - Varathorn from the Dalish elf camp in the Brecilian forest after delivering the iron bark.
- Spear thrower(agility: 30; damage: 9.00; fast aiming, +2.5 to armor penetration) - genlock master of the anvil in the Dead Moats.
- Golden Sun Bow(agility: 30; damage: 9.00; +4 to attack) - elf Denera, assistant to the slave trader Caladrius, in the Tevinter warehouse in the elfage of Denerim.
- Falon'Dina's Grip(damage: 9.60, +2 damage, fast aiming) - dragon treasure, upper level of elven ruins in Eastern Brecilian.
- Magician's Eye(agility: 34; damage: 9.60; +3% to the chance of a critical strike at a distance, +4 to attack) - chest, village shop in the village of Shelter.
- Bow Marjolaine(agility: 34; damage: 9.60; +3 to cunning and damage, fast aiming) - chest, Marjolaine's house in the Denerim Trade Quarter after the start.
- Antique Guardian Crossbow(strength: 14, damage: 9.60, armor penetration: 7.00, range: 44, +1 damage, fast aiming) - reconnaissance commander of the guards from Soldier's Peak from the Guardian Fortress add-on.
- Crossbow with improved grip(strength: 26; damage: 12.00; +1.5 to armor penetration, +4 to attack) - for completing orders from the Ravens from Master Ignacio in the “Bitten Nobleman” tavern in the Trade Quarter of Denerim.
The best daggers in Dragon Age: Origins:
- Olaf's Exceptional Cheese Knife(agility: 24; damage: 5.60; +1 to armor penetration, 2 slots for runes) - Olaf’s locked chest in the village of Honnlith, the key is on the corpse next to Sheila.
- Duncan's dagger(agility: 24, damage: 5.60, +4 to agility, +10% to the chance of a critical hit or backstab, +10 to damage against dragons, 2 slots for runes) - a rebel ogre on the battlefield from the add-on “ Return to Ostagar."
- Beastman Dagger(damage: 5.60; +10% to the chance of a critical hit or backstab, 2 slots for runes) - the fourth floor of the tower of the Circle of Mages.
- Extinct Thaig Shanker(agility: 26; damage: 6.00; +5 to cunning, +0.5 to armor penetration, +6 to attack, interrupts spells, 2 slots for runes) - a broken chest on the site with the ogre leader in the Kadash taiga from additions "Stone Prisoner".
- Thorn of the Dead Gods(agility: 26; damage: 6.00; +3 to damage and armor penetration, 2 slots for runes) - after being at the Caridin Crossroads.
- Gift of the Grays(agility: 26; damage: 6.00; +5% to the chance of a critical strike in melee, 2 slots for runes) - Valendrian after rescuing the slave trader Caladrius from captivity in the elfage of Denerim.
- Raven Dagger(agility: 30; damage: 6.40; +15% to the chance of a critical hit or backstab) - Godwin from the second floor of the Circle of Mages after delivering a parcel of lyrium from Rogek from the Dust City in Orzammar (you need to ask for the amount of 75 gold for the goods ).
- rose thorn(agility: 30; damage: 6.40; +2 to agility, +1 to health recovery in combat, +3 to damage, +5% to the chance of a critical hit in melee, +30% to the chance of a critical hit or hit in back, 3 slots for runes) - sold by Garin from the Common Halls of Orzammar.
The best staves in Dragon Age: Origins:
- Harrowmont's Staff(magic: 20; damage: 4.80; +1 to magic, +2 to constitution) - Harrowmont, for the support provided during the resolution of the issue of the throne of Orzammar.
- Sylvan's Mercy(magic: 24; damage: 5.20; +5 to resistance to the forces of nature, +1 to magical power, +10% to damage from the forces of nature) - Bodan Feddik in the main camp of the detachment.
- Vicious Staff(magic: 24; damage: 5.20; +1 to mana recovery in battle, +5 to magical power, -1 to willpower, +10% to damage from spiritual magic and electricity) - garlock general in captured by the creatures of darkness Elvenage Denerim.
- Oak Branch(damage: 5.20; +1 to magic, +2 to constitution, +10% to nature damage) - Great Oak from Western Brecilian for returning the acorn.
- A piece of wood(magic: 24; damage: 5.20; +1 to constitution, +10 to resistance to the forces of nature) - Varathorn from the Dalish elf camp in the Brecilian forest. Give the order to the mabari to look for something useful.
- The last argument(magic: 32; damage: 6.00; +3 damage, +10 magical power, +15% fire damage) - Bodan Feddik in the main camp of the squad.
- Breath of winter(magic: 36; damage: 6.40; distance: 58, magic power: 7; +25 to cold resistance, +15% to cold damage) - a frantic demon from the second floor of the Guardians' fortress on Soldier's Peak.
- Lord Magister's Staff(magic: 36; damage: 6.40; +6 to willpower and magical power, +2 to mana recovery in battle, +10% to damage from fire and spiritual magic) - sold by the quartermaster from the tower of the Circle of Mages on the lake Calenhad.
The best accessories in Dragon Age: Origins:
- Belt " Blessing of Andruil"(+2 to all characteristics, +20 to resistance to the forces of nature, +1 to restoration of mana and stamina in battle, +10 to physical resistance) - sold by the quartermaster from the tower of the Circle of Mages on Lake Calenhad.
- Ring " Zhivitel"(+10 to constitution, +3 to health restoration in combat and armor, +10 to health restoration outside of combat, +20% to received healing effects) - sold by Garin from the Common Halls of Orzammar.
- Ring " Key to the city"(+2 to all characteristics, +4% to the chance to repel hostile magic, +10% to received healing effects) - Council in the Diamond Halls, after finding five Codex entries in the residential areas of Orzammar.

 Didactic games on the topic “Garden and vegetable garden
 Consultation for parents “The role of role-playing games in the life of a preschooler Consultations for parents role-playing games at an early age
 Game, types of games, educational and methodological material on the topic Contents and types of games
 Wrath of Ashardalon Dnd tabletop role-playing game