Divinity original sin 2 tomb of lucian walkthrough. Divinity: Original Sin. Walkthrough of the game (3). School in Arks
When playing Original Sin 2, you are guaranteed to encounter a lot of different problems. No, not of a technical nature - I'm talking about all sorts of puzzles, confusing situations and the like. To solve them, you will need to use certain knowledge gained in the game, ingenuity - or simply look at our list of the most asked questions.
We tried to collect as many questions as possible (and answer them), but if you suddenly have something else to ask, feel free to write in the comments. We will try to answer everything!
BEWARE OF SPOILERS!
I saw how some players took the second level immediately upon arriving at the Eye of the Reaper, but I don’t have enough experience. What is the problem?
It's simple. Before you enter the cabin with Windego, hit one of the masters a couple of times. As soon as they rush at you (and everyone will become hostile), open the door and go inside. After a dialogue with Windego, she will destroy the ship, and at the same time kill all the masters. You will get a lot of experience points - because they were with you in battle. Now you should have enough experience to take the second level upon arrival on the island.

I’m trying to get “Retribution” (we already know what this thing is), but Dallis and her gop team are constantly killing me. Any advice on this?
First, complete the task of Master Arinika first - otherwise you will have to kill her, and you will fail the quest. Now look. You have two options - you can act relatively honestly, or you can cheat. If you want to fight, then barricade yourself at the top of the wall, armed with a couple of teleportation spells (gloves and a spell bought from Gavin will do). Shoot opponents from above, and sometimes teleport away from the wall the Geists and Alexander who made their way there. If this doesn’t work out, try runʼnʼgun tactics - fire at the enemy, move with “Tactical withdrawal” or any similar skill, and so on until victory. True, it will take a lot of time.
The second method is relatively easy, but to perform it you will need to start a new game. The fact is that on the ship where you are sailing, there is a room with barrels containing the fog of death. You can only pick up barrels if you have 14 strength or pumped up telekinesis, plus everything needs to be done very quickly. Having opened the door to the room, immediately run and pick up the barrels, and then try to run away from the recess in the floor - otherwise you will die from the fog. The easiest way to do this is either by going through the game in co-op (then your partner can resurrect you), or by playing as the undead - representatives of this race don’t care about the fog. After this, all that remains is to carry the barrel to the gate, go around Dallis’ group from the rear, and place the barrel behind Alexander’s back. Then blow it up and watch the cut-scene.
Keep in mind that you shouldn’t leave a barrel somewhere near the gate “for later” - you risk simply not finding it. Well, keep in mind that there is not much fog in the barrel, and it will not cope with all the enemies at the gate. By the way, the fog does not disappear, so be careful when running around the location.
If you manage to do everything right, and if you took the second level on the ship, then by the end of this battle you will easily get the fourth level.

Where can I purchase skill books in Fort Joy? I couldn’t find any books from school X, but that’s exactly what I need!
Some of the NPCs with books you could accidentally kill, some of them leave after completing quests. The rest remain to trade one way or another. Here is a list of people you need:
- Warfare: Kalias, a lizard in the Saykhella cave, in the south Hunting skill: Penka, the girl who stands on the balcony above Griff's kitchen.* Assassin's art: Hilda, a merchant girl who walks around Griff's kitchen. Pyrokinetics: Stingtail, a lizard in the south, to the left of Saykhella's cave. Hydrosophistics: Redzik, a blue lizard who walks near Griff's kitchen. On the left on the map. Aeroturgy: Gavin, the magician who gives you the Teleport quest. You shouldn't complete it until you buy all the books you need. Geomancy: Maol, an elf who roams the southern coast. Polymorphy: Dr. Leste, at the entrance to Saykhella's cave, in the south Summoning: Nebora, the blacksmith Necromancy: Mona, a sick woman in a tent in the east of the camp
Where can I find a Fain mask and face cutter to create my own?
Litzerez - from the master in the torture chamber of the fort (later in the game you can find several more). Mask - from the sorceress Windego, after leaving the fort to the left, along the sandy beach. The Fein mask can only be worn instead of a helmet.
Found X pieces from Brakk's set, where can I find the rest?
In a dungeon on Blood Moon Island, my fellow party member became possessed by a demon. How can I help him?
A club to the back of the head. As soon as a fellow party member dies, the demon will crawl out of his body and the scoundrel can be destroyed. If you don’t want someone to be possessed by a demon, make sure that “Blessing” is cast on you during the battle.
I should immediately note that it is not known how to expel a demon from a girl who can be found in a dungeon.
On the Nameless Island, I received a task by talking to a piece of black mirror. The task says to kill Alexander. Is there any point in doing this?
Alexander's death will result in you being able to give his head to White-Face. Thanks to this, you will not have to fight with members of the Black Circle in that cave, plus you will be able to change character tags (once and only for one hero, keep in mind).
I can't turn on the columns for the entrance to the Academy correctly. How do I get there?
The correct combination of columns can be obtained in two ways - by talking with Alexander after you kill White-Faced, or by finding them out yourself by passing tests at the seven altars that are scattered around the island. The order is:
- Column of people: sun (Ralik) Column of elves: moon (Tir-Tsindelius) Column of dwarves: moon (Dune) Column of orcs: sun (Vrogir) Column of imps: moon (Zantezza) Column of magicians: moon (Amadia) Column of lizards: sun (Zorl -Stissa)
After this, place the phase capacitor (you can pick it up from the body of the inactive construct at the altar of imps) on the stand by the door and hit it with lightning. The way will be open. If you are too lazy to bother with the columns, go to the very south and use teleportation spells to reach the camp there. Climb up from the camp, dig up a cache there - and you will find yourself at the Academy via a different route. There is even an achievement for this.
The bird spirit in front of the arena says I should be the champion. Champion of what?
The two previous arenas are in Driftwood and Fort Joy. But in general this is not necessary.

I reached Arx. I saw a kraken in the port here - will it be a difficult fight?
The fight will not be easy, but not soon. The Kraken will not appear in Arks itself, so relax.
I found the embassy of the Ancient Lizard Empire, it is burning, and there are endlessly reborn skeletons burning. What should I do with them, not run back and forth?
Why not run? But in general, the clue is contained in the name of these skeletons - they are cursed. So set fire/wet/oil the ground underneath them and then cast Blessing on the area. After this, the skeletons can be defeated. There aren't many of them here, so don't worry about wasting Origin points.
There is an attic in Lord Kemm's mansion - but how do you get there?
There is a vase in the lord's room on the second floor. Move it aside and you get an extended ladder leading to the attic.
How to find Kemm's hiding place? I was told about it in several tasks at once, but I didn’t find any basement here.
The cache is not in the house, but in the gardens - right in the middle of a small pond, near the portal. Find a lever next to the water pump (you need to have a certain amount of perception to see it), use it to release the water. The cache is open, you can search it. Don't forget to pick up the scroll, the painting (on the left side of the vault, if you look up from the entrance) and the cup (on the right).
There are evil guards in the hiding place, they hit you painfully, and even recover. What should I do?
After killing the guardian statue, use Source Draw on it.

There are two paintings here, and between them there is clearly room for a third. I use “Ghost Vision” - I see the ghost of the painting. And where to look for its physical embodiment?
The painting is located in the Arx sewers, in the hideout of child thieves. You can get there from a room filled with boxes with the fog of death - look closely at the map and don’t miss it. In the shelter, persuade the main one from the children, then buy (or steal, if there is no money) the painting, and return it to its place. A passage further will open.
I can't walk the Path of Blood in the Cathedral of Lucian - the statue constantly says that I am not worthy to go into the crypt of the Divine. What should I do?
There are two options. The first is to hire a completely new companion, bring him to the statue, and it will let you through. The fact is that the character should not have a single theft or murder. If for some reason you cannot take a new character into the group, you can do differently. Go to the house of the toy merchant Zanders on Arx Square and talk to him. After mentioning the Path of Blood, convince him to give you the amulet.
The amulet will need to be charged with the power of the Source - for this you will need a secret passage to Lord Kemm's vault (you need the hall where Arhu was), where you can find the fountain of the Source. After charging the amulet, return to Zanders and convince him again. He will tell you about the Scroll of Atonement - go to the second floor of the house, find the storage table there and write the password “Hydra” on the paper. After taking the scroll, go to the Cathedral. Having reached the statue, turn left - there will be a recess in the column near the wall. Place the scroll and amulet there, and next to you, in the pool of blood, the door to Lucian's tomb will open.
How to solve the pipe puzzle in Lucian's Tomb?
First, arrange the pipes as shown in the screenshot below. Then, before starting the stream, cast "Blood Rain" on the grate next to you, and when the blood flows down - "Blessing". Then start the threads and wait until they arrive:

Okay, the pipes have been passed. And what to do with the levers in Lucian’s tomb, further in the story?
You need to make words from the first letters of the levers in order to move on. Make a mistake and you will die. The word that needs to be “made up” of levers in the English version is “power”, in Russian it is “right”. Accordingly, if you play in English, then you need the following levers: “Potency”, “Order”, “Wisdom”, “Empathy” and “Righteousness”. If you play in Russian, then choose the levers “Directness”, “Decision”, “Authority”, “Will” and “Courage”. You can enable them in any order.
After character creation, you will awaken on a ship as a prisoner. You, like many other wizards, were sent to Fort Joy for “cure” due to the fact that you are dangerous both to others and to yourself. A certain witch deliberately used the power of the Source in the city so that she would be caught and imprisoned with you, and now the intrigue continues.

You will find a collar on you that blocks the power of the Source. Talk to the warden to find out about the murder that took place in one of the cabins. Next, go to the crime scene and talk to the master. It turns out that someone managed to throw off the collar and then finished off a wizard from your brethren.
After that, go further into the ship and talk with other NPCs. Some of them (specifically, five people, if you also play as a hero with a backstory) are the most interesting, since in the future they can become your companions.
Get to the opposite side of the lower deck to start a dialogue in which the same witch from the prologue (she was the one who managed to remove the collar and commit the murder) will summon a kraken-like creature, knock you out and disappear.

When you wake up, you will see that most of the masters have died. Examine future companions who have fallen unconscious, and then rise higher. On the new floor, visit the lower room, the key to which hangs on the right in the corner (hold Alt to highlight objects), and go inside. Negotiate with the masters there or kill them, then leave the room. Finally, visit the small room in the corner where Fane sits.
This is one of the companions that you may have noticed earlier in the form of an elf. The undead will refuse to come with you, so get out to the upper deck on your own.
Outside you will see a summoned monster destroying the ship. Kill the fiends, and then run to the opposite side, where the lifeboat is located. You can drop her right away, or tell her to wait for you and then return for potential companions. If you save them, you will improve your relationship with them (they will survive in any case).
After the battle with the fiends, return to the boat. Unfortunately, due to the delay, you will not have time to get out, but this will not affect anything, since the ship will sink anyway.
Fort Joy
Coast
After the shipwreck you will wake up on the shore. Go forward and talk to Baby Tom at the statue, which is a fast travel point. To use the teleport, simply open the menu and select the altars.
Now you won't be able to teleport anywhere, so continue on your way. You will soon discover the Red Prince - one of the possible companions that you can take into your group. That's exactly what we did.

Next you will come across a black cat that will follow you. If you have the “Animal Friend” perk, then you can talk with him, but the cat won’t tell you anything interesting and will follow you anyway. Make sure he doesn't die if you want to get the Summon Companion spell.
Climb onto the broken bridge, where you can pick up a shovel and a sleeping bag. The first will make it possible to dig holes (in the absence of a shovel, a lizard can do the same), the second will allow you to restore health and armor outside of combat.
Walk forward, staying close to the thicket, until you come across a cave. The entrance will be hidden by vegetation, so keep your eyes open. Once inside, you will be taken to the Secret Alcove area, where Fain will be waiting for you.
Recruit him if you want and then get to the end of this area where there is a waterfall with a chest. To pick up the last one, you need teleportation magic (put a mark on the map near the chest so you don’t forget about it and come back here in the future). Here, on the beach, deal with three turtles.
Ghetto
There are a lot of tasks directly in the city. You can talk to all NPCs, but only a quarter will be able to tell you something interesting.
First, turn right, where you can hear a woman crying. Here you will receive the task “Mother's Worst Dream”. The woman Terah cannot find her daughter Erma, and no one, they say, wants to help her. A person standing nearby will tell you that little Jet has died. Tell Farrah about this to complete the quest.

After that, go up the stairs and approach Griff's mercenaries. Two gnomes playing cards will invite you to join - agree. If you lose, you can lose all your items. True, you can also tell the cheaters that you have nothing, and then they will not touch you.
The "Extortion" quest can be obtained to the left of the entrance. Resolve the conflict between the elf and the man, among whom is another possible companion: Ifan. Accept him into the group or refuse his services, and then follow the elf if you decide to help her, or continue on your way.
Get to the city center where the kitchen is located. Here the head of the mercenaries, Griff, will tell you about the loss of his goods and point out the thief who is sitting in a cage. The thief will be an innocent elf named Amiro, who will ask you to rescue him.
Below the fortress you will come across a fishermen's camp where Stingtail sleeps. The Lizard is a soothsayer required by the Red Prince on his personal mission, which you should already know about if you accepted him into the group and talked to him. Nearby is Sybil, another potential partner, who, in turn, wants to finish off Stingtail.
If you accept both companions into the group, you will have to decide which side to take. You can also talk to Stingtail in the presence of the Prince, and only then include Sybil in the party and complete her task.

Before killing the lizard with Sibylla, inspect the nearest box where the smell of oranges remains. Tell the lizard off and demand that it be returned. Once you have the orange, decide Stingtail's fate as you choose.
Open the orange through the inventory to get the narcotic plant. Return this stuff to Griff, and then release Amiro. The elf will reveal to you the location of the secret path that will lead you out of Fort Joy, but it’s too early to go there yet.
Not far from the Kitchen you can find a hatch that will lead you to the Arena. Here you will receive the task “Fort Joy Arena”, in which you need to defeat four opponents in one battle. The enemies will be level three, so it’s better not to meddle here in the early stages.
After completing the quest, go back outside and find Blacksmith Nebora nearby. Having learned that you have become a champion, she will agree to remove the collar from you (but not from your companions). You should not take advantage of this offer yet, as all masters will become hostile to you.

The quest “Geist Killer” is taken on the city wall. Talk to Magister Arnica, who is trying to find a certain Migo. You will find the missing person lower and to the right near the shore. It turns out that Migo was subject to corruption, which turned him into a mad cannibal. It is not necessary to fight him; on the contrary, you can ask him for a ring (you must have an Arnica flower), and then return the item to Arnica.
The girl will believe you that you found her father, and then go to Migo. To complete the task, visit them on the beach. By the way, the newly united family can simply be killed in order to take the good breastplate and ring.
The quest “Finding Emmy” is given out by a dog named Druzhok. Your friend, if you are kind to him, will show you the location of the key. Ask him about the key to find out about the missing Emmy, the dog that was taken by the masters. You will find the dog later when you reach the Fort Joy Prison.
Visit the cave where the elf invited you. Here, talk to Amiro, if you have already saved him, as well as other inhabitants. The main elf, deprived of sight, is a soothsayer, and it is she who will tell you a lot of interesting things.
By the way, Amiro will ask you to tell other elves who live on the continent about them, but you will return to this task much later. Finally, Lois can interact with the soothsayer - another companion that you could find in the city near the tents with a fire.

Talk politely to the lizard if you want him to show you his wares. Next, go deeper into the cave, having first removed or broken the barricades, behind which lies a secret path. She will lead you to poisonous frogs - kill them.
The task “Jar of Souls of Withermoor” will be given to you by a child. Agree to play peek-a-boo with him twice and find him. After this, find a small hole in the wall to activate a new replica: the child will tell you about a secret hatch that lies nearby. Go down the hatch.
You will find yourself in the Forgotten Tomb with a statue of Lord Withermoor. Remove the spear from the statue's chest and then talk to it. Withermoor will ask you to find his soul in the Bracca phylactery, which you will reach later through the dungeon.

You will receive the “Teleport” task from Gavin. The guy will call you for a private conversation - agree if you want to get the teleportation gloves. To do this, you will have to disconnect your portrait from the group and take the rest of the party away, and then talk to your counterpart Gavin.
On the second or third level, get to the beach at the top left where the crocodiles are. Kill them to get the above item. Next time Gavin will meet you at the exit at the top, where he will ask you to leave the Fort. Using teleportation, you will escape, but Gavin will soon die. You can pick up a good robe from his body.
Fort Joy Prison
There are three ways to escape from the Fort, but each of them involves going through a prison:
- The first option is associated with the already described Gavin, with whom you will get to the beach. You can only get out of there through the cave, which is the transition to the prison.
- The second option is to use the hatch to the right of the statue, which is in the center of the city. Inside, activate the lever to go to prison.
- The last method is connected with a hint from Amir, who will tell you the location of the tunnel for your help.

The third option is the most complete, so it's better to go with it. In the tunnel you will find neutral fire slugs that were once human. Their queen was once the wife of King Brakk, famous for his tricks - it was he who turned the queen and her subjects into slugs.
After the conversation, go upstairs to the cells. A lizard is imprisoned in one of them, but he will not tell you anything interesting. Break through the door to move on. In one of the cells, talk to Verdas, the dying elf. Examine the camera at the top right and take the amulet from the body using the teleporter.
By the way, the farthest cell on the left, which cannot be opened, will become your home if you commit a crime and are captured.
Eventually you will reach the end of the corridor, where the masters want to eliminate the renegade. Kill them, take the key and move on. If you give Delorus the potion, he will tell you about the boat, which will help you leave the fort.
Jail
Inside the prison you will find a bunch of monks - mindless creatures that were once living lizards, people, gnomes, etc. They won't attack you, so feel free to step forward.
In one of the rooms, find Emmy - the same dog that Friend told you about. If you tell her about Buddy, then she and other dogs will not attack you. They can also throw a ball if you managed to find it earlier.

On the other side of this area is the boat Delorus mentioned. Tell the masters the password (Delorus told you this too) to avoid the battle. After this, talk to the boy Khan, who will invite you to leave the Fort. It's better to refuse for now.
On the right side of the zone is a torture room, run by an insane sadist. You will have a difficult battle with the psychopath himself, as well as his monks.
Moreover, golems in cages will also resist you, but first they will have to break the cages (it will take 3-4 turns).
After the battle, take the Face Cutter from the corpse (useful to Fein), and then talk with little Trice. Here you can also unlock the eastern tunnel, which will lead you out of the Fort in the same way.

In the same area, to the left of the stairs going up, approach a small altar, near which your perception skill should work. If successful, you will discover a lever that will open a secret path to Brakk's phylactery.
Kill the skeletons inside and take all the jugs. One of the jugs belongs to Withermoor, whose task you have already accepted. The remaining jars will also come in handy, so it makes sense to save them. Before leaving, interact with the statue on the left (perception above 14 required) to receive the Tyrant's Leggings.
The stairs, as well as the left exit, will lead you to another part of the fort, where you will have to fight the masters.
Courtyard of Fort Joy
In the courtyard, kill the masters and go upstairs. Explore the room and go out to the balcony, where you can activate the stairs, which will lead you to the masters' chambers.
If you leave the prison through the left entrance, you will find yourself in front of the gate. Go to the only possible turn, where there are even more masters. Kill them and save Paladin Kork. If you manage to save him, he will tell you that his order knew nothing about the atrocities of the masters. Otherwise, an elf in your party may eat part of his body to learn about a wizard named Arhu.

After this, visit the main hall inside the building, where the trial led by Judge Orivand takes place. Kill everyone.
After destroying all the masters in the fort, leave the territory by any means. Pass the swamps and climb the hill where Zaleskar, an undead merchant, stands.
Go up, keeping to the shore, until you come across the witch Windego. She was the one who destroyed the ship, so it's time for revenge! After killing her, take the Mask of Reincarnation - a valuable artifact for Fane and any other undead.
Not far from here, find a destroyed tower with a thunderstorm raging inside. Use teleportation on the items inside to move them down. In the bones of the corpse you will find the most valuable item, which is called the Tyrant's Boots.
You will receive the “Cornered” quest above from the broken bridge. Paladin Tarlin will inform you about the Shrieker hanging on the pillar. You cannot go through this creature in the usual way, as it will instantly destroy you. It is necessary to kill the Screamer using a rod with the “Cleanse” ability, or the Helm of King Brakk, which has the same skill.
In the fiery ruins above, kill a group of masters, and then another one that is trying to defeat the paladin Gareth. It is in your best interest to keep him alive, since it depends on him whether you remove the collars or not. However, if he dies, other ways will appear.

You will receive the “Armory” task nearby by looking into the basement. You will find yourself in Brakka's armory, where the half-dead Master Sang is located. The corruption is consuming him, so do him a favor and kill him. From him you can learn that the nearby lever is cursed, making it impossible to use.
Use the Origin skill “Blessing” to clear the lever and move on. Inside you will find the Helm of Brakk and an endless tank containing the Source.
Leave the dungeon and walk along the bridge. At the dead end, search the skeleton. Continue walking until you reach a road with a blinded Master Locke next to it.
You don't have to kill him if you agree to surrender. This will be followed by an attack by enemies, during which Lok will be hostile to both you and the monsters. You can deliberately not hit him, after which, when the enemies are killed, the battle will stop and Lok will let you go.
At the end of the road, talk to the bear cub who lost his mother. You will find her body a little further, but you cannot tell the bear about it. Scare him or inspire him.
Mission “Burning Pigs”: from the center of the map, go down until you reach a burnt village with strange pigs. The poor animals are engulfed in flames that cannot be put out in the usual way, so you must come up with something. Using the animal friend perk, you can find out that pigs are actually people, and Brakk is responsible for this curse.
To heal the pigs, you must learn the Blood Rain spell and cast it on them. When the surface around is saturated with blood, use the power of the Source “Blessing” on it to create a sacred fire that will extinguish the damned.
When one pig is healed, you will find an undead lizard named Scapor. He is a kind of beholder who watches the execution of the curse. You'll have to fight him.

After this, you can come across the last pig, which is located to the north at the entrance to Dragon Beach. To save her, advise her to visit the Sanctuary of Amadia and take a dip in the pond there. When the job is done, she will become one of the merchants and offer you interesting goods.
Central ruins
On your way through the center of the location, you will come across a group of fiends, whose bodies, after death, emit infected blood. Be careful with her, as she applies a painful "debuff" for several turns.

Next, you will have to fight the monster Moloch of the Void, who, together with other creatures, will decide to finish off the Red Prince, and at the same time you. The battle can seem like a real challenge if you haven't found good equipment yet and are at a low level.
Coast in the South
The eastern road through the forest will take you to the southern shore. There you will be attacked by two poisonous and one fiery salamanders. Again, the battle will be difficult if you are below level five.
Not far from the battle site, you will find the Bahara lizard, which guards the approaches to the Sanctuary of Amadia. If you have already saved Gareth or previously rescued the boy Han (the boat in the prison), then she will give you a vine that you can climb up.
The Red Prince, by the way, will ask for the opportunity to talk with Bahara, since she is a clairvoyant.
If you have already saved Gareth, you will find him on the territory of the sanctuary. Talk to the locals as they all have interesting information and some are traders.

You will receive the “Healing Touch” quest a little higher in the Sanctuary of Amadia, where a certain Simone is trying to heal wounded soldiers. To complete the quest, use some kind of healing spell on all fighters.
The quest “Eternal Admirer” is given by the priestess Gratiana, who guards the statue of Amadia. After talking with the priestess, you can talk directly to the face of Amadia in the form of a stone, and how your visit to this place will end depends on the lines you choose.
If you are rude, a fatal battle will ensue, but if you respond with respect, Amadia will call you the chosen one, and the pond around will be covered with sacred flame.
Dark Cave
On the quest “Treasury of King Brakk” you must visit a cave, the entrance to which is located near the shore not far from the Sanctuary of Amadia. Inside you will meet a rude undead creature named Trickster, who will insult you and tell you that you cannot go any further.
Next to the Trickster are boxes, each of which will simply freeze you if you activate them. At first glance, there is nowhere to go from here, but the solution is simple and lies in the illusion - just step on the abyss behind the boxes so that the invisible bridge appears.
Behind the bridge you will have your first battle with the Trickster, who will create two illusions to help himself. After the battle, you will find yourself in a hall with a statue in the center, as well as many doors that are traps.

Behind the next door you will have another battle with the Trickster. This time there will be more opponents, but do not forget that the seemingly limited location is dotted with invisible bridges that you can use. After killing the Trickster, pick up the “Cursed Ring”.
Advice: Keep in mind that when you put on the ring, you will become cursed and get the corresponding hunched animation. Moreover, if you remove the ring, your characteristics will drop and remain reduced until the item is put back on. To get rid of the curse, the ring must be given to one of the companions, but it is better not to use it at all.
At the end of the dungeon, a real treasury awaits you with heaps of excellent items, gold and phylacteries. Urns, mind you, can be swallowed or broken. The Trickster Urn is connected to an enemy you already know, who, as it turns out, did not really want to harm you, but Brakk's curse forces him to guard the treasury.
You can take the Urn of Gratiana to the priestess herself in the Sanctuary of Amadia to find out the truth about her. The last three urns are associated with necromancer skeletons from the Gargoyle's Labyrinth.

The quest "Champion of the Gods" is activated at the end of the room with the help of a statue. Using it, (only the main character) you will be transported to the “Chambers of Echoes” - an otherworldly world where you will have to talk face to face with your god (each race has its own deity). Here you will be taught the Source skill “Blessing” and indicated your further goal.
Eastern Bank
Higher up from the salamander beach, walk along the rocks until you find vines. Along them you can climb to a plateau leading to the eastern shore.
The quest “Labyrinth of the Gargoyle” is located here. Near a structure with many doors and traps, you will find a gargoyle who will invite you to go through the labyrinth. If you put on the Ring of Brakk, the statue will mistake you for the king himself and immediately take you to the end.
To complete the maze, you will have to split the group (unlink the portraits on the left of the screen from each other to make the chains break). In the first room, stand on the slab so that a skull appears on the altar nearby - an object that allows you to open doors in the labyrinth.

After the first use, the skull disappears, so you will have to find a new one for each door. Now open the door on the left and get to the hatch, which will take you upstairs. Be careful as there are many traps placed around. With one character stand on the slab to open the door, with the second character go inside and stand on the slab, with the third character take the skull from the altar.

Unlock the doors on the right, which will lead you to the main building. This is where the gargoyle can immediately teleport you if you show her the ring. However, such a trick still will not save you from collecting valuables in the maze on your own.
Before entering the building, you can open other rooms. The third one, which is located next to the room where you opened the blue door, can only be accessed by teleportation.
The fourth one leads to the right door at the entrance to the labyrinth, where you will find a portal on a small ledge. To get there, use the teleporter. Next, you will be transported to another platform with a portal, which will lead you to the “Kingdom of Orobas”.
Inside this small area, you can use the teleporter again to collect valuable items.
Finally, in the center of the maze are three burning skeletons and a cursed Historian. Kill the first and help the last by removing the damage from him using the method you already know: blood and blessing.
The quest “A Fate Worse than Death” is activated inside the building in the labyrinth. In the right room you will come across necromancer skeletons playing cards, with whom you will have to fight. After the battle, if you have already obtained the jars from the Treasury of Brakk, break the phylacteries of these undead, otherwise they will rise again (this will continue indefinitely).
Having picked up the key from the body, go through the only door. Inside, activate the plate using the iron box from the next room, since the usual ones will quickly burn out.
After this, you will find yourself in a spacious room with many rooms, each of which is worth exploring.
In the end, you will run into a magical shield, which can be unlocked both with the help of the power of the Source (answer option in the dialogue) and with the help of Withermoor, who will appear here if you helped him in the past.

Outside the gate, collect all the valuables, including the Tyrant's Gloves. Before leaving, look into the closed recess on the right, where the well is located. Throw 150 gold at him to get a good item.
Dragon Beach
The quest “Sourceless Dragon” is taken to the right of the plateau in the east. Here you will find a frozen area, in the center of which lies the Winter Dragon Slaine. Break the chains that bind him, and then have a conversation.
From Slaine you will learn about a certain witch who in the past charmed him, and then deceived him, chained him and began to use him as a source of energy. Go in search of the witch, who is located in a cave nearby (the entrance looks like a huge skull).

After passing the traps in the cave, you will soon reach the witch Radek. If you start fighting her and refuse to deceive Slaine, then you will have to fight both Radek and three beetles and the dead. It makes sense to place part of the group at the beginning, since the beetles will appear there and begin to attack you from afar.
Radek herself uses necromancy spells, so get ready for charms and other tricks.
Pick up the wand from the witch's body and return it to Slaine. The dragon will thank you and say that he will come to the rescue when you are not waiting for him. By the way, you can kill Slaine, but rest assured, the dragon will not surrender to you so easily.
You will receive the “Call to Arms” quest from the druid Immit, who will inform you about the Screaming. You may have already met one of them and probably know that the only way to kill the Screaming One is with the help of the Cleanse spell. A little further you will meet Gareth and his group, who are preparing to attack the masters.
You can start preparing for the attack yourself. To do this, after rescuing Gareth, visit the Sanctuary of Amadia and inform the locals about your success. After this, the strange companion of the gnome will be able to remove the collars from all your companions, and then all the refugees of the Sanctuary will go towards the ship.

On the spot, the refugees will set up a camp and will be waiting for you. To let them pass further, you must destroy the Shriekers blocking the way using the appropriate wand or ability on Brakk's helmet. Finally, the dragon can also help you if you have previously freed it.

After this, the refugees, led by Gareth, will go towards the ship, but you will have to divert Bishop Alexander’s attention to yourself. Just go down to the pier to start the fight.
It is worth noting that the battle ahead is incredibly difficult (you have never encountered such difficulties on the island). In addition to the bishop himself, you will be confronted by Geist and four masters of different classes.
After two turns, a side hostile to everyone will join the battle, namely the Void Worm - a huge creature with a ton of health, which will not leave you even a 1 on 1 chance. The easiest way is to take your group away while the masters and the worm destroy each other, and then deal with winner.
When the battle is over, you will meet the elf Malaise. Before you go with her, make sure that you have completed all your tasks on the island, as it will not be possible to return here.
Awakened
Ship "Mistress Vengeance"
On the ship you will encounter a new difficulty: it turns out that the ship is alive, as it was made of elven wood. You need to convince the ship to carry you.
First, explore the upper deck, and then go down to the next level.
Gather all your companions and continue down to the lower decks until you reach the cage with the surviving Bishop Alexander. He is unconscious, so you won't be able to talk to him. However, persuade the guard to let you through, and then rip the necklace from Alexander's neck.
At the same level you will find a mirror that allows you to change the appearance, characteristics and abilities of both the protagonist and named companions free of charge.

On the opposite side you will come across doors. Before opening them, look for a diary nearby that contains the code word “Fortitude.” Return to the door, insert Alexander's necklace, and then say the password.
In Dallis's cabin you will meet a certain Tarkin - a mysterious necromancer with ambiguous answers. Decide for yourself whether he helped Dallis intentionally or under duress, and then make the appropriate choice - kill or spare (there is an achievement for sparing Tarkin).
After that, explore the cabin. Near the bed you will find a mechanism that will remove the closet and open a mysterious button - it is this that will unlock the door to the treasury. Now pick up the pyramid near Tarkin and use it to move to the hidden room below.
You have to defeat two serious opponents - Geists. When the battle is over, pick up the book with the song and return to the upper deck. All you have to do is sing the text in front of the ship, and then it will agree to transport you. The disease will say that your next goal is the city of Driftwood, where Maester Siva lives.

Along the way, you will be attacked by Dallis along with a mysterious hooded wizard. You will face a difficult battle against bloodhounds, masters, and gheists, who cannot be defeated at high difficulty levels.
Moreover, the mission will not require complete victory from you - you only need to hold out for five turns, protecting the Ailment, which will then transport you to a safe place.

During the battle, immediately run to the Ailment, because the enemies will do the same. Protect her with healing spells, apply armor with a geomancer, restore magic shields, in general, do everything so that she does not die.
Especially watch out for gheists and a warrior with a two-handed sword, as their blows can mow down 250-300 health at a time (we remind you that Sickness has only 700 plus armor).
The task “Into the Halls of Echoes” is activated immediately after teleportation. This time you will see all the gods, but in a non-trivial position: they will all be suspended on the Tree of the Void.
Bless your god with the magic of the Source, and then talk with him. It turns out that you are the last hope of the gods; moreover, you will become the Chosen One and lead your race.
About possession of the power of the Source
Reaper Coast
The quest “Sharp Awakening” is completed quickly. After the Ailment brings you back, you will finally reach dry land and go ashore. A little higher, find a gnome fighting a giant insect. They will disappear right in front of you, and then a battle with the fiends will follow.
On the quest “Plundered Caravan” you will find a place of massacre where fiends attacked a caravan with people and dwarves. One dwarf will survive, so you can talk to her and find out what happened. Next, having received the necessary information, present it to the guards at the gate so that they will let you into Driftwood.

From the beginning of the location, you can turn right to the raised bridge, where the boy Barrin is standing. He will ask you to save his mother on the quest “They Shall Not Pass,” which you can do both in the future and now using teleportation.
If you want to complete the task now, then simply go to the cliff and use teleportation to move three companions with the wizard onto the boat below (the spell's distance is enough).
On the way towards the city, you will come across a chicken coop and chickens, which, if you talk to them, will tell you about the stolen eggs. The task “When to Count Chickens” will begin. Head a little north of Big Marge, keeping to the shore to find the monster. Kill him and explore the area - nearby you will find one surviving egg, which you need to take to the chickens.
The quest will continue in the future if you return here again. The chicken will hatch and kill all the chickens, after which you can take it with you. All that remains is to take Squeak to the bridge with the paladins, behind which there is a magic rooster. Near the last one, your chicken will turn into a monster, so you will have to kill it.
Driftwood
The quest “Law of the Order” is issued in the city. Get to the main street with merchants, and from there turn towards the shore, towards the piers. There, talk to Magister Raymond, who will find you suspicious. Mention in conversation that you want to join the order, and then Raymond will leave you alone.
As a result, the master will give you a certificate, thanks to which you will receive immunity: none of the guards will dare to touch you. When Raymond leaves, talk to Julian to learn about the missing masters. The quest will continue later.

The task “A Man and His Dog” is taken on the square. Just talk to the beggar with the dog sitting next to him. Even without the “Friend of Animals” perk, you can simply unscrew the dog’s collar and find out that the object has needles sewn to it, because of which the animal is suffering. Tell the beggar off by driving him out of town or robbing him.
If you are kind to her, you will find out that she is the mother of the same crazy master you had to kill in the prisons of Fort Joy.
After this, have a few words with Garvan, who will give you the task “Losses in the Ledger”. The latter is to search for valuable cargo, which you will go after a little later.

Then talk to Lovrik if you want to use intimate services. From him you can buy a night with a lizard - an expert in alcove affairs, which is located on the third floor.
After a stormy night, you will find yourself wearing only trousers and at gunpoint with a crossbow. If the Red Prince takes advantage of the opportunity, then the lizard will turn into the Red Princess and there will be no attack.

The quest “You Can’t Fill Up Grief” is taken on the second floor of the same tavern. Talk to Captain Ableweather, who will tell you about the shipwreck. After that terrible night, she can neither sleep nor eat, as she is haunted by terrible sounds.
In another room, interact with the sleeping adventurer to get some recipes from him. You can also break into his chest and take away valuables.
In the basement of the tavern you will find the entrance to a cave. The bully gnome will not let you through just like that, so you will have to fork out fifty coins. Inside you will find a separate tavern where smoking mixtures are sold.
Talk to Ganges the lizard first if you have the Red Prince in your party. Next, go to the teleportation statue, near which there are two pressure plates hidden - stand on them to unlock the secret room on the side.

On the left you will find the headquarters of the head of the local gnomes named Lohar. The latter is in conflict with the masters, which you will learn about from him. The dwarf will also ask you to help him with the disappeared dwarf Mordus, who has disappeared into thin air, and now no one can find him.
Before leaving the tavern, talk to Dorothea the Luxurious to accept the quest “Web of Carnal Desires.” A girl will offer you a kiss around the corner - agree if you want to redistribute your characteristics a little.
Before interacting, you will have to disconnect your companions and show up to the meeting alone.
Dorothea will turn into a giant spider, after which you can either kill her or accept the kiss. In the latter case, you will have the opportunity to add two points to any characteristic, while losing a physique unit.

Finally, at the top of the area lies the Driftwood Arena, where, like in Fort Joy, you will have to defeat the local champions. You will have to fight against five enemies, moreover, your eyes will be blindfolded, which will significantly affect your accuracy and reduce the range of abilities to a minimum.
Outside, to the right of the tavern, is the Driftwood Prison. In it, you can talk with the boss to negotiate a reward for finding the master's killer.
In the basement of the same building, talk to the bored master who is fed up with his work. Leave him or convince him to leave the hated place.
The “Missing Masters” quest develops further. Visit the fish warehouse near the port where the inspection takes place. The masters, as you will learn, suspect that the junk dealer is hiding the real killer.
But do not think that the masters are right, since the elf Stewart, sitting outside the tavern, will tell you that the real criminal is among the visitors to the tavern.
At the warehouses, talk to the boss who will refuse to give you valuable information. After this, find the gnome Kannox and convince him that you need to find the suspect. Say that you managed to escape from Fort Joy, and then the gnome will reveal himself to you. It turns out that the criminal is hiding in a barrel.

Before this, you can look into the basements of the warehouse, where the masters cannot find the entrance. In one of the rooms, simply move the barrels and use the hatch. Below you will find a spacious basement with traps - go past them and get to the end of the room.
Open the barrels marked with a cross, from which poison will flow. Eventually you'll come across a barrel of Source weapons, and then you'll be attacked by fiends.
You will conclude that in fact, behind the rotten fish in the barrels lies a powerful weapon, as well as the fog of death, with the help of which the dwarf queen wants to conquer the world.
In the right room near the shore, open the barrel to find Higba the Ragman. Help him get out of the encirclement without getting caught by the masters. If you get caught, then you will have to either fight or surrender Higba with his guts. After a successful escape, the junk dealer will say his thanks and slip back into the barrel. He will also reveal to you that he got the cheeks of the murdered masters from the cook Uivlia.
Visit the cook and accuse her of murder. It turns out that she really slaughtered the law enforcement officers, and then chopped them into soup. However, it will not be possible to imprison her immediately, since there is no hard evidence.

The task “Lost and Found” is taken west of the building with the fish. Near the shore, talk to Lagan, who has lost his wedding ring. Offer your help and find the ring by simply holding Alt. When you do this, fiends will attack you - kill them.
You can now continue with the quest "A Sharp Awakening". Visit a house near the entrance to Driftwood where a girl is playing on the porch. From her you will learn that the masters took Siva to the scaffold.

Leave the city the same way you entered, and then go a little higher to find a scaffold. Approach Siva and free her, then kill all the masters. Next, return to Siva's house, talk to her and go down to the basement.
You have to perform a ritual that will call upon God. Complete the following steps in the order described:
- Take the root and blade.
- Take the bowl.
- Use the blade to bleed yourself.
- In the craft menu, cross the bowl, root and blade.
- Place the created brew near the dragon figure, and then activate the wheel.
- Inhale the smoke and hold your breath.
After this, a god will appear who will teach you a new Source ability called Spirit Sight, which allows you to see ghosts. Go back and use the skill to see Master Harrick.
Then you can continue the task “The Missing Masters”. Visit the tavern again and use the skill you learned. Talk to the first spirit to find out that the cook killed him. Now the spirit cannot leave in peace, since the ring holds it here.
With the help of the robber character, sneak into the left room while the maniac is in the other. There, open the board in the floor and pull out the hand on which the desired ring is located. If you take this evidence to the boss in prison, he will immediately send a subordinate to arrest the cook.
Alas, the same fate awaits this master as everyone else. If you tell Stuart everything, he will be able to return to the ranks of the masters. Finally, showing the ring to the killer will trigger a battle. When she dies, pick up a piece of paper with the names of the victims and give it to the boss.

Before leaving Driftwood, you can feed the cat rotten fish corrupted by the void. After such a meal, the animal will die, and a spirit will appear in its place. Talk to the ghost to get the achievement.
Soon after leaving the city, you will be attacked by crazy gnomes. Kill them and move on. You will come across a lonely statue, next to which there are constantly extinguishing torches. You won't be able to light them individually, so use a fire AOE spell.
Further on the shore you will find a lamp with a genie. If you have an agility above 20, you can convince him to fulfill one of your wishes: to get rich (you will receive a stolen necklace, which you need to sell as quickly as possible without being seen by the guards), ask that enemies not come into your sight (you will go blind forever), or ask for the power of the gods (lightning will kill you). Otherwise, you will have to fight the genie.

Continue along the western shore until you find a cave shaped like a skull.
The quest “Shadow over Driftwood” takes place here. You have to fight with void crawlers, of which there are incredibly many here. The cave itself is quite large, so you will have to wander for a long time. Moreover, it is dotted with minks (they allow you to quickly move around the location), one of which will lead you to four crawlers.
You can also simply avoid climbing into that hole and get to the very north of the cave, where the road leading into the abyss is located. You will be able to move your heroes across the abyss using teleportation to immediately find yourself in the place where in the future the game would throw you with the help of the four fiends described above, and fight the enemies with the whole team.
After exploring the entire cave, get to the center with the wreckage of the ship, where the dwarf Mordus is located (it was him who Lohar asked to find). Mordus will turn out to be an undead necromancer, so get ready for a desperate battle.
If one of your heroes dies during the battle, then Mordus will immediately absorb his Source and turn into a huge fiend, which at current levels cannot be defeated if you play on tactical difficulty or higher. To defeat Mordus, try to kill him first and as quickly as possible.

After the battle, Mordus will remain alive and will ask you not to kill him. If you save his life, you can learn more about the magic of the Source. You can also find out information about the owner from him by threatening to kill him. As soon as Mordus begins to speak, something will destroy him.
Before leaving, visit the room on the side, where the body of a gnome with a yellow stone is located. When you try to leave the room, a huge ship will break through the wall, containing neutral crabs and a hostile shark. Kill the shark, pick up its hand and feed it to the elf to find out about the dead boy Joe.
It was him that the children were looking for on the shore of Driftwood on the assignment of “Hide and Seek”. Return to them if you want to complete the task.
After that, visit Driftwood again and look into Mordus's house. You could get here right after your date with Lohar, but overall there is no difference. If you visit Mordus's house after killing him, then you won't have to make an extra circle.

Inside the house you will come across a gnome - one of Lohar's workers. Tell her that you are working with her master to get inside, or just kill her. Explore the dungeon, release the imprisoned gnomes, and then approach the mysterious stone head, into which you need to insert a yellow stone (you will find or have already found it after the battle with Mordus).
The “Taste of Freedom” task will start immediately behind the opened secret entrance. Inside you have to solve a puzzle, which is presented on a 4x4 field. Use the power of the Source to go to the spirit world and see the right combination.
If you look at the door to the treasury, standing in front of the field, activate the plates from top to bottom and left to right as follows: first row third plate, second row second and fourth plates, third row second plate, fourth row fourth plate.
Next you will find undead chained to a table, as well as many vases. The undead will ask you to release it by activating the levers opposite. You can also simply interact with one of the vases to start a battle.
A battle will follow in which the undead will help you. After that, talk to him and choose a reward. Keep in mind that the lich will offer you to increase one of the characteristics - agree immediately and do not ask questions, otherwise he will hand you a random book of skills and go on his way.

Now return to Lohar and tell him about Mordus. When you visited Mordus's dungeon, you (or at least you should have) found a letter from the Dwarf Queen, which talks about her plans. If you first hand over the letter to the masters, a battle will follow when you visit Lohar. The letter can be given to Lohar himself. One way or another, as a reward from both factions you will receive the key to the chest.
The “Competitors” task takes place on the bridge on the left side of the location, which is guarded by the troll Grog. To pass, you will have to give him five thousand gold, or eliminate his competitor.
Both trolls have a lot of health and also have an ability that regenerates six thousand health in one turn (they will only activate it during the first turns).
Fire works well against Grog, but poison works well against Marg. After killing one troll, the other one will refuse to let you through, so you will have to fight twice.

The "Aggressive Capture" task is activated on the bridge with the troll. You will find dead bodies and bloody trails that will lead you to the area with the chest that Garvan mentioned (from the quest “Losses in the Ledger”. Use the Source spell to talk to the ghost Liam.
It turns out that Garvan finished him off for selfish reasons and no such monsters attacked him. In order for the spirit to find peace, it is necessary to take revenge on the killer.
Killing Garvan is quite difficult, since he is in the city and never leaves it. If you don't want to become a criminal and go to jail, just find poisoned food and feed it to him. To do this, visit the toilet behind the pub, in one of which there is a suffering person. He will tell you the recipe for spoiled food: meat stew and mackerel poisoned by the void.
The first can be purchased in a tavern, while the second is in abundance in warehouses. Create food and give it to Garvan so that he will run into the toilet, where you can finish him off.
Meadows
Go to the bridge in the north, where the paladins are camped. Talk to Tom Hardwin, who will ask you to bring the white masters to clean water. Go to the mines to the east and follow the deeds of the masters.
On the quest “Buried Past” you will come across Gareth (if he survived in the first location), who has captured and wants to kill Master Jonathan. If desired, ask Gareth to spare this criminal.
The Ugly Duckling quest takes place in a meadow nearby. There you will find the sick bird Ferno, which is actually a phoenix. Burn the bird to cure it. In place of the charred creature there will be an egg, which can be left in the inventory for the future or eaten on the spot.

On the quest “Bestial Treatment” you will come across talking cows, who are actually bewitched people. Naturally, the cows will need your help in killing the evil sorceress.
Explore the witch's house (the key is in the thicket below), capturing her eye. To develop further events, you need to finish off Alice Alisson, which you will be able to do a little later.
Finally, there are scarecrows in the meadows, each of which are opponents. As soon as you talk to one, all the others will come to life and attack you. The battle, keep in mind, will be difficult, since the scarecrows have the passive skill “Horror,” which turns enemies into a stampede without the possibility of further control if the target does not have magical protection.
Pogost
Along the eastern bank, move south until you reach the cemetery. The "Family Affair" quest is awarded by Tarkin (if he was spared on the ship). The necromancer will need you to go down to the Surrey crypt and get the artifact there. Inside, you'll have to solve a lever puzzle using ghost vision.
The three switches will only work after you step on the pressure plate in the very last room. Number combination: 2-1-3.
The quest “Stranger in a Strange Land” is given in the north by the ghost of Vilnx Kriva. The lizard wants you to bury it according to its own customs, that is, cremate it. Pull your leg out of the grave and then throw it into the flames of the dragon statues.

Continue your journey. Nearby you will find a stone platform, which is guarded by four ghost gnomes. The Featherfall bird sits there, feeding on its owner. Part of the latter's body can be eaten by the elf to learn the necromancy ability Bone Cage.
There is a bench nearby where you will see Zimsky's ghost. Interact with him to improve your luck stat by one and receive a vial of Source.
Next you will come across a guard dog named Andras. Andras is guarding the grave and will not let you inside. If you try to pass, then you will have to fight the monster Kedelon Bonecrusher, as well as a gang of skeletons that this warlock dog will summon.
A little higher on the hill you will find the burial site of Victor Flynn with a note saying that he faked his death. Alas, he still failed to avoid death - his skeleton lies in the crypt.

The task “Reluctant Servants” is activated in the cemetery. Silent servants roam here, which the watchman Farima will tell you about. It turns out that the servants are controlled by Master Riker, so in order to free the poor puppets, you will have to kill him.
The quest “Heroes' Shelter” is issued immediately. Get to the center of the cemetery and open the small crypt where four famous warriors are buried. In everyone's grave lies a clue to the treasures they left behind in the world.
By the way, if you open all four coffins, then the heroes will rise up and fight you. The first three caches of Garrick, Halla and Bromley are located above and to the right at the exit from the cemetery, to the north at the entrance and to the left, not far from the sawmill, respectively.
The “Generous Offer” quest is taken near a living estate, the door of which will speak to you. If you admit that you are awakened, she will let you through. Inside you will find Master Riker, who will give you an order to find the tablet in the Black Mines location.

The "Snake's Tongue" quest is given out at the master's house. After interacting with the silent salamander, return to the cemetery and look for a burning chest near two statues. Move the box towards you using teleportation or telekinesis to open it. It turns out that the password for the chest is made in the old lizard language, which the silent salamander knows about. The Red Prince can unlock the cache in the same way.
“Existential Crisis” is a task that you will receive higher and to the right in the cemetery. A voice will be heard near one grave - dig it up to rescue the skeleton philosopher. Crispin will ask you three burning questions that will need to be answered.
All answers without exception must contain the “Undead” tag, so put either Fain or an ordinary undead on your side for a verbal duel. If you lose, one of your companions will die.
Near the cliff on the right side, visit the altar, which is opposite the giant tree. Use the Source skill “Blessing” on the altar to activate an event: the elf will drag your companion down.
Follow the missing person to save him. Kill the elf without using poison skills against him, as they heal him.
The mission “They Shall Not Pass” continues. Go past the gated southern part of the cemetery using teleport or brute force. Below you will reach the very house where it was impossible to get to at the beginning of the location, since the connecting bridge was raised.
As we mentioned at the same time, the barrier could be overcome using teleportation. Otherwise, the only option left is the one described above - to go around on foot.
Black mines
On the right, at the edge of the location, you will find a path into the mines, blocked by insects. Kill them and then talk to the spirits using Source magic.
The mission “On My Last Gasp” will unfold here, during which the masters will finish off ordinary peasants. If you do not intervene, then all five people will be executed, otherwise you need to attack the masters immediately if you want to save everyone.

After the rescue, it turns out that another family member is in danger - the nephew. Go to the oil rig where he was hanged. Get to the top and talk to Master Jonathan, who will have to be killed immediately (after the first line) if you want to save your nephew.
Keep in mind that the entire district in the form of other masters will come running to Jonathan's aid. Moreover, the rescued person will begin to use the magic of the Source, which will attract the attention of the oil fiends, which will then turn into fire fiends when the oil catches fire.
The quest “No Exit” is given in the west of the fort, where a couple of masters are trying to burn down a house. You can kill the masters to save the person inside, who turns out to be blue blood Owen Anchoret.
Finally visit the coast where the Shriekers are located. After destruction, get to the buildings with the masters, in which they conduct operations to extract the Source from the magicians.
Deal with them and find a diary that tells about a safe path to the Black Mines.
The “Excavation” task is already developing in the mines. The beginning of the cave is dotted with traps, so it is better to leave the whole team at the beginning, letting one thief go ahead, who is able to neutralize the entire path.
One way or another, soon you will reach the defeated master, after talking with whom you will have to fight with the fiends. Next, go down into the mine. Inside, look into the side room where there is a fragment of a column.

After a while, you will come across a chicken who will inform you of a threat on the way - the Screaming One. Finish him off normally or bypass him using teleportation.
In the ruins, find a hole hidden in the wall, which can be opened with the key from the waterfall. Inside you will find the second fragment.
In the workshop, kill the masters or intimidate them to avoid a fight. Next, you need to restore the oil pump, obtaining information from engineer Krug.
After exploding the wall with barrels, you will reach a temple with statues of the ancient people to which Fein belongs. Pick up the artifact that lies in the nearby boxes, and then go to the last room with the statues. From the digger's diary you will learn about the correct order for activating the statues; Moreover, the necessary information is contained on the altar.
The order of activation of the statues is as follows: the top one is first, the second in the last row is second, the second in the third row is third, the second in the second row is fourth, the first in the third row is fifth, the first in the second row is sixth, the first in the last row is seventh .
After the puzzle you will unlock a force field, behind which you will find an ancient tablet. Next comes a real challenge in the form of a level fourteen boss (if your level is lower, better come back here later). Eternal Ethera opposes your deities, but now she has just awakened, so you may have enough strength to defeat her.

After the battle, return to Master Riker. You won't find him there, so visit his room, equipped with instruments of torture. Before handing over your find to the master, ask him to teach you the new powers of the Source. Ultimately a battle will follow that cannot be avoided.
The master's house also gives you the quest “Opposites Attract.” To do this, simply draw a line of food between the turtle and the rat. Now all you have to do is visit the paladins on the bridge and tell them about the atrocities of the masters.
Paradise Hills
Beyond the paladin bridge you will receive the “Three Altars” quest, in which you will have to help living deer in the battle against their dead relative. To complete the quest, you need to visit two more similar places.
The quest “Test of All Seasons” is activated in a forest clearing, where you will find a bowl surrounded by statue trees. To complete the quest you will need to cast specific spells on specific statues, as each one represents a different time of year. Listen carefully to the riddle from the mysterious voice, and then the task will become easier.

On the road below and to the left, deal with the opponents and talk with the undead named Victor.
The Buried Past quest continues. Gareth attends to the funeral of his relatives under the protection of paladins. Near Gareth, pick up the gloves of the culprit who killed his parents. Next, get past the outpost in the form of paladins, negotiating with them or using brute force.
Inside you will find four assassins. Use ghostly vision to talk with Gareth's dead relatives who live nearby.
It turns out that they do not want revenge; on the contrary, Gareth’s peace is important to them. After this, Gareth will enter the room and decide to finish off the killers. Dissuade him from staying on the hero's path, or give the go-ahead, and then Gareth will embark on the path of revenge.
Finally, the spirits will reveal to you the name of the main culprit - Master Jonathan. Kill him if you didn't do so earlier when visiting the Black Mines, and then bring Gareth the Master's Ring.
The task “Dangerous to yourself and others” will start in the eastern part of the location, where you will find the healer Swann. From him you will learn about the dangerous infected Natalie, who is located in the basement. You can help her, but then you will have to fight monsters. Keep in mind that AOE spells will damage the girl.

On the way up you will come across a sawmill and a gang of "Lone Wolves". Use ghostly vision to see how many restless souls are following them.
The spirit of the wizard will ask you to avenge him and finish off the mercenary nicknamed Faithful Eye.
Corbin Day will complain about his slave fate and complain about the master Rust Anlon. You can finish off the latter in the future, thereby freeing Corbin.
The spirit Black Widowmaker will tell you about the treacherous murder: his partner Snake Root slipped him poison. The girl will refuse to confess to what she did, so you can kill her.
The Grave Digger's spirit will tell you about the Woodcutter who finished him off. Visit the latter and, using the answer option tagged “Mystic,” make her see the Grave Digger in her dreams. After this, Dremoseka will show you the location of the treasure.
The task “Log Like a Log” takes place here. You need to look at the sawmill and talk to the log. The elven piece of wood will ask you to pay the woodcutter who cut it down for it. You will find the woodcutter at the bottom of the location, but he will also be dead. To destroy his spirit, use the Soul Absorption skill.
The task “Valuable Booty” is taken from the head of the mercenaries, Rust Anlon. He holds Saheila, already familiar to you, captive, so he will have to be finished off. Moreover, Sybil will want the same. If you kill Rust, then from that moment all the mercenaries of the brethren will become hostile to you.

After the sawmill, visit the clearing to the east by breaking down the gate. There you will find Sadhi - the Red Princess, with whom your red-skinned comrade can retire. This will be followed by a battle with the killers, and the princess will disappear again.
Above and to the right you will find riddled soil, broken into small areas of land. To move, use teleportation or wings.
Next you will reach a lonely hut where Almira and Mikal are located. Together the couple left the hot spot, but there were some injuries. You won’t be able to cure Mikal just like that, because there is a curse around him.
The source of corruption is the dragon, which you will find above and to the right from here. Finish him off and return for your reward.
In the future, you will meet a couple on a ship. Then Almira will ask you for one more favor, which is to find the tablet. In the past, you could already get it on Riker's instructions.
Monastery Forest
A zombie named Eithne is a librarian. If you convince her that you are not a member of the Black Circle, she will allow you to buy books with various abilities from the schools of Necromancy and Transfiguration.
Reach the ruins in the center where Hannag lives. The masters are trying to kill the lizard, so help her if you want to get an additional slot for the Source abilities. Next, Hannag will tell you about his student, who may soon be executed. If you manage to rescue him, she will make you a student, but if not, she will only hand over a book about the Source.

The Three Altars quest continues nearby. You will find the monster surrounded by wolves, who will increase its strength. The monster must be stunned every turn, as it is quite capable of killing your entire group at once.
In the north of the location you will come across the corpse of a fortune teller, whose name is Alisa Alisson. The body flies on a cross and is quite capable of fighting; moreover, one of its abilities - a passive aura - takes away four hundred HP every turn from the entire squad. A dangerous opponent, so don't even think about fighting him if your level is below 15.
After the murder, visit Alice's hut, which is located in the meadows. In her chambers you will find ingredients with which you can create a potion (witch's eye, mushroom and catalyst) to heal people turned into cows.
On the other side of the bridge you will find a lonely house, next to which there is a cage with two demons. Their current owner is Jaan - the same master of the Source that you have already encountered more than once. Find and kill the demon located on Blood Moon Island for him if you want to more fully master the power of the Source.

On the shore you will meet the Dead Ferryman, who transports everyone to that very island. Any character other than the undead will not survive this journey, as it takes place through the fog of death.
To overcome the obstacle alive, use the following trick: separate all the heroes from one character who is going to use the boat. When he turns out to be dead on the other side, the rest of his living party members will immediately teleport to him.
Blood Moon Island
Go down and to the right until you reach the demons led by the Lawyer. Immediately you will find a familiar Ailment, which teleports without talking. Next, you can make a bet with the gnome who just spoke with Illness, betting with him for five hundred coins.
The lawyer will offer to teach you new features of the Source's power, but in return he will ask for a counter favor - to kill the Black Circle group. You will find the targets in the center of the island, after which the Lawyer will reveal to you the location of the Nameless Island.

Next, you can finish off the Lawyer, since Jaan asked you to do so. As a reward, you will receive an increased Source resource. Jaan will also need you to find the owner of the Lawyer by asking the spirits on the island about his name.
Find a bridge assembled from fragments, and then a map with statues, an archive and a mountain marked on it. The mission “The Forgotten and the Damned” is activated.
Go up and to the right and at the turn you will find loosened ground, under which there is a hatch hidden. You will find yourself in the Archives, where the ghostly abbot of the library is located. Behind one of the cabinets you will find part of the Anathema weapon, as well as a new pyramid for fast movement and a special book with a spell to tame the flames, which you will need to destroy the statues.

Near the statues you will find cages with demons. Before opening them, look into the world of ghosts and negotiate with the guard spirits to get permission to release the prisoners. You have to defeat a baby, a gnome and a lizard, each of which uses demonic abilities.
Preparing to sail
The mission on this part of the land is coming to an end, so it’s time to set sail. For the next journey, you need to open three additional slots for Source abilities, learn the Source Drawing skill, discover the location of the mysterious Nameless Island, solve Gareth's dilemma, and also (optional) complete the personal quests of your companions.
Keep in mind that opportunities to increase Source slots can be easily missed. There are four characters in total who can help you in this matter: Mordus, Riker, Hannag and Jaan - remember these names.
You will receive the ability to extract the Source from Siwa when you open the cells described above.
Finally, the location of the island can be revealed by the Lawyer, God (according to the ritual in Siwa’s hut), and also the Ailment. When all the conditions are met, return to the ship and order it to sail.
B unnamed island
This part of the land is a whole battlefield, where masters and paladins on one side, and the Black Circle on the other, constantly fight. Your task is to visit all seven Divine Temples and complete the tests there. When the job is done, you can proceed into the depths of the mysterious Academy.

Talk without leaving the ship with the succubus Almira, who wants to find two pieces of the Deliverer. Also here you will find Master Delorus, whom you met back in Fort Joy. He can become a companion, but his level is too low for full-fledged battles.
Temples of the Gods
Temple of Ralik
The first sanctuary represents the people, and here you will stumble upon a confrontation between the masters and members of the Black Circle. Choose a side and then take part in the battle. After the battle, activate the altar with a person so as not to receive the “debuff”, or with another race, but then you will become blind for some time.
Temple of Vrogir
Go up and to the left until you come across a Cheka squad. If you convince them that you are the embodiment of Almira, then there will be no battle.
The inside of the temple will be flooded, which was done by order of the Cheka. You can cancel the order and send the entire group off the island. After this, find the key that will allow you to unlock the secret path to the Armory with valuable items.
On the same shore you will find a Gloomy Cave, where you can find powerful weapons. Picking up the Blade of the Eternals will provoke an attack from the apologists.
Inside the demon sanctuary, you will find that a necessary item is missing from the altar. Go to the ghostly world and talk with the spirit of the imp, who will tell you the reason for the loss - it turns out that the crystal was stolen by members of the Black Circle.
Go west until you come across two mongrels who found a strange stone. Kill them or simply throw meat at them to get the crystal you're looking for. Now you can use the altar.

Activating the altar will take you to the miniature world of Zantezza. First place the boxes on the nearest plates. Continue further, past the blocked doors using teleportation.
To speed up time, use the hyperactivity device in the hall on the right. The other device will initiate a kill protocol, so don't touch it. Finally, in the center you will find a core, which you need to get to as quickly as possible, otherwise you will die.
After this, move along the northern path to find the Cheka group. Kill them and take the Dark Mirror from the head.
Elves will meet you on the approaches to the temple. To avoid a fight, answer them that you are awakened or are carrying out the will of the masters.
Here you will learn that Bishop Alexander has gone after you and has already landed on the island. You will find him at the very top of the elven sanctuary in the company of Gareth, who wants to kill him. Help Alexander, who has separated from Hammer, or complete Gareth's revenge and finish off the bishop.

Another task will be given to you by Sybil if she is in the group. The tree in the temple will direct her to take the life of the Prince of Shadows. When you leave the temple, your friend Saheila will advise you to destroy the Tree so that the elves will finally gain freedom. Decide what to do.
Temple of Amadia
The ancient people's sanctuary is located in the lower left corner of the island. You can get there only by climbing up the vines, which will lead you to the temple floating in the sky.
On the spot, overcome all obstacles and chasms using various blessings of Amadia. Along the way, if Fain is part of your party, you will receive unique gloves. Get to the center and interact with the altar.
Temple of Zorl-Stissa
Get to the shrine and interact with the altar. No difficulties. To the east of the temple you will find the Prince of Shadows lizard, whom Sybil has been hunting for throughout the game. She will go into a trance due to the lizard's magic, so you will have to sing a song to her. A battle will follow in which you will have to fight invisible people.
Finally, the Red Prince can also interact with the Prince of Shadows. After the murder, travel to the ghost world to find out the reason for the hunt for the Red Prince. It turns out that your partner and Princess Sadha can give birth to real dragons, which does not at all appeal to the nobility of the lizard empire.
Temple of Dune
On the way to the sanctuary, overcome all the chasms using magic. Inside, defeat the cursed Dune warrior, and then fulfill his request - absorb him. After starting, go around the temple from the north and talk with the undead. She will ask you to finish off the damned gnome.
On the assignment "White-Face" you have to finish off the eponymous leader of the Black Circle. Using the black mirror, pretend to be White-Face's subordinates in order to safely reach his hideout, which lies to the left of the Temple of the Moon near the mountain.
The entrance will be protected by the troll Krug, with whom it is impossible to reach a compromise. There's no point in fighting him honestly, so just teleport him into the lava.
In the cave you will see an altar that you cannot interact with. Dispel the illusion behind him by using Alexander's Hood, and then finish off the leader.
In the Cheka camp you can find an acquaintance of Windego, who could have been killed back in Fort Joy. One way or another, she will have to be dealt with again.
Now that all the temples are activated, head to the Sanctuary of the Moon. Inside you will find seven pillars, each representing a specific deity. Each of the seven represents either the Sun (light) or the Moon (darkness), as you learned when visiting the temples.
Set the affiliation of the gods to the luminaries, and then use the lever. To activate the lever, move the lightning bolt thing called the Phase Capacitor onto the pressure plate.

If you wish, you can go a completely different route without activating the altars. To do this, visit the corner of the island on the lower right, where the islands are located. Using them you can get to a separate land where a hatch is hidden. It is he who will lead you to the halls of the Academy.
Inside the Academy, you will meet a fiend of the void, who will reveal to you that their true motives lie in the desire to return the power illegally stolen by the gods.
Go into the hall, dotted with the bodies of teachers. You can interact with them to strengthen some characteristics instead of weakening others. Then find the panel and install the Phase Capacitor, which will fire the beam. It is necessary to direct the beam to the post using mirrors.
In another room you will find the key to the room on the left with valuable treasures. Near the pillar that the beam should reach, install a couple more capacitors, and then interact with the lever. This will take you to the Hall of Heroes.

In the hall you will meet all the story companions, as well as Gareth or the Bishop, depending on your choice. Agree to fight.
After this, a battle will begin in which all the chosen ones will take up arms against you. Get to the Divinity Key, which lies on the right. Ultimately, when you overcome the Guardian challenge, you will be greeted by the long-forgotten Dallis Sledgehammer.
If you managed to change the Bishop to your side, then she will immediately finish him off. Dallis then annihilates the key and goes into hiding.
Finally, the destruction of the arena will follow, during which the battle will unfold. You will have to defeat your own copies in the form of divine avatars, as well as the Source Titan, which will appear at the end. When the job is done, Illness will appear and ask you to launch the beacon - do this to leave the location.
Once on the ship, talk to Illness. Your next goal is Arx, where Dallis went.
Oh hota for Dallis
Coast
Directly on the ship you will move to the hill. Pass the camp near the shore and get to the port. Once there, it turns out that the harbor was attacked by a kraken. If you think that your strength is enough to destroy 18 levels, then give him a fight.

After this, search the shipwreck and find the key. Also talk to the ghosts to learn about Dallis, who rushed to the tomb of Lucian himself. Defeat the vampires by helping the paladins to let you into Arx.
Arx
In the city center, find the artist and use ghostly vision to talk to the spirit. The latter will reveal to you that the local prince owns a rare painting.
After visiting the nobleman’s residence, you will stumble upon Kat, who will also mention the paintings and offer you help. On the top floor, prepare to meet the guards; in the hall there is a key that can only be transferred to you using telekinesis. Finally, you will find the treasured path to the basement outside the house.
The “Execution” quest will begin with a series of executions: paladins will kill masters, wanting to find secret members of the Black Circle. Talk to Marie, who will ask you to rescue de Selby. The latter violated discipline and refused to carry out executions, so she herself ended up on the scaffold. The only way to save her is to kill the local head of the paladins.

On the quest “The Power of Mercy”, visit the prison on the lower level of the city. Deal with the guards, and then find the cage with Windego's old friend. If you let her go, you will learn a new spell that allows you to turn fiends into allies. She will also reveal to you that the local leader of the paladins, Kemm, is secretly working for the demons.
The quest “The Last Stronghold of the Masters” is activated in the barracks. In the ghost world, find Marvell, who lives in the kitchen. Next to it, clear the path from the boxes and use the hatch.
By the way, on the hatch there will be a password in the form of four phrases, two of which can be found in the next room (the others will have to be selected at random).
On the lower level, find the secret button to get into the master's vault. Next, to unlock another secret, remove all four pictures, behind which there will be buttons. As a result, you will find yourself in a new room where the ghost of Hux lives. Here, pick up the key and go down to the next level through the closed hatch.
You will eventually come across Master Raymond surrounded by Geists - kill him. Next, examine his documents and read the information about Dallis, which contains all the plans of the masters. It turns out that they set out to destroy the Source, Divinity and the Void itself, for which they have already recruited Tarkin, whom you know. The latter took upon himself the responsibility for the resurrection of King Brakk.

Return to the city and go up and to the left, where the burning part of the city is located. Visit the lizard embassy, where you can find a mysterious portal.
To the right of the city, explore the apartments of the artisan Zanders, who makes toys. One of the toys came to life and disappeared - you will find it near the pier and learn that there are corpses in Zanders' basement. Visit his house again, and then talk to the master himself and decide his fate.
Then visit the library, where history doc Hubert will examine you. Correct answers: House of Dreams, 1234, Tenax and Cassandra. If you answer correctly, Hubert will ask you to go down with him to the basement, where he will open a new story and give you a book of talents of your choice. There is also a chest, the key to which is in the previous room.
On the quest “Just What the Doctor Ordered,” you will visit the Black House, where Deva lives. If you defeat White-Face on Blood Moon Island, the doctor will let you inside. Next, Deva will offer you a deal: half of the divine power on your part, help in the battle against Dallis on his. Keep in mind that the transaction will definitely have consequences. If you refuse, you will discover that the powerful demon Adramalich is hiding behind the doctor's guise.
Dungeon
The quest “Secrets of the Dwarves” is activated when you approach the gnome area. Make your way to their courtyard from the east by teleporting to the balcony of the wise man's house. Here you will find stones that will help you get to the other side.
On site you will find the place of the already completed wedding, which has taken on the appearance of a slaughterhouse. If you activate the cake, a battle will follow with the toys that crawl out of it. There you will also find a message from Dev. Before leaving, examine the bodies to find the key.
Take a look into the house where newlywed Isla Gall has taken up residence. On the top floor you will come across her dad Michel, who is about to leave Arx. Next, look into the kitchen and take the Lulabelle wine to unlock the secret passage.

You will find yourself in a sewer full of spiders - kill them. Next, visit the right side of the dungeon, where there is a brotherhood of child thieves who will pit you against the troll. When the battle is over, take the Strange Painting, which is that rare image.
Ultimately, you will find yourself in the secret abode of Queen Justinia in the company of Isbale. If you released Windego after the interrogation, you learned that Isbeil was consorting with demons. That is why you can now surrender it to Justinia, after which the latter will refuse to stand up for Isbeil in battle. After the battle, talk with Justinia and decide her fate.
Before leaving, you can visit the sewer branch, which will lead you to the prison. There you will come across the boy Karon, who is an awakened one. If you return here again after some time, you will not find Karon in place, but you will find him in the western part of Arx, where he will commit a massacre.
Visit the temple and speak with Avenny to receive the key to Arhu's private chambers. After exploring the chambers, at the exit you will find paladins who will accuse you of killing Arhu. Finish them off or try to negotiate peace.
On the opposite side of the temple, talk to Charlie the dog to find out about the true culprit behind the disappearance of Arhu. It turns out that Kemm, whom you know, is behind the crime.
Talk to Lyle to learn about the Blood Path pilgrimage. It turns out that only an absolutely sinless person can overcome it. Come inside.
Along the way, you will come across a statue of Lucian, who will ask you four questions. It doesn't matter whether you answer honestly or lie, because if you actually committed crimes, the statue will instantly destroy you. If you have sins, then you can use a trick: return to the ship, take an “empty” companion who has not yet participated in your adventures, and then bring him here and take the test with him.

Next, a riddle with pipes awaits you. It is necessary to pass liquids of three different colors into three bowls on the opposite side. As a result, it turns out that one liquid is missing - use “Bloody Rain” above the center of the platform, and then bless the blood with the Source skill.
After solving the problem, continue on your way. Behind the door you will find minions of the Source, who are easy to kill, but pointless, since they are reborn. To overcome this challenge, you must dial the right combination of levers. Each of the levers represents a separate letter, and you need to collect the word “RIGHT”.
Divinity
The "End Times" task is the final one. Malaise and Tarkin will act on your side. In the hall, talk with Lucian and Dallis. It turns out that the first faked his death in order to unhinderedly absorb the Source of the gods.
Dallis is an eternal one who has always worked for Lucian. Moreover, Fain is her father. Hammer's ultimate goal was to completely consume the Origin and move it to a safe place - one where the Void could not threaten it.

Next you will have a battle with King Brakk. The leaders you know will fight on his side, while Lucian and Dallis are on yours. You won't have to kill Brakk personally, since you won't have enough strength, so just try to survive.
Finals
- If you make an agreement with the doctor, you will meet with him again to give half of your divinity. Next, Lucian and Dallis will die, and you and the demon will divide the world in half, creating a balance between light and darkness.
- The second ending is "Ascension". You will become a sole god without the help of a doctor.
- The third ending involves the spread of the Source throughout the world. Each of the inhabitants of the Earth will become a magician and will contain the Source.
- The final ending hinges on the destruction of the Source. Magic will leave Rivellon forever.
Video: walkthrough of Divinity Original Sin 2
Like if it was useful

Fall of the Hammer is a story quest in Divinity: Original Sin 2. "Lady Vengeance" washed up on a rocky shore near Arx. The illness reminded us that we must find Dallis and stop her from using Etheran and the stolen power of the Source as she intended.
Walkthrough
This story quest is activated in Act IV - The Hunt for Dallis.
Talk to Illness. She will tell you that you need to find Dallis and stop her from using Etheran and the stolen power of the Source. Illness advises starting your search with the local Divine Order.
Arx Harbor is overrun by fiends; defeat them so you can explore Dallis's ship, the Lord of Terror. "Mr. Terror" can tell you that Dallis and Vredeman are much older than himself... although he was once an elf and then an ancestral tree. Don't forget to check the chest, which contains a powerful unique amulet for magicians.

Walk across the bridge to Arx. Along the way, you will need to help the paladins defeat the fiendish vampires (quest “Battle at the Gate”).
Inside Arx, you learn from some paladins that Dallis can be found somewhere inside the cathedral.
After completing Linder Kemm's Vault, Arhu will direct you to Zanders. Toy merchant Zanders, in turn, will tell you how to complete the first part of the Path of Blood and give you a special amulet. You will also take the Scroll of Atonement from his house.
Complete all side quests before heading to Lucian's Cathedral.

Head to the cathedral to follow the Path of Blood. When you approach Lucian's statue, don't waste time on dialogue; none of the answers are correct. Instead, look to the left of the statue for a switch. Place the Source-filled amulet you received from Zanders into it, then press the button. You will automatically read the Scroll of Atonement and the hatch will open.

Through the hatch you enter Lucian's tomb. There's a puzzle ahead.
Create some blood on the iron grate using a blood rain spell, flesh sacrifice, or by wounding (you will need to remove the armor):

Interact with the altar and select the second option to align the pipes. Below is one solution:

Once you have the pipes lined up correctly, cast Blessing on the blood by the iron grate, then quickly touch the altar and select the first option to activate it. The puzzle will be solved, and a secret hatch will open under Lucian's sarcophagus. Enter it.
(Some users completed the puzzle in a different way: using a character with developed telekinesis, move the teleportation pyramid to the bowls behind the pipes. Then teleport to the pyramid and create blessed fire, water and blood in the bowls).
You find yourself in a place called "Series of Suffering". Here, the Source puppets will attack you and interact with levers, which will impose various effects on your party, such as turning into cows and the like. Use Source Draw on these dolls to kill them, or use powerful AoE spells. Once the puppets are out of the way, activate the five levers, the first letters of which are included in the word "RIGHT". The sequence doesn't matter.


After activating the "correct" levers, the barriers will be removed. It's time for the final battle. Make sure you complete all the quests, memorize your best skills, and equip your best gear before entering the real Lucian's Tomb. The final battle and Divinity await you. You won't be able to go back.

Job structure
"Mistress Vengeance" washed up on a rocky shore near Arx.
The illness reminded us that we must find Dallis and stop her from using Etheran and the stolen power of the Source as she intended. Illness advised starting the search with the local Divine Order.
We learned that Dallis and Vredeman arrived in Arx aboard the Mister Terror.
"Mr. Horror" told us that he brought Dallis and Vredeman, as well as their "soulless soldiers" to Arx. Interestingly, the ship claims that both Dallis and Vredeman are much older than himself... although he was once an elf and then an ancestral tree. Probably there is some kind of mistake here?..
We learned that Lord Linder Kemm, the head of the paladins, can be found in the magisterial barracks. The paladins recaptured them from the magisters during the riots. We need to talk to Kemm about Dallis: perhaps he knows what she intends to do in Arx and why she needs Etheran.
Kemm confirmed that Dallis had arrived in the city aboard the Mister Terror. But where she went next, he doesn’t know. He wants to find Raymond, the head of the White Masters. If we find Raymond ourselves, we can find out where Dallis is now.
We found the Masters' barracks, their center of operations. The paladins plundered it and killed the masters. We need to take a look around here.
We discovered a secret vault under the masters' barracks - perhaps there we can find out what Dallis is doing and what she intends to do with Etheran.
After examining the dungeons under the masters' barracks, we found out that Dallis wants to penetrate the tomb of Lucian, located in the cathedral. We will have to do the same if we want to stop her - after all, Etheran is still in her hands, and the stolen Source too. Whatever she's up to, it's obviously some kind of dirty trick.
We found out that Vredeman is actually King Brakk, whom Dallis resurrected to help her find Etheran. We need to be extremely careful when we meet her face to face, since she is served by a mad sorcerer king...
It turns out that Lord Arhu is the custodian of the cathedral. Anyone who wants to break into Lucian's tomb will have to ask for his help.
We've come to the cathedral, but to get to Lucian's tomb, we'll first have to survive a ritual called the Path of Blood. We have to figure out how to get through it.
Finds in the attic of Kemm's house:
- In the attic of Kemm's house we found a letter stolen from Dallis. He seems to be spying on her... but it doesn't look like an official investigation. What's on his mind?
- We found a strange mirror in Lord Kemm's attic. Looking into it, we saw the last moments of the life of a disgusting creature locked in a cave full of fire and lava. I wonder what kind of creature it was - and why does Kemm need such a mirror?..
- In the attic of the Kemm estate we found the mirror of the Black Circle. Looking into it, we saw the last moments of White-Face, trapped in fire and lava during the destruction of the Nameless Island. Where did Kemm get it from? Was he following the Black Circle... or was he doing something else?
Lord Arhu is missing. We need to find him - or find another way to get into Lucian's tomb.
We found Lord Arhu's diary. He seemed to have doubts about Lucian's command not to allow anyone into his tomb. Arhu did not understand the late Divine's intentions and wondered what he would say if he saw what the world had become in his absence.
We learned that both Dallis and Kemm independently demanded that Arhu open Lucian's tomb. He resolutely refused, although, apparently, even he himself could not help them bypass all the protective devices that guard the final resting place of the Divine. Arhu was clearly tormented by doubts about loyalty to Lucian's last will in our days, when the Void threatens the entire world.
Windego reveals that Linder Kemm made a vow to the God King:
- Windego said that Linder Kemm made a vow to the God King.
- We went to Kemm and told him everything we had learned about him from Windego, but he denied all the accusations. We probably shouldn’t have believed her then...
Kemm tried to stop us from freeing Arha. It appears that he is a servant of the God King; he was tasked with finding out from Arhu how to get into Lucian's tomb.
We have found Lord Arhu. He told us everything he knew about how to get into Lucian's tomb: we need to get past the statue of Lucian on the Path of Blood - with the help of a certain amulet and the Scroll of Atonement. Both of these items can be obtained in the city, from the toy maker Zanders. The amulet must be worn on oneself to be charged with the Source, and then placed in a hidden mechanism on the Path of Blood. After this, you should read what is written in the Scroll of Atonement, and the passage will open. He also warned us about the dangers of the Death Room, where there are many levers, most of which activate traps. You need to pull the five levers that form the word "right" in order to pass without interference. However, Arhu said, no one knows how to disarm all the traps all the way to Lucian’s tomb. There are still many dangers there.
If Arhu dies:
- Lord Arhu died, but his sign told everything he knew about how to get into Lucian's tomb: we need to go past the statue of Lucian on the Path of Blood - with the help of a certain amulet and the Scroll of Atonement. Both of these items can be obtained in the city, from the toy maker Zanders. The amulet must be worn on oneself to be charged with the Source, and then placed in a hidden mechanism on the Path of Blood. After this, you should read what is written in the Scroll of Atonement, and the passage will open. He also warned us about the dangers of the Death Room, where there are many levers, most of which activate traps. You need to pull the five levers that form the word "right" in order to pass without interference. However, Arhu said, no one knows how to disarm all the traps all the way to Lucian’s tomb. There are still many dangers there.
In a small camp near the coast we found a puppet of the Origin hiding. She told us that she fled from the "room of death" under the "huge hall of weeping and song." Isn't she talking about the cathedral?..
The Origin Puppet mentioned that in the room from which she came, there are many levers that lead to death, but only a few say "right". She told us that we must gain the right to freedom. What does it mean?..
The word “RIGHT” was engraved on the body of the Source puppet. Perhaps it has something to do with where the puppet came from...
Zanders, a toy merchant, was involved in the design of the defenses around Lucian's tomb. We must find out everything from him.
Toy merchant Zanders told us how to complete the first part of the Path of Blood. We will need an amulet filled with Source and a scroll of Atonement. The scroll should be in a locked desk on the second floor of Zanders' house - the password is "Giyora". Once we find both of these items, we can use them in the cathedral to open a secret passage. You need to look for a hidden mechanism next to the statue of Lucian.
We received the Scroll of Atonement.
We received the amulet of the Source. For it to start working, it needs to be filled with the power of the Source and put on.
We filled the amulet with the Source.
We stand at the beginning of the Path of Blood. Will they consider us pure and righteous, will they allow us to pass?..
Walk the Path of Blood:
- We tricked ourselves along the Path of Blood and went down.
- We walked along the Path of Blood and went down.
- We were unable to follow the Path of Blood. Surely there is a way around it...
We entered the Tomb of Lucian, but did not find either Dallis or Etheran there. Was she ahead of us?..
We managed to solve the riddle and moved on.
The talking door warned us that we would die if we tried to reach Lucian's tomb and ordered us to leave.
We entered a large room with many levers... and very unfriendly Source puppets.
By pulling the right lever, we were able to move on.
We have entered what by all indications must be Lucian's tomb.
oEPTSYDBOOP KHCHMELBFEMSHOBS YZTB, LPFPTBS MYYSH OENOPZYN KHUFKHRBEF Dragon Ade Origins . PYUEOSH LBUEUFCHEOOBS, DEFBMSHOP RTPTBVPFBOOBS Y U ChPNPTSOPUFSHA RPMOPZP LPOFTPMS DEKUFCHYK RETUPOBTSEK. YOFETEUOP, YuFP PDYO Y FPF TSE LCHEUF NPTsOP TEYYFSH DCHHNS-FTENS TBOSCHNY URPUPVBNY. EUMY CHCH OBUMY LCHEUFPCHSHCHK RTEDNEF YMY RTPYZOPTYTPCHBMY LMAYUECHPZP RETUPOBTSB, LPFPTSCHK Refinery ChBN RPNPYUSH, KH CHBU CHUEZDB EUFSH CHPNPTSOPUFSH ЪBLPOYUYFSH LCHEUF DTHZY N RHFEN. l RTYNETKH, RPLYOKHFSH ZhPTF tBDPUFSH NPTsOP NYTOP ABOUT MPDLE YЪ RPDENEMSHS FENOYGSCH YMY RPTKDS YUETE RPTF RPUME VYFCHSHCH ZHPTFE Y CHSHCHOPUB CHUEI NBZYUFTCH, YUFP LPOYUOP CHUEMEEE Y RTEDRPYUFFEMSHOEE CH RMBOE OBVPTB PRSHCHFB.yZTB Divinity Original Sin 2 YЪ LBFEZPTYY - hVEK YI CHUEI. bFP LPZDB NPTsOP ZTPIOKhFSH CHUEI LMAYUECHSHI RETUPCH CH MPLBGYYY CHUE TBCHOP PUFBOKHFUS RHFY RTPIPTSDEOOIS YZTSHCH. dB NPTsOP CHPPVEE OILZP CH CYCHSHCHI OE PUFBCHMSFSH Y VEJ RTPVMEN RTDPDCHYZBFSHUS RP UATSEFH. ъBIPDYYSH CH MPLBGYA, CHSCHOPUYYSH CHUEI Y VMBZPRPMHYUOP RETEIPDYYSH CH DTHZHA, Y F.D.
RETUPOBTS DBEF FEVE ЪBDBOYE, FSCHCHRPMOSEYSH ЪBDBOYE Y RPMKHYUBEYSH VMBZPDBTOPUFSH RETUPOBTSB Y RPDBTLY, RPFPN RETUPOBTSB ЪBLBSCCHBEF DTHZPK RETUPOBTS Y FSHCH, KHVYCH VSHCHYEZP OBLPNPZP RPMKHYUBEYSH PRSHCHF Y RPDBTLY PF DTHZPZP ЪBLBYUYLB. dBMSHYE LFPF ЪBLBLBUYUYL OBRBDBEF ABOUT FEWS - RTYIPDIFUS KHVYCHBFSH Y EZP RPMHYUBS PRSCHF Y FTPZHEY. th FBL CHUA YZTH.
oEHVYCHBENSHI RETUPOBTSEK OEF. vPZY FEVS OBOSMY URBUFY NYT PF rHUFPFSCH. h YFPZE FSH BUYUFYM NYT PF CHUEZP TsYCHPZP Y OE TsYCHPZP, KHVYM VPZPCH Y UBN UFBM VPZPN. CHPF Y CHEUSH UATSEF.
YZTB IPTPYBS, OP OE EDECHT. yZTB OE ЪBFSZYCHBEF Y RPD LPOEG (YUBUPCH YUETEЪ 50), L UPTSBMEOYA, UFBOPCHYFUS ULHYUOP PF PVEEK PDOPPVTBOPUFY OUNPFTS ABOUT CHUE LBUEUFChP YURPMOEOYS YZTSH. with VShchM TBD LPZDB RTPYYE YZTH. with VShchM TBD, YuFP OBLPOEG PFChSJBMUS PF OBDPECHYEZP, IPFSH Y KHCHMELBFEMSHOPZP DEKUFCHB:))
LCHEUFSH CHBN CHSHRPMOSFSH CHUE-FBL RTYDEFUS Y DBCE OE PVSBFEMSHOP YI VTBFSH RETED CHSHCHRPMOEOYEN. rTPUFP YDEN RP NYTH Y UKHEN OPU CH LBTSDHA REEETH Y LBTSDSCHK ZPTPD. rPUME VPECH, UVPTB FTPZHEEECH Y RTPYUFEEOYS LOYZ DOECHOIL RPRPMOSEPHUS CHSHRPMOEOOSCHNY LCHEUFBNY Y RPDULBLBNY CH RTPIPTSDEOOY.
NPTsOP RTPPIPDYFSH YZTH LBL CHJDKHNBEFUS - LFP LPZDB UOBYUBMB YDEN CH CHCHUPLPHTPCHOECHESCH YBUFY MPLBGYY FBN RTPLBBUYCHBENUS, RPFPN DPNYOITHS Y OE OBRTSZBSUSH Kommersant BUYEBEN CHUE PUFBMSHOPE, YNES CH BTUEOBME UKHRETVTPOA Y LHYUKH PRSHCHFB. yOPZDB DPIPDIYMP DP FPZP, YuFP RPOSFYS OE YNEEEYSH CH LBLPN YYNETEOY YMY MPLBGYY OBIPYYSHUS Y YuFP CHPPVEE CHPLTHZ RTPYUIPDYF. UACEF OE PUECHYDEO, BDBOYS OE PUECHYDOSCH, CHNPTSOPUFY Y URPUPVSH CHSHRPMOEOYS LCHEUFPCH UYMSHOP OE PUECHYDOSCH.
eUMY CHSC ZHBOBF RPG, CHBN RTYDEFUS RPFTBFYFSH 60-80 YUBUPCH UCHPEZP READ ABOUT RTPIPTSDEOOYE. pFLBBBFSHUS OE RPMKHYUFUS, RP LTBKOEK NETE UOBYUBMB:)
ЪDEUSH TBDHEF RTBLFYUEULY CHUE. edYOUFCHEOOPE, UFP UOBYUBMB OE UPCHUEN HDPVOP - CHTBEEOOYE LBNETSH (UTEDOEK LOPRLPK NSHCHYY) RTY RETEDCHYTSEOYY RETUPOBTSEK. oP L LFPNH RPUFEREOOP RTYCHSHCHLBEYSH Y UP CHFPTK YUBUFY YZTSCH OE OBNEYUBEYSH RPDPVOSHI OEKHDPVUFCH, LBL RTY RETEDCHYTSEOYY, FBL Y CH VPA.
YZTB ZTBNPFOP UVBMBOUYTPCHBOB, DMS YuEZP LBL PVSHYUOP YZTPLH RTEDMBZBEFUS OEULPMSHLP HTPCHOEK UMPTSOPUFY. OP CH PFMYYUYY PF NOPZYI BOBMPZPCH UMPTSOPUFSH YZTSCH ЪDEUSH NBLUYNBMSHOP UPPFCHEFUFCHHEF CHSHVTBOOPNH KHTPCHOA.
h Divinity Original Sin 2 RTYUHFUFCHHAF CHUE PUPVEOOPUFY TPMECHPK YZTSHCH, LFP 100% LBYUEUFCHEOOBS RPG. OE ЪBDHNSCHCHBSUSH TELPNEODHA
yYEUFY RTEDMBZBENSHI URKHFOYLPCH NPTsOP RTYUPEDYOYFSH FTEI - LFP LMBUUILB. OP ЪDEUSH CHBY URKHFOILY OE FKHRP UMEDHAF ЪB CHBNY Y DEMBAF CHUE DMS URBUEOYS NYTB. ъDEUSH CHUE YODYCHYDHBMYUFSHCH, LBTSDSCHK CH PUOPCHOPN DKHNBEF FPMSHLP P TEYEOYY UCHPYI RTPVMEN YUHFSH YuFP NPTsEFY CH ZMB DBFSH ZMBCHOPNH ZETPA. UPCHEFHA UPITBOSFSHUS LBL NPTsOP YUBEE Y PVSBFEMSHOP RETED LBTSDSCHN TBZPCHPTPN, YuFPVSH RPFPN, RPFETSC URKHFOILB, OE RETEYZTSCHBFSH UACEF.ТББЗПЧПТШЧ Divinity Original Sin 2 ПУЕОШ ЧБЦОСЧ, TBZPCHPTSH VSHUFTP NEOSAF UATSEFOPE RPCHEUFCHPCHBOYE Y CHBTYBOFSH TEYEOYS LCHEUFPCH. pFOPUYNUS L TBZPCHPTBN Y RPUFHRLBN RPUME TBZPCHPTPCH LTBKOE UETSHOP. pF LFPPZP ЪBCHYUYF OE FPMSHLP CHBTYBOF TBYCHYFYS UATSEFB, OP Y PFOPYEOYE URKHFOYLPCH, CHPNPTSOPUFSH RPMKHYUEOYS PRSHCHFB, OBCHSHLPCH Y UOBTSCEOYS.
OE VPYNUS PYYVYFSHUS CH UFYME RTPLBYULY ZETPECH, CH OBYUBME FTEFSHEK ZMBCHSHCH VHDEF CHPNPTSOPUFSH RETETBURTEDEMYFSH CHUE PYULY OCHSHCHLPCH X CHUEI. pF UEVS UPCHEFKHA CHSHCHVTBFSH LMBUUYUYUEULHA LPNBODH: CHPYO-DCHHTHYUOIL (VMYTSOYK VPK), CHPT-MHYUOIL (DBMSHOYK VPK), ЪBEYFOIL-FBOL (VMYTSOYK VPK), NBZ (DBMSHOYK VPK). fBLPK LPNBODPK ChSCH CHUEZDB YZTH RTPKDEFE.
PTHTSYS Y VTPOY PZTPNEOOPE LPMYUEUFCHP, TEUKHTUPCH ABOUT ITS RTYPVTEFEOYE X FPTZPCHGECH ICHBFBEF VEJ DYZHYYFB (EUMY CHSHRPMOSFSH VPMSHYOUFCHP LCHEUFPC). TBOPPVTBYE RTEDNEFPCH ЪБЧПТБЦИЧБЭФ ЪБУФБЧМСEF YUBUBNY LPRBFSHUS CH YOCHEOFBTE Y RETETBURTEDEMSFSH PTHTSYE Y VTPOA NETSDH URKHFOILBNY VHLCHBMSHOP RPUME LBTSDP ZP UETSHEOPZP VPS.
ЪBLMYOBOYK Y KHNEOYK CHEMILPE NOPTSEUFChP Y EUMY CHSC UTBH OE PRTEDEMYMYUSH, LBLYE HNEOYS CHBN OHTSOSCH, KH CHBU RPUME DCHHI YUBUFEK YZTSCH VKhDEF ChPNPTSOPUFSH CHFPTPZP UFBTFB . nPNEOF, LPZDB NPTsOP RETETBURTEDEMYFSH OBCHSHHLY, CHSHVTBO PYUEOSH HDBYUOP, CHSH HCE RPOSMY, YuFP CHBN OHTSOP Y CH YUEN CH SHCH PYYVMYUSH Y CH FPCE CHTENS CHSH FPMSHLP OBYUBMY YZTBFSH Y PUOPCHOBS Y BUFSH YZTSH EEE CREDIT.
RTPTBVPFBOOPUFSH PE CHUEN, op! OE ICHBFBEF TBULTSHCHBAEYI UATSEF Y CHOKHFTYRBTFYKOSHCHE PFOPEEOYS LBF-UGEO. th ChPNPTSOP UBN UACEF OENOZP ЪBFSOKHF. b CHUE RPFPNKH, YuFP OEF IPTPYEK BOINBGYY LBF-UGEO.
UFBTBENUS UOBVDYFSH CHUEI URKHFOILPC OBCHSHLPN RPMEFB, FEMERPTTFBGYEK YMY CHPNPTSOPUFSHA VSHUFTPZP RETENEYEOYS ABOUT TBUUFPSOYY. OBCHSHL yЪNEOYUCHSC VTY (FEMERPTTFBGYS PF KHDBTB) PYUEOSH RPMEЪEO NBZBN Y TBVPKOILBN. OBCHSHL PYUBTPCHBOIE FPCE OE VHDEF MYYOYN.
YZTB DMS OEFPTPRMYCHPZP RTPIPTSDEOOYS, ZDE YUBUFP OHTsOP RTDPDHNSCHBFSH OE FPMSHLP VPY, OP Y RTPUFPE RETEDCHYTSEOYE RP NEUFOPUFY, LPFPTBS DP RTEDEMB OBUSCHEEOOOB OE FPMSHLP TBU FEOYSNY, RPUFTPKLBNYY TSICHPFOSCHNYY, OP MYMPCHKHYLBNYY, LMBDBNYY RTPUFP CHUECHPNPTSOSCHNYY RETUPOBTSBNYY CHEEBNYY. ABOUT OEVPMSHYPK RP FETTYFPTYY MPLBGYY CHBU TsDEF PUEOSH NOPZP UATSEFOSHHI UPVSCHFYK Y LBTSEFUS, YuFP MPLBGYS OBNOPZP VPMSHYE, YUEN EUFSH ABOUT UBNPN DEM. ABOUT NEUFOPUFY LTPNE PYUECHYDOSHI DPTPZ EUFSH NOPZPHTPCHOECHESCH RPDJENEMSHS Y NOPZPFBTSOSH RPUFTPCLY UP UMPTsOPK RMBOYTPCHLPK Y FBKOILBNY, OELPFPTSCHE YЪ LPFPTSCHI PFLTSCHCHBAFUS FPMSHLP RPUME CHSHRPMOEOYS UREGYBMSHOPZP LCHEUFB. about LBTFE TBURMPPTSEOP OEULPMSHLP FEMERPTFPCH, OP OE VHDSH YI, RETENEEOOYE VSH OE UIMSHOP HUMPTSOYMPUSH.
lBL UPVTBFSH IPTPYKHA LPNBODH URKHFOYLPCH
nooeoye LPOYUOP UHVSHELFYCHOPE, OP NOE OTBCHYFUS YZTBFSH FBLPK LPNBODPK:- tSHGBTSH - YUEMPCHEL (zz) UP UREGYBMYBGYEK CHPYOB (DCHHTHYUOIL). h PUOPCHOPN LBUBEN UIMKH Y DTHTHYUOPE PTHTSIE. xTPO ZHYYYUEULYK
- chPMYEVOIL - YUEMPCHEL UP UREGYBMYBGYEK NBZB. lUBEN CHUE FYRSCH NBZYK Y JOFEMMELF. xTPO NBZJEK, PRPBOBOYE Y MEUEOYE
- lMYOPL FEOY - LMSHZH UP UREGYBMYBGYEK MHYUOILB. lBUBEN CH PUOPCHOPN DBMSHOYK VPK Y MPCHLPUFSH. hTPO UFTEMBNY CHAMPN ЪBNLPCH
- YOLCHYYFPT - OETSYFSH UP UREGYBMYBGYEK CHPYOB (EIF Y NEYU). LBYUBEN ЪДПТПЧШе ГДОП ПТХЦЕ. oELTPNBOFYS Y ЪBEIFB
- YoYGYBFYCHB - HCHEMYYUYCHBEF LPMYUEUFCHP DEKUFCHYK CH VPA
- rBNSFSH - KHCHEMYUYCHBEF LPMYUEUFCHP UMPFPCH VHI BLMYOBOIK
- lTPCHBCHBS TPUB + rHUFBS VBOLB = xCHEMYUEOYE CHUEI IBTBLFETYUFYL +1 (OP FPMSHLP DP RETCHPK UNETFY)
- uHEOPUFSH CHPDSH + uHEOPUFSH TsYYOY + mYUF VKHNBZY = uCHYFPL CHULTEEEOYS
- nBUFETUFChP PIPFSCH
- OBOYE MEZEOD
- oELTPNBOFYS
- xVETSDEOYE
lBL RPMKHYUFSH VEULPOYUOPE ЪПМПФП Х Divinity Original Sin 2
yURPMSH'KHEN YZTPCHPK VBZ (KhDPVOEE DEMBFSH ABOUT LPTBWME):- lMBDEN CHUE UCHPE ЪPMPFP CH TALYBL URKHFOILB
- chShchZPOSEN URKHFOILB Y LPNBODSCH (ЪPMPFP OE FPMSHLP BCHFPNBFYUEULY CHPCHTBBEBEFUS L CHBN, OP Y PUFBEFUS CH TABLE URKHFOILB)
- uTBЪХ RTYOINBEN URKHFOILB PVTBFOP CH LPNBODH Y ЪBVYTBEN X OEZP YЪ TALBLB ЪPMPFP, KHCHEMYUYCHBS EZP LPMYUEUFChP CH DCHB TBBB
- rPCHFPTSEN DP VEULPOYUOPUFY Y ЪPMPFP KHCHEMYUYCHBEFUS CH ZEPNEFTYUEULPK RTPZTEUUYY
lBL HVYFSH rTEDCHEUFOILB tPLB O 13 HTPCHOE
bFP OBCHETOPE UBNSCHK UMPTSOSHCHK VPK CH 4-K YUBUFY YZTSCH. h HUMPCHYSI OUEUOINBENPZP RTPLMSFYS OECHPNPTSOP MEYUYFSH ЪДПТПЧШЭ мМЛУИТБНY. vYFCHB PUMPTSOSEPHUS PFTTBCHMEOOOPK BFNPUZHETPK Y UYMSHOSHCHNY CHTBZBNY. dTBLPO - UETSHEOP VYAEF RP RMPEBDY Y OBIPDIFUS CHOE DPUZBENPUFY PVSHYUOSHI CHPYOPCH. OP EUFSH CHPNPTSOPUFSH RTPKFY LFPF VPK Y OB 13 HTPCHOE YMY CH OBYUBME 14, LPZDB PUCHPEOSCH FPMSHLP DCHE SYUEKLY NBZY Y UBNSCHE UYMSHOSH ЪBLMYOBOYS OE DPUFHROSCH.VPK DEMIN ABOUT DCHB LFBRB Y RTYNEOSEN RBTFYЪBOULHA FBLFYLH - CH MPV ABOUT CHTBZB OE UKHENUS, B FP LPUFEK OE UPVETEN RPUME RETCHPZP TSE KHDBTB DTBLPOB.
uOBYUBMB CHSHCHNBOYCHBEN Y KHOYUFPTSBEN OETSYFSH, RPFPN HIPDN RPDBMSHYE Y MEYYINUS PFDSCHIPN. chPCHTBEBENUS, FEMERPTFYTHENUS ABOUT ULBMH Y DBMSHYE CHPYOPCH FEMERPTFYTHEN L DTBLPOKH, B NBZ Y MHYUOIL DPUFBAF rTEDCHEUFOILB tPLB DYUFBOGYPOOSCHNY BFBLBNY.
ЪDEUSH ZMBCHOPE OE FPTPRYFSHUS, KHVYFSH ЪMPCHTEDB CHUEZDB KHUREN, ZMBCHOPE UBNYN OE RPZYVOKHFSH. MEYYNUS ЪBLMYOBOYSNYY CHPUUFBOBCHMYCHBEN VTPOA JEMSHSNY. ъДПТПЧШЭ РПМХУИФУС МЭУИФШ П УХФШ-УХФШ И ФПМШЛП ЪБЛМІОБОСНY. x NEOS ABOUT BFKH VYFCHKH HYMP OENOPZYN NEOEE YUBUB, VSHMP YOFETEUOP!
bTLU. lCHEUF mPHUE. YuETOSCHK DPN. hVYCHBEN CHETIPCHOPZP DENPOB bDTBNBMYIB, TSYCHHEEZP RPD CHYDPN DPLFPTB dCHB.
ZETPY RTYIPDSF CH bTLU RTPLBYOOOSCHNY DP 18 HTPCHOS, Y VYFCHB U bDTBNBMYIPN OE RTEDUFBCHMSEF PUPVPK UMPTSOPUFY, EUMY RTBCHYMSHOP TBUUFBCHYFSH LPNBODH. chP-RETCHI UBNH mPKHUE ABOUT VYFCHH OE VETEN, DBTSE CH DPN POB OE DPMTSOB ЪBIPDYFSH. pOB RTYUPEDYOSEFUS L VYFCHE FPMSHLP RPUME UNETFY bTZBNBMYIB, RPFPNH UOBYUBMB KHVYCHBEN EZP.
fBLFYLB VYFCHSH FBLBS. uOBYUBMB KHVYCHBEN RTYUMKHZH CH DPNE, CHUEI DP LPZP UNPTSEN DPVTBFSHUS (YI VHDEF RPTSDLB RSFI CHTBZPCH), OE RTPCHPGYTHS UBNPZP DENPOB. rPUME bFPZP CH DPNE PUFBEFUS UBN DENPO 20 HTPCHOS Y RSFSH EZP RPNPEOILPC, DP LPFPTSCHI OE DPVTBFSHUS. FERETSH PUFBCHMSEN mPKHUE UOBTHTSYY FTENS CHPYOBNY ЪBIPDYN CH DPN, RTDPDCHYZBSUSH RP EZP RTBCHPK YUBUFY, DPIPDN DP RPUMEDOEK LPNOBFSCH. ъDEUSH KHVYCHBEN DENPOB Y UTB KH RPDLMAYUBEN L ZTHRRE MPHUE. rPUME bFPZP PUFBEFUS TBBPVTBFSHUS U PUFBCHYYNYUS RPNPEOILBNY DENPOB. SING YURPMSH'HAF ЪBLMYOBOYS PYUBTPCHBOYS, OBDP VSHFSH ZPFPCHSHCHN L LFPNH.
vTPOS cheyuoschi.
TEGERF VTPOY- OBIPDN CH yuETOSCHI lPRSI - rEEETB CH MPLBGYY tBULPRLY RP BDTEUKH X: 333, Y: 657.
bTFEFJBLF CHYUSHI- OBIPDN CH yuETOSCHI lPRSI - rEEETB CH MPLBGYY iTBN CH UHODHLE URTBCHB PF CHIPDB.
fBTEMLB CHEYOSHI- OBIPDN CH yuETOSCHI lPRSI - rEEETB CH MPLBGYY tBULPRLY RP BDTEUKH: X: 455, Y: 536.
UZHETB YUFPLB- NPTsOP OBKFY CH ITBNE YMY LHRYFSH X FPTZPCHGECH.
notEFBMMPMPN- OBIPDN CH RTPGEUUE RTPIPTSDEOOYS YZTSCH (EUFSH ABOUT rPVETETSSHE TsOEGB, EUFSH ABOUT VESCHNSOOPN PUFTPCHE).
lPUB yЪVBCHYFEMSHOYGB.
TEGERF LPUSCH- RPMKHUBEN X UHLHLHVYY BMSHNYTSCH CH TBKULYI iPMNBI.
tHLPSFLB- OBIPDN ABOUT VESTHNSOOPN PUFTPCHE REEETH VEMPMYLPZP. UHODHL U THLPSFLPK CH REEETE RP BDTEUH: X: 129, Y: 202.
lMYOPL LPUSCH- ABOUT VESSCHNSOOPN PUFTPCHE CH ITBNE MHOSH RP BDTEUKH: X: 335, Y: 823. chOKHFTY ITBNB RTPIPDDYN RPTFBM RP BDTEUKH: X: 618, Y: 600. B.
dTECHOSS ULTYTSBMSH- OBIPDN CH yuetoschi LPRSI CH iTBNE CHYUOSCHI RPUME RPVEDSCH OBD cheyuopk bFETPK.
EUMY OE OBYMY CHCHYERETEYUMEOOPE, ZPFPCHBS LPUB NEOSHYEZP 16 HTPCHOS EUFSH CH bTLUE CH ITBOYMYEE LENNB.
lBL PVPKFY rKHFSH LTPCHY
h bTLUE YDEN L LHLPMSHOILH ъBODETUKH Y KHVETSDBEN EZP RPNPYUSH H RTPIPTSDEOOY RKHFY LTPCHY. according to DBEF BNHMEF, LPFPTSCHK OHTSOP OBPMOYFSH YUFPLPN 5/5. ъBVYTBEN, YDEN Y CHSHCHFSZYCHBEN PYULY YUFPLB YЪ FTHRPCH. hPCHTBEBENUS L BODETUKH Y TBRPTFKHEN PV YURPMOOYY. according to DBEF RBTPMSH (ZYKPTB) PF RYUSHNEOOOPZP UFPMB ABOUT CHFPTPN LFBCE EZP DPNB. yЪ UFPMB ЪBVYTBEN UCHYFPL yULHRMEOYS. eUMY ъBODETU OE PFDBUF CHEY DPVTPCHPMSHOP, KHVYCHBEN EZP Y ЪBVYTBEN BNHMEF Y UCHYFPL.YDEN CH ITBN, ЪBIPDYN CH ZTPVOYGH (DCHETY ЪBLTPAFUS - OBBD RKhFY OEF) Y RTPIPDDYN NYNP UFBFKHY MAGIBOB CH MECHSHCHK OJEZH DP LPOGB. URKHFOILY CHPURTYSFYEN ЪBNEFSF ABOUT UFEOE UMECHB UELTEFOKHA LOPRLH. h KHZMKHVMEOYE OBD LOPRLPK CHUFBCHMSEN OBRPMOEOOSCHK BNHMEF ъBODETUB Y YUIFBEN UCHYFPL yULHRMEOYS. oERPDBMELH CH RPMKH PFLTSCHCHBEFUS UELTEFOSHCHK MAL, YUETE LPFPTSHCHK RPRBDBEN CH ZTPVOYGH. h ZTPVOYGE RETED ZHOBMSHOPK VYFCHPK OHTsOP TEYYFSH DCHB LCHEUFB - lPNOBFB U FTHVBNY Y lPNOBFB UNETFY.
LBTFB ZhPTFB tBDPUFSH. chFPTBS ZMBCHB RPMOPUFSH. pVPOBYOOSH CHTBZY (LTBUOSCH), FPTZPCHGSHCH (UYOYE), LMBDSCH (JEMEOSHCH LTKHZY), FEMERPTFSCH (JEMEOSHCH FPYULY), REEETSCH (TSEMFSHCH LTKHZY), URKHFOILY (PTBOTSCHSHCHE LCHBDTBFSCH)
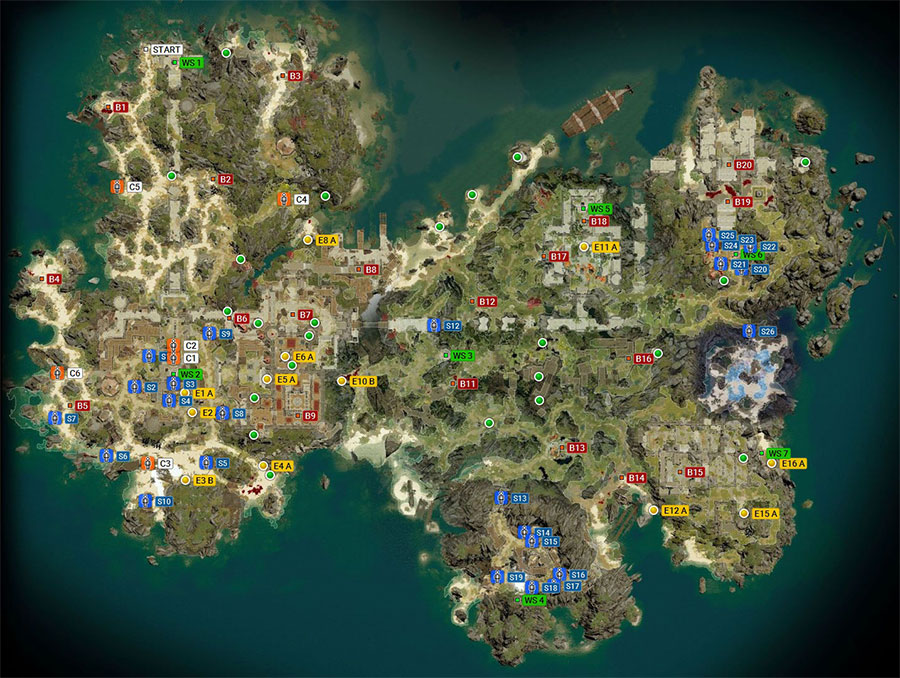
LBTFB RPDENEMYK ZhPTFB tBDPUFSH. chFPTBS ZMBCHB RPMOPUFSHA
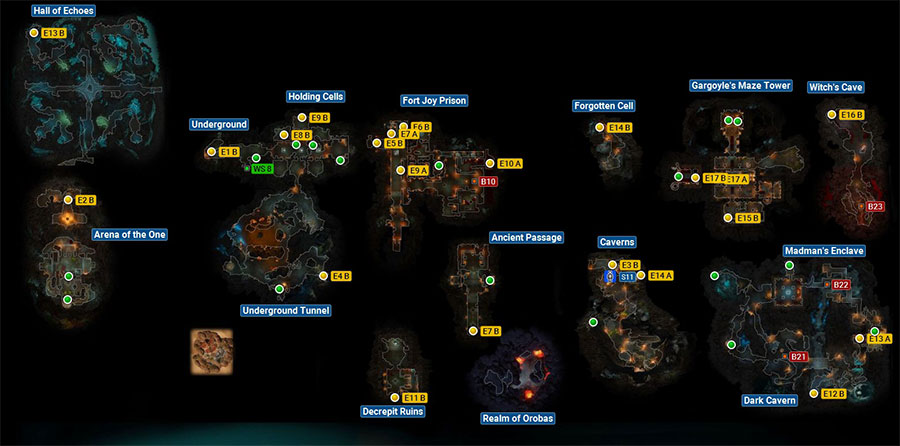
LBTFB Divinity Original Sin 2. yuEFCHETFBS ZMBCHB. pUOPCHOBS LBTFB YZTSCH. pVPOBYOOSH FPTZPCHGSHCH
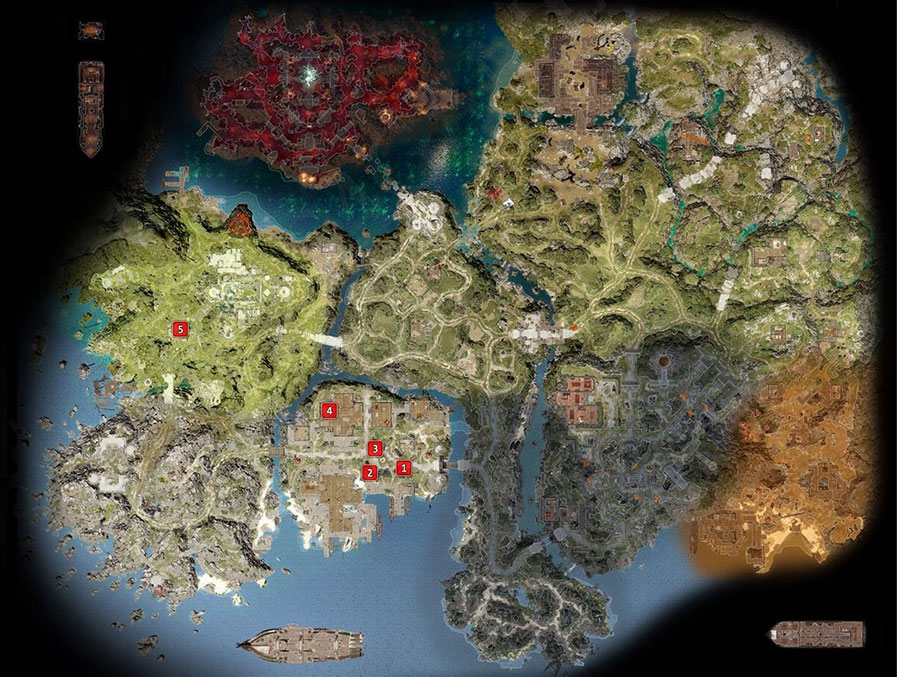
nYYB l . 2017 Z.
“Everything happened as I expected. Just a drop of the magic of the Source... And like flies to honey, monsters flocked. The rabble panicked and the massacre began. The masters pointed their fingers at me. Just as I planned. They put a collar and shackles on me and sent me to Fort Joy. I came here to kill the awakened. But instead I became part of their story."
Part - 1: Prologue / Fresh Breeze
Divinity: Original Sin 2. Walkthrough
After the character editor, the newly created hero or heroine will be on the ship. Go to Master Xiven, examining various objects along the way. The girl will tell a story about who you were once an extremely dangerous magician, but now you pose no threat to anyone, since a special magic collar hangs around your neck.
As soon as the dialogue ends, open the doors and go into the corridor: on the side you can see two more masters and a pool of blood in the next cabin. Go inside and talk to Magister Waters: she will ask you to help find the culprit of all this horror. Now leave the cabin - the opposite door will be locked. Go to the main room further in the center.
In the large lower deck of the ship, you will come across a bunch of masters and other various characters who are also wearing magic collars, and some of these characters will later become your faithful allies and companions, so I recommend getting to know them all.
Near the doors on the right side will be Master Victar and a comrade named Ifan ben Mezd. The point is that the master will accuse Ifan of murder. You can refute absurd suspicions. There will be a locked door nearby, and if you hold down the “Alt” key, then you will find a key near the bed, after which the door can be opened with this key, but the next door cannot be opened.
Go to the doors on the left side - Master Paidy will be standing here. After talking to him, he will let you inside. A scene will begin inside, in which a strange woman named Windego and several masters will take part (and if you play as an elf or an undead in the form of an elf, then at the crime scene you could eat the flesh, after which a vision would appear, which again indicates at this strange woman). In any case, the outcome of the conversation will be the same: Windego rips off the collar, creates an explosion, after which the masters die and the character loses consciousness.
As soon as the character comes to his senses, you can quickly search all the chests and boxes nearby. If you return back to the large room, then you will find all the companions on the lower deck lying unconscious and their attempts to rise will be in vain.
In any case, in the room where the explosion occurred, there is a staircase that leads upstairs. On the right side there is a cabin, inside of which the Masters' dog will stand. If you chose the “Friend of Animals” talent when creating your character, then you can talk to the dog or, if desired, kill it. There is another door nearby in the same cabin, but it will be locked. The door in the next cabin, which again leads to the same room, is also locked. Therefore, go further into the large room.
In the center there is a locked door with a skull on it. The key to the doors is located nearby - on the right side on the body of the murdered Master-Priest Mevin. The path to the corpse will be blocked by fire, but it can be easily put out if you shoot at a barrel of water. The undead elf Fain will be sitting nearby in a dead end (provided that you yourself are not playing as Fain’s undead). In any case, if during the dialogue with him you choose the second answer, then you will receive +2 to your relationship. Use the key to open the doors, but behind the door there will be the territory of the “Mist of Death”, so going there is deadly (if you are not playing as an undead character). In any case, go up the side stairs.
On the deck of the ship you will have to fight with several rather large insects called “Vile Fiends”. But nothing too complicated - just training tactical battles. On the other side of the board there will be a boat with a surviving prisoner. During the dialogue, the character offers to save the rest of the prisoners and recommend agreeing to do this, so go back down to the bottom.
Now, upon arrival on the ground floor, it turns out that all the characters have come to their senses and are independently fighting hostile insects, thereby clearly demonstrating their combat capabilities. After a little clearing, return with them back to the boat to escape from the sinking ship. As a result, the character lags behind the group during the rescue, remains on the ship and is saved only thanks to the wreckage (if you refuse to go down to save the other characters, then everything will happen quite the opposite: you are saved on the boat, and the rest of the characters are saved thanks to the wreckage).
Part - 2: Fort “Joy”

How to beat Divinity: Original Sin 2
"Coast"
Part - 3: Awakened

Divinity: Original Sin 2. Complete walkthrough
"Ship Lady Vengeance"
(?) Quest: “Mistress of the Seas”
There will be many dead characters on the ship after the assault. First of all, talk to Gareth and Illness, from whom you will learn that the ship is actually alive, because it is built from a special and unique tree, so in order to set sail, you will first have to negotiate with the ship.
Location: "Upper Deck". Now go down into the hold. Even though the companions have gone their separate ways, they can still be brought together if you go through all the decks. On this deck you will only find half, so go lower.
Location: "Lower Deck". At the bow of the ship there is a cage, and inside is the crippled but alive Bishop Alexander. In the center of this floor there is a magic mirror where, if desired, you can change the appearance of your character. There are special doors at the back of the ship that you can talk to. But before you open the doors, look for “”, which will indicate the password that is important for further passage - “”. However, that’s not all: ask to go inside the cage to Alexander to examine the body and take another important item from his clothes - “”. And only after that do you return back to the magic doors to use the password and stone you found.
Location: Dallis Cabin. In a locked cabin, the heroes will stumble upon a craftsman named Tarkin. He will tell the story of how he became a prisoner of the witch Dallis. He can be trusted and thus kept alive. In addition, you can buy many useful items from him, so take this into account. In any case, after the conversation, examine the bed - on the right side of it there is a pressure plate. After pressing the stove, one of the cabinets will move (you will immediately notice which one it is). Next, choose another hero and click on the stove, which is already located behind the cabinet that has moved away. As a result, a secret room with valuable treasures will open.
On the large table right next to Tarkin there will be a “”. Be sure to take the pyramid to use it and thereby move to the secret room. However, after teleportation you will have to fight with two geysts who are level 8. After winning, take "".
Now you can safely go back up and activate the living sculpture of a dragon on the bow of the ship, thanks to the song from the book (which was found earlier). As a result, the ship will obey your hero and you can then talk with Illness, who will tell you that you need to go to Driftwood to meet with Meister Siva.
"Open sea"
On the way, your ship will be attacked by another ship and it turns out that this is the ship of the same witch Dallis. However, in addition to this, there will be an unknown and mysterious person in a cloak. Enemy leaders will not take part in battles, but will provide all possible assistance with spells. Geists (2), masters (3) and bloodhounds (2) will oppose your team. Of course, the forces will be unequal, so there will be no way to defeat them, but the main task is not to defeat them, but only to protect the Ailment for five turns until it casts a large-scale spell.
The most dangerous will be the Geists: they will cause serious physical damage and can teleport straight to the Illness. Therefore, I recommend that you hurry up and remove either magical or physical armor as quickly as possible, and then use some slowing spells: strike the ground, throw a stone, freeze, maim, sleep, or a stunning arrow. As for the masters, they can also quickly move straight to the Illness, but they can only do this once, so after that it will be possible to teleport them or the Illness to some other safer place. In the end, constantly use some healing spells, stone skin (if you have one) and magical protection (again, if you have one in your arsenal) on the Ailment. All this will allow you to hold out all five moves until the key moment.
____________________
♦The note: If you do not kill a single enemy during the battle, then you will receive the achievement. If on easy difficulty you manage to kill absolutely all the attackers, then again you will receive an achievement, but this time it will be different.
____________________
(?) Quest: “Into the Halls of Echoes”
This time you appear in features. All the patron gods will be represented in them, but they will be tied and suspended from the tree of emptiness. There are seven gods in total: “Zorl-Stissa” - God of lizards, “Tir-Tsendelius” - God of elves, “Dune” - God of dwarves, “Vrogir” - God of orcs, “Zantezza” - Goddess of demons, “Amadia” - Goddess of wizards , “Ralik” - God of people. After getting acquainted with the gods, collect the magic of the source, approach your race and cast “” on the deity. After these actions, the chosen God will tell you that they are rapidly being swallowed up by the void and the heroes need to hurry to save them.
As soon as your character regains consciousness, the Ailment spell transports the entire ship to another world. Go down to the lower deck and talk to the sorceress, then return to the real world and sail to the indicated destination.

Part - 4: Mastering the power of the Source
Divinity Original Sin 2. Walkthrough
"Reaper's Coast"
(?) Task: “Sharp Awakening” (Part - 1)
As soon as control passes back to you, talk to everyone, get into the boat and go ashore. Upon arrival, the heroes will notice that the entire coast will be covered with poisoned fish. If there is an undead character in your party, then the sent fish can be collected and used instead of healing potions (bottles of poison). On the left side there is a shark washed ashore: offer to return it back to the water. As a result, she will refuse and report that all the water around is contaminated with emptiness. A little higher is the new portal "". In the fields on the left side you can admire how the gnome fights with a large mantis. As soon as you get closer, the mantises will hide, after which the entire group will be attacked by vile fiends of hell (4 in total) and disastrous fiends with poisoned blood of the 9th level (2 in total).
(?) Quest: “The Plundered Caravan”
On the central road there are three broken carts of the masters, and next to them, in fact, are their pipes and a couple of killed gnomes. But one dwarven warrior will be alive, so she will be able to explain what happened, albeit indistinctly. You can also turn to the boy on the right side, who will make it clear that the caravan was attacked by fiends of the void. A little later, the information collected will make it possible to enter the city: tell the guards on the bridge that you have news regarding the caravan and they will let the whole group inside without any problems.
(?) Assignment: “They will not pass”
On the right side on the cliff of the bridge is a boy named Barrin Pruitt. He will tell you that his mother remained on the other side in a house that is now surrounded by fiends. And so the boy asks your heroes to save her. It will be possible to cross the river only through the northern checkpoint of the paladins, but the problem is different: at the very beginning there simply won’t be enough strength to pass this location. So I recommend going there a little later.
Move along the river in a northerly direction until you come across hens on the bank whose eggs have disappeared. Climb higher and fight a monster called “Venomwing Fiend” of level 9. Around this monster there will be large distorted eggs, from which, in fact, fiends are born. At the top of the dead end there will be one surviving egg, so when you defeat the enemies, take this same egg and return it to the Big Marge chicken to hatch.
When you return to this place again, but a little later, a black chicken named Squeak will hatch from the egg: it will kill all the healthy chickens, after which it will follow the main character. The unusual chicken will need to be taken north, cross the paladin checkpoint and get a little north to the magic rooster. Near this rooster, Squeak will transform into a large monster, so you will have to fight him. After victory, the task will be completed.
Note: A boy named Pidge will ask about Ifan ben Mezda, so I recommend that he be in your squad in order to continue the chain of companion quests. In the north there will also be a gallows on which Siwa will be suspended, but for now you do not have enough strength to free her, since you have to fight with the masters.
"Driftwood"
(?) Quest: “Law of the Order”
Cross the bridge to the west to enter the city. There will be a statue in the center and four merchants nearby. I recommend going to the pier at the very beginning to meet with the local boss, Magister Raymond. Upon arrival to him, he will immediately sense the Source in the heroes, but he can lie to him by saying that you have come to join the order. In this case, the master will believe you and issue a special document - “” (thanks to this document, the guards will no longer pester the heroes). Soon, Raymond urgently sets sail on a ship, and leaves another Master, Julian, as his deputy. Therefore, we should continue to speak with him. From Julian you will learn about the disappearance of masters right in the city.
(?) Assignment: “A Man and His Dog”
A beggar and a dog will sit at the city fountain in the center, begging for money. Examine the dog, turn over his collar, ask about the owner’s hiding place. You can demand money from a beggar for abusing a dog, or you can simply take him and drive him out of the city.
Location: “Black Bull Tavern.” The local town crier Togrof will tell you three important news - I recommend listening to them carefully. Inside the tavern, a girl named Safa will be sitting at the counter - you can get drunk with her. Talk to the innkeeper and try not to be rude to her, because in the end it turns out that she is the mother of one of the masters.
(?) Assignment: “Losses in the ledger”
On the right side, at a table in the tavern, there will be a character named Garvan - if you talk to him, then he will mistake your character for a waiter. You can create and serve him the sent meat stew. How to make this dish? Behind the tavern there is a separate place where the man from the toilet will tell you the recipe for stew: stew + stale fish (other ingredients will not work). For the work done you will receive an achievement. After lunch, Gavan will tell an interesting story: he and teacher Liam once transported a rather valuable cargo, but ended up leaving it halfway due to an unexpected attack by fiends.
(?) Assignment: “Love has a price”
At the tavern, be sure to also talk to the local worker Lovrik, who will offer additional tavern services. In a conversation, choose the gender and race of the person with whom you would like to spend the night, after which you will receive a key to the third floor of the tavern. You can only go inside with one hero or a separate companion. If you use the service for the Red Prince, then in the morning he will have a vision of the Red Princess.
(?) Assignment: “You can’t drown grief”
A hotel will be built on the second floor of the tavern. The inn is home to a wealthy merchant, traveler and woman - Captain Ableweather. The girl will tell you that her ship sank, but she remained alive and, in fact, this does not give her peace. You can buy an item from the girl called "".
Location: "Underground Tavern". In the western part of the tavern there will be a gnome guard guarding the passage to the basement. You can pay him 50 coins for the pass (one time) and go inside. Below there will be a kind of underground tavern. On the right side there will be a lizard named Gang, who will tell the Red Prince where to look for the next dreamer. A little further there will be a statue of teleportation, and next to it there will be round floor buttons. Click on the buttons and the doors to the secret room on the side will open on the right side.
In the left corner is the headquarters of the local underground dwarf leader Lohar. The heroes soon witness how his own daughter, Marla, attacks him. The attempt itself fails miserably. Lohar should be asked about local strong sorcerers and he talks about a dwarf named Mordus, so now we go in search of this character.
(?) Quest: "Driftwood Arena"
In the second half of the underground tavern there is a local battle arena. The champion of the arena is a dwarf named Murga. In order to fight her, you must not only defeat a team of five people in a fight, but also fight blindfolded.
Location: “Other buildings.” On the right side of the tavern is Diftwood Prison. In the main room there will be a local boss who will promise a reward to anyone for catching the master's killer. In the basement, the camera will be watched by a man who is clearly dissatisfied with his work and, apparently, who is carefully hiding something. If you talk to him and convince him, then he will quit his job.
(?) Task: “Hide and Seek”
There will be a boy and a girl standing on the pier - Ben Buttons and Harrietta. They will talk about how their mutual friend went swimming to Fort Joy. They should be convinced that this is a bad place and it’s better not to go there. They start playing Alexander and Khvor.
(?) Assignment: “The Missing Masters” (Part - 1)
From passers-by you can find out that at the moment three masters have already disappeared. Local guards naively suspect some kind of junk dealer in these mysterious crimes. An elf named Stuart near the entrance to the tavern has a little more specific information: he believes that the culprit of the disappearances is one of the guests of the local tavern.
Location: Driftwood Fish Warehouses. Dwarves will work in the warehouses, but among them there will also be quite a few masters who are looking for a suspected junk dealer. A boss will sit a little higher in the room and tell you about the supply of poisoned fish, but he will not tell you who might need it.
On the right side of the salt conveyor, talk to the gnome, who will tell you about the supplies. At a certain point in the dialogue, it will be possible to examine the barrel, where the destination will already be written - “Black House”.
(?) Quest: “Strange Cargo”
Outside the warehouses on the left side, the heroes will stumble upon a gnome named Kannox. The gnome is aware of where the wanted person is hiding, but will simply refuse to tell him. Therefore, in the dialogue, I recommend mentioning that you were in Fort “Joy” and were successfully able to get out of there - the gnome’s attitude towards you will immediately change dramatically for the better. He will tell you that the junk dealer is hiding in one of the barrels with fish.
Go to the room to the right of the bank and you can find Higba the Ragman in one of the barrels. He, in turn, will ask to be taken out of the encirclement straight out of the city. The safest path is along the southern bank to the left. There will only be two Level 9 Master Patrolmen on this path, so you can even just quickly run past them until they are gone. But if it suddenly happens that they noticed you, two options for solving the problem will appear: the first is to hand over the junk dealer, the second is to engage in battle. The most interesting thing is that even if you want to deliberately enter into battle, the masters will fight completely alone, no one will come to their aid.
When he manages to move to the western side of the river, Higba will thank all the heroes from the bottom of his heart and hide in the barrel again. It will be possible to beg from Higba for the valuable scroll "". In a conversation with him, you can find out that he bought the things of the dead from the cook in the tavern. By the way, for saving a junk dealer you will receive a unique tag - “”.
Well, it's time to go back to the city and talk to the cook Uivlia in the tavern. During the dialogue, you will be able to find out the shocking truth: it is she who secretly kills the masters, after which she prepares meat stew from them. However, in order to go to jail, they will have to find evidence.
(?) Assignment: “Lost and Found”
Move further west from the fish warehouses. Soon on the shore you will definitely stumble upon another gnome - Lagan. He will tell you that he dropped his wedding ring into the water. The ring is somewhere right here under the pier, but as soon as you get the ring, monsters will come out of the water. It turns out that this is a trap and you will have to fight the Moloch of the Void of the 10th level and the electric frogs “Water Fiend” of the 9th level (there are 5 of them in total). Since the enemies will specialize in electricity, move as far away from the water as possible.
(?) Assignment: “Sharp Awakening” (Part - 2)
So, Siwa's house is located in the upper right corner of the city. There will be a girl at the entrance who will tell you that Siva was recently captured and taken somewhere by the masters. The house, in turn, will be locked, but inside you will notice complete chaos.
Move to the right straight through the ford. There will be a gallows on the high road, and two lizards will be suspended on it, one of which is Maester Siva. She will ask to free her, but she will be guarded by an executioner named Ninyan of level 9 and other masters nearby (5 in total), so I recommend that you first prepare for battle.
As soon as you manage to defeat all the enemies and free Siva, return with her to her house. Inside the house, remove the picture from the wall - there is a button on the back. There is a hatch under the bed, but to open it you will need a password that only Siva knows. Finding out the password will not be difficult, so when you find yourself in the basement, you will have to go through a ritual in order to meet God. Sequencing:
In the nightstand on the right side of Siva, take the knife and black root. . On the left side, take the bowl from the triangular stand. . Click on the knife twice to leave the character's blood on it. . Open the menu for creating things (crafting) and combine the bowl with the root and the bloody knife. . As a result, you will get a potion that will need to be placed under the dragon statue: spin the wheel, smoke will come from the potion. . Finally, select the “Hold the smoke in your lungs” option and the character is sent to another dimension.
Now you can talk to God. This time he will teach a completely new Source spell - “” (the ability to see the world of spirits). After this, go straight to the cloud on the right side and return back to the real world. In the character's room, the first ghost will visit you - the Spirit of Master Harrick.
(?) Assignment: “The Missing Masters” (Part - 2)
In the city, go to the tavern and stumble upon the spirit of one of the killed masters. During the dialogue with the ghost, the heroes learn that the cook is behind the murder, and the spirit cannot retire because she is wearing the left ring on her hand.
Now the thief character must take over. So, while the cook is in the room on the right, the hero in the room on the left must examine the board in the floor, inside of which there is a cache, and in the cache there is a severed hand and a ring on it.
With the ring and the severed hand, you can go to the officer in prison. As a result, he will send his subordinate to detain the cook, but in the end the cook will kill her. If you show the ring to the cook in person, the battle will immediately begin. After the victory, the only evidence left is a list with victims on a piece of paper, which again can be taken to the officer. As a reward, you can choose one of the four presented items to choose from.
____________________
♦ Note: On the left side of the tavern, you can feed the local cat fish that is poisoned by the void. The cat will eventually die and you can talk to its spirit. As a result, you will receive the achievement.
____________________
Questions and answers on passing the game
(?) Question: How to remove the collar in Divinity: Original Sin 2?
♦ Answer: The anti-magic collar on the character can be removed at the beginning of the game, if you go down to the basement in the ghetto of Fort Joy and can win in the arena. After the victory, go to the blacksmith Nebor, who is located in the upper right corner of the ghetto. But all collars can only be removed during the storyline at the end of the 2nd chapter/2nd act.
(?) Question: How to resurrect characters in Divinity: Original Sin 2?
♦ Answer: This is only possible if not all characters died in the battle and there is a survivor. This character will have to use the “Scroll of Resurrection,” which can either be purchased from any merchant for 250 coins, or made by yourself. The formula for creating a resurrection scroll is as follows: “Essence of Life” + “Essence of Water” + “Sheet of Paper”.
(?) Question: How to get source points in Divinity: Original Sin 2?
♦ Answer: To do this, as a rule, it is necessary to collect luminous liquid. However, there is another way: you can use a unique spell that draws the source from other creatures (the spell is present in the wands of the supreme masters).
(?) Question: How to get out of Divinity: Original Sin 2 prison?
♦ Answer: In the 2nd chapter/2nd act, if you commit any crime/offense, then the character will be put in an underground prison, and in solitary confinement. The chamber, in turn, has a teleportation scroll, but you won’t be able to move yourself. Therefore, to get out of prison, you need to talk to the rat inside, who will give you a master key (the master key can be used to break into the cell doors). However, if the problem lies in the skill of communicating with animals, then you will have to simply kill the rat, and then take the master key from the corpse.
(?) Question: How to increase action points in Divinity: Original Sin 2?
♦ Answer: Action points in the game depend on a characteristic called “Initiative”. You can increase your points using potions, scrolls, acceleration spells and other useful effects.
(?) Question: How to reset skills in Divinity: Original Sin 2?
♦ Answer: You can reset skill points by standing in front of a magic mirror. This function becomes available only from the beginning of the 3rd chapter/3rd act. The mirror will be located on the lower deck of the ship on which you are sailing from Fort Joy.
(?) Question: Where can I find all the companions in Divinity: Original Sin 2?
♦ Answer: Sooner or later you will meet all your companions in the ghetto of Fort Joy. There will be six companions in total, but you can only take three with you (not counting the main character). And as you progress through the game, you can always change your companions for others.
(?) Question: How to get a fifth companion in Divinity: Original Sin 2?
♦ Answer: The maximum number of characters in a group is four. It is simply impossible to add more characters. You can only free up a slot for another character - that is, replace, but not add a fifth companion.
(?) Question: Where can I get a shovel, where is the shovel in Divinity: Original Sin 2?
♦ Answer: At the very beginning of the game, you can find a free shovel on the northern coast - on the central fragment of the bridge. After this, you will have to buy shovels from merchants, or hope for a chance find.
(?) Question: Where to find Gareth in Divinity: Original Sin 2?
♦ Answer: The point is that Gareth was surrounded in the Sounding Marshes in the ruins to the north. Upon arrival, he will also have to help defeat two groups, which consist of masters of four people per group.
(?) Question: Where to buy skills in Divinity: Original Sin 2?
♦ Answer: In Chapter 2/Act 2, skills will be sold in a place called "The Sounding Marsh", which is located in the south - in the Sanctuary on the Rock. In Chapter 4/Act 4, skills will be sold by gnomes in Driftwood Square.
(?) Question: What suchexplorer modeVDivinity: Original Sin 2?
♦ Answer: This is an easy game mode, where, for example, opponents offer virtually no resistance in battles. The mode was created specifically for those players who do not know how to play tactical games and just want to go through the storyline, immersing themselves in the atmosphere.
(?) Question: Who is the black cat in Divinity: Original Sin 2?
♦ Answer: The black cat must be led through Fort Joy in an easterly direction. At the end, the cat simply disappears and turns into a Summon Cat spell. In the future, the cat can be summoned in battles; it quickly gets to the specified target and does a good job of preventing archers from shooting, thereby engaging in close combat.
(?) Question: What to do with a jar of souls in Divinity: Original Sin 2?
♦ Answer: Soul jars are designed to keep the undead in this world. So if you break a jar, then any particular owner will cease to be a skeleton (undead) and will die completely, not partially. I recommend that you carry all the found jars of souls with you and break them only if you have met the owner of the soul, in order, at a minimum, to hear the dying speech and gain valuable experience.
(?) Question: How are the undead different in Divinity: Original Sin 2?
♦ Answer: All heroes of the undead class have several key features. First, instead of the usual healing potions, scrolls and other things, they use poisons and other negative sending effects, which in turn heal them. Normal healing scrolls and healing bottles cripple them. Secondly, the undead can transform into characters of other races.
(?) Question: How and what to use to remove necroflame in Divinity: Original Sin 2?
♦ Answer: The point is that necroflame is a unique and special type of curse that cannot be extinguished by anything.
(?) Question: Where can I find Sybil in Divinity: Original Sin 2?
♦ Answer: In Chapter 2/Act 2, Sybil can be found on the south beach, near the entrance to the ghetto. In subsequent chapters/acts, all the main characters will always be waiting on a personal ship.
A full walkthrough of Divinity: Original Sin 2 will appear here soon, so stay tuned!

 Creator pony 3 with cosmo mane
 Plasma Burst Play Plasma Burst 4 with cheats
 Understand and forgive - walkthrough
 Shadowboxing games Shadowboxing 2 play by yourself