What to do with the heart of a phoenix divinity. Dedication. Test of all seasons
Note. The walkthrough was written based on the English version of the game with partial localization, so some names, names of items or quests may not match.
Troubled waters
When you wake up, look around and collect the first items from the table - equipment, an empty flask, a tome. In the future, we will not pay attention to such trifles. Talk to Master Siven, then move to the very end of the ship. Talking with other characters is completely optional. When you go to Master Williams, you will find a witch here. Whatever you choose, the witch will rebel, there will be an explosion and the Void will appear.
When you wake up, search everything around and be sure to find at least some kind of weapon. Equip it, go up two tiers to find yourself on the deck of the ship. Here you will have to fight for the first time - it will be slugs. Defeat them - the poisoned puddle can be used to lure opponents there, who will take damage. Alternatively, you can get rid of this puddle by using fire.
When you hover over an object that can be searched, you will see a “golden chest.” Search and then re-aim at the target - the chest will be painted gray. This is very convenient because it will allow you to know what you managed to search and what you didn’t.
Walk around the deck of the ship in a circle and chat with the children and the gnome sitting in the boat. Agree to help, to the left of the boat there will be a descent into the hold with a fire escape - follow there, go into the room where the prisoners were, and the battle will begin. Defeat all the fiends, after which the characters will run to the deck to the boat.
Go to the room where you first appeared and decide what to do with Master Siven - you can leave him here, you can finish him off, or you can try to save him until the last moment, pressing the piece of fabric more and more tightly. Eventually, the ship will be destroyed, and after loading you will be washed ashore.
Fort Joy
Follow the path forward, there will be two fiends a little to the right - kill them, and then continue along the shore to meet your first potential ally - the Red Prince lizard. Thanks to the fact that you returned on the ship for the remaining prisoners, he will say that he can trust you and will join the detachment. Looking ahead, it is worth noting that the lizard will be useful to you when completing a number of quests - its claws are capable of digging out various mounds. Otherwise you will have to look for a shovel.
A little further you can meet the Black Cat. If you have the Animal Friend talent, you can even talk to him. The cat will follow you, it will be unclear what to do with it. But the answer is already there: if you lead the cat across the bridge without being killed by the guards, you will earn an achievement and get this cat as a pet. It's about meeting Khan inside the Fort Joy prison and going on a boat ride.
Continue exploring the beach and collecting useful items, including coins and consumables. Some treasures are buried, so to get to them you will need the claws of a lizard (the Red Prince is a potential companion) or a shovel. To the east of the original location is an altar. Such shrines are used in the game for fast movement. The bridge leading to the fort is damaged, but you can return here after you have the teleportation gloves (or the corresponding skill) - this way you can move one of the squad members to the other side and collect the loot.
Near the ruined tower there is a small path that leads to the top of the mountain with many useful items.
Continue south. The game will automatically save right before you encounter opponents. Fiends are one of the main types of enemies in the game. Killing them is easy enough, but be careful as their bodies can explode, causing damage to those around them. This way, you can use ranged attacks in those moments when you deliver the final, killing blow.
Directly attacking opponents is not always the best strategy in the game. Use environmental effects to make the battle much easier. For example, barrels of oil and poison, surfaces doused with oil, water or blood, etc. The latter conduct electricity.
After destroying the fiends, continue south until you reach the Fort Joy camp. When this happens, search the body of Master Atusa near the fort gate. If you absorb her flesh, you will open bloody memories (the elf race has this skill - if you are not an elf, then hire Sebilla, located near the “Caves” location). There are various characters here and you can complete many side quests. But the main task at this stage is to find a way out of the fort and move to the eastern part of the island.
You can discover and complete the following quests in this area:
- Every mother's nightmare.
- Extortion.
- Captive elf.
- Geist killer.
- Driven into a corner.
– Withermoor Jug of Souls.
- Bloody memories.
– Artifacts of the tyrant.
– Signs of resistance.
- Saheila tribe.
- Teleport.
– Arena of Fort Joy.
Most of these quests will reward you with experience and items, but none of them are necessary for the main story. You can also remove the collar as part of the mission of the same name. To do this, it is enough to become the champion of the underground arena (Arena of Fort Joy), which can be accessed through a hatch located in the camp kitchen. Next, talk to Nebora (the seller near the main entrance) and she will remove the collar.
Clue. Heart of the waterfall
If your character has the "Jester" tag, then you can cheer up a small child near the waterfall. In turn, the child will tell you about a valuable treasure hidden inside the waterfall (where you can teleport).
At the location, you can recruit even more companions, as well as begin completing their personal quests - the Red Prince, Sebilla, Lowse, Fain and Ifan ben Mezda. Please note that you can take three teammates with you at a time. Some members of the team do not get along very well with each other - for example, Sebilla and the Red Prince. While you can still take them together, be careful not to kill Stingtail or any other characters that are important to their personal quests. By the way, both Sebilla and the Red Prince need Stingtail, which you will encounter as part of the Captive Elf quest.
There are several ways to escape from this part of the fort. The simplest (but certainly not the easiest) is to leave the fort by force. Four Masters guard the entrance to the main building. Even more is located in the courtyard. Your characters must be at least level five. In addition, you will need good equipment to have a chance of winning - otherwise everything will be in vain.
However, if you decide to force your way through, you can save the paladin standing in the courtyard, who was sent here by the Divine Order to find out what really happened on the island. The fort has plenty of loot (especially paintings, which are highly prized by merchants). Therefore, it is in your interests to return here a little later.
Another option is to use the teleportation gloves, which you will receive when completing the Teleport quest. This is a very useful skill that will come in handy not only for exploration (so you can find one of the potential companions located in an inaccessible place or get to treasure chests), but also in battle. You can teleport an enemy archer into your trap (for example, onto a burning surface or frozen blood), or send a melee fighter to a ranged enemy so that he does not spend action points, but can get closer to the enemy to attack. Even if you use other means to escape, we highly recommend completing this quest!
If you decide to escape from the location using teleportation gloves, then your characters will find themselves in the dungeons of Fort Joy. But if your level of thievery is not high enough to open some of the doors in this place, you can leave the dungeon using the southern entrance (requires level three and three companions). Then return to Fort Joy, teleport one of the squad members to the second floor of the fort (near the gate guarded by Master Borris and the others), lower the ladder down and make your way inside the prison.
There are a lot of silent monks in the prison, but they won't attack you, so ignore them. Here you can find the jailers, defeat them and use the sewer or boat (quest by the boy Khan) to escape from prison.
If you completed the quest "The Jar of Souls of Withermoor", then the lord should have told you about a secret lever hidden in the Sanctuary of the Seven on the territory of the Fort Joy camp. We are talking about an altar of displacement. When you use the lever, a hatch will open, which will also lead you into the dungeon.
If you completed the Captive Elf quest, Amiro marked a hatch on the map. This hatch will lead to an ancient tunnel through which you can escape from the prison of Fort Joy. If you removed the collar from the main character (after becoming the arena champion), then absolutely all masters will attack you when they meet. If you decide not to resist, you will automatically find yourself locked in the fort prison, from where you can escape.
You can also sneak into the fort's prison. Have one of your party members sneak past the magisters (through the stairs to the second level of the fort) to the eastern part of the fort to lower the bridge to the other part of the island. You don't need the whole team to do this, since there is another waypoint on the other side (such waypoints automatically bring the whole team together).
Before leaving Fort Joy, complete the quests of the companions - the Red Prince, Fain, Sebilla and Ifan ben Mezd. You may have two other partners - Beast and Lowse.
Noisy swamps
As soon as you move from this part of the island to another, all the masters will automatically become hostile, so be careful. You can still return to Fort Joy and move around peacefully as long as you don't get noticed by the magister. Once you reach the eastern part of the island, the first main goal is to reach the Shrine of Amadia, where the Seekers are hiding. There are two entrances to the camp - in both cases, the vines you can climb must be lowered by Bahara. By the way, the Red Prince needs this clairvoyant for his quest chain.
In one case, look for Bahara on the cliff of the beach, and in the other, in the place where you will be attacked by a huge number of Void fiends. There will be an area covered in fire and poison. Teleport to move the sources of fire and poison, and then ring the bell to call Bahara.
There will be many hostile creatures, including fiends and undead, wandering around the island, along with some wizards. Save as often as possible - make it a habit. When faced with fiends, remember that they may not be as safe as the first. Later, stronger fiends may appear, so do not waste potions, etc. If you find that the battle is too difficult, try using surrounding objects against enemies. You can carry barrels of oil or water with you, which will save your life more than once.
You can start exploring the island by heading east. On the way, everything can be complicated by the appearance of fire or poisonous gas. Using special skills, you can put out fire (rain or hail) or remove poison using flame. The flaming pigs you see along the way can be cured with a blessing and bloody rain, but you will not receive any reward for this, but you will be able to continue an additional quest (more details in a separate material).
After you kill the three salamanders, continue south along the beach. At the end of the road you will find the Sanctuary of Amadia. Talk to Bahara, who is standing on a hill, and the lizard woman will let you in by dropping vines. The sorcerers in the sanctuary will tell you that they plan to leave the island, taking away the masters' galley. To do this, you need to save their leader Gareth and find a weapon that destroys the Screaming.
Gareth can be found in the ruins to the north, where he will be attacked by several masters. We are talking about the quest “Driven into a Corner”. If you don't have the blessing yet, come back after you visit King Brakk's treasury and interact with the statue there. If Gareth dies during the battle, then Exter will become the leader of the Seekers.
There are two weapons you need on this island - inside the illusionist's cave (priestess Gratiana, Bracca's former lover, located in the sanctuary of Amadia, will mark this place on your map - the entrance is on the beach in the southeastern part of the island, near the three salamanders). This is related to the quest "King Brakk's Treasury".
There you will learn the blessing skill, which will be useful not only in battle, but also when completing various quests such as “The Armory” and “Burning Pigs”.
Clue. Dark Cave
Do not attempt to interact with the blocking field. Open the map and you will see a way to get around it. There is a statue inside the ruins that will give you clues for the puzzle. The key is each capital letter from which you need to form a word. You can find out about this if you talk to the rats - the Animal Friend talent is required, which Ifan ben Mezda has by default.
The second weapon you can find belongs to the witch Radeka, hiding in a cave near the gargoyle's labyrinth. She uses her wand to control and capture the Winter Dragon Slaine. You can break the chains that bind the dragon and promise him that you will kill the witch and return the wand to him. In this case, he will help you deal with the Screaming before you get to the last masters, led by Alexander. But you can keep the witch's wand for yourself - you will have to fight Slaine.
There is also a place in this part of the island that you might want to explore. But it is not necessary to visit - we are talking about the gargoyle’s labyrinth and completing the quest “A Fate Worse than Death.”
Before you begin your final assault on the Masters, make sure to complete other tasks on the island, because once you board the Lady Vengeance ship, there is no turning back.
And these are the quests:
- Eternal admirer.
- King Brakk's treasury.
– Healing touch.
- Armory.
– Artifacts of the Tyrant.
Also, don't forget to ask Leah at the Shrine of Amadia and remove the collar (if you haven't done so before).
After you save Gareth's life and get the weapon, it will be time to storm the magisters' bastion in the northeast of the island. By the way, if you helped Slaine, then you don’t need a weapon - just approach the Screaming Ones and Slaine will destroy them. Report this to Gareth - this will begin the “Call to Arms” quest.
While Gareth and his men hijack the ship, you and your team will have to attack the masters and distract their attention. This is a difficult task, so you can ask Gareth to send two people with you to help - you can choose an archer, an elemental caster or a fighter. But it may be best to fight the Masters on your own, since Gareth's men have low HP and are useless most of the time (you can't directly control their actions).
Note. You may need skill books and equipment from Seeker Kerban, a merchant at the Shrine of Amadia. He will be dead as soon as you board the Lady Vengeance ship, and you can take back everything you sold him. But not the skills and equipment available to him initially!!!
To counter the Magisters, you will need to take out the Screaming Ones first, using Brakk's Rod to kill them instantly. Then, if you do not want to get caught in the crossfire of the masters, do not rush to enter the bastion through the front gate. You can use the door to your right and flank the masters. Or use the corridor to lure opponents one at a time. The Master Knight can use the phoenix skill to ambush you and set the oil barrel on fire, so it's best to teleport the barrel to another location beforehand.
Bishop Alexander is a very tough enemy and his melee attacks can kill one member of your team per turn. The best way to defeat him is to keep your distance and attack from afar. You can use the teleportation skill to keep him at a distance. Or use the Hail Strike skill, which allows you to freeze enemies. Once Alexander is killed, you can easily deal with the rest of the masters.
But be careful, Bishop Alexander is not the last boss you must face. To leave the island, you need to defeat the fiend worm, which appears after the death of Alexander and his masters. Sometimes the Worm appears earlier and also attacks the masters. Therefore, you do not need to use all your consumables for the battle with Alexander.
If you feel that the team needs a rest before challenging the Worm, you can use the ability to escape the battle and return here later.
Compared to other enemies you faced earlier, the Worm has a large HP pool and better armor. However, it is weak against skills that use water. Use Hail Strike to attack him. Also, avoid having your companions too close to each other, as the Worm has a lot of AoE skills.
After you defeat the boss, you can talk with Malaise to go to the ship “Lady Vengeance” (quest “Lady of War”).
Note. As soon as you board the Lady Vengeance ship, you and your comrades will be separated - move all valuable and best items to the main character. In addition, as soon as you leave Fort Joy, all unfinished quests will be archived.
Ship "Mistress Vengeance"
After defeating Bishop Alexander, talk to Illness to board the Lady Vengeance galley. Your main task at this stage is to set the ship in motion and go to the mainland - the main quest “Lady of War”.
The first thing you need is the pearl of Bishop Alexander. You need to convince Magister Ranly or kill her to examine the bishop's body. Then you should find out the password for the doors to the cabin. First, find these doors, and then tell her when interacting with her that you forgot the password (you will need to show the Bishop's stone). Ask him to remind you. You will then learn that the password to the captain's quarters is “Fortitude.”
If you suddenly couldn’t find out the password and chose the wrong phrases, go to another door. If it didn’t work out with her, then change the character and communicate with others.
Note. There is a mirror on the lower deck that will allow you to redistribute talents, attributes, and even change your character's appearance.
If you have the Animal Friend talent, then talk to the ship's rat. She will tell you that Dallis uses songs to control the ship. Go to Dallis' cabin and pick up the dusty tome lying on the table. In Dallis' cabin there is a secret room with useful items and coins - guarded by two assistants. Perhaps you should go there after you have companions again.
After this, talk to the dragon on the edge of the galley and sing a song. Then you will have a choice - to free the ship or to bend it to your will in order to control it.
Dallis will try to capture the ship with a group of masters. You need to provide enough time for Malaise to cast the spell. You need to hold out for about four turns.
Explore another world, talk to the Gods and use the blessing on one of them. After you talk to your God (depending on the chosen race), you will be teleported back to the Lady Vengeance. When you return, Alexander will leave the ship. You need to talk to Illness to complete the next step and take a boat to the coast.
Reaper Coast
On the Reaper Coast, your main task is to find someone who will help you master the power of the Source. The main quest is “A Sharp Awakening”. Just like on the territory of Fort Joy, there are several additional locations in this region. First, explore the beach to fight several fiends and find the masters' caravan. Talk to the dwarf warrior who remains alive to begin the quest “The Plundered Caravan.” You will need to report what happened to the masters in Driftwood, but you will do this later.
A dying shark is lying on the beach, having left the sea for fear of some monsters. You can kill the shark and take the human limb, which is necessary for another quest - “Hide and Seek”. Near the edge of the bridge you will find a crying boy who needs help. Agree to help him find his mother to begin the quest “They Shall Not Pass.” You need to get to the other side through the paladin's hold and Stonegarden in order to pick the door blocking the path with a master key. You can complete this quest later.
Approach Driftwood and you will find a chicken coop nearby. If you have the Animal Friend talent, then chat with the main chicken. This will begin the quest “When to Count Chickens.” Go to the indicated place, kill the fiends and take the chicken egg lying a little further. Return it to the chickens, for which you will be rewarded.
Before you explore other parts of the Reaper's Coast, you may first want to rescue Maester Siva, who is hanging near the entrance to Driftwood. Convince the masters to leave or kill them. Siva will take you to his home (Maester's House on the map) and teach you the useful skill “Seeing Spirits.” This skill is required to complete many other quests on the Reaper's Coast. I highly recommend studying it before moving on. Otherwise, you will spend a lot of time searching for information or moving from one place to another.
There are even more side quests in Driftwood, which we have listed below:
– Grebb the scientist.
- Hide and seek.
- Web of desires.
- Sleeping traveler.
- Strange cargo.
– Love has a price.
– Driftwood Arena and others.
These quests will provide you with additional experience points, coins, equipment and new talents. In addition, the quest “Strange Cargo” will allow you to find out information about the master sorcerer.
Driftwood is dominated by two competing factions - the Magisters and the Dwarves. The Magisters will give you the quest "The Lost Masters and the Law of the Order", while the Dwarves will ask you to complete the quest "Shadow over Driftwood". You can accept both quests, since they both lead to the same place - a ruined cave.
Note. While you are completing the quest "Shadow over Driftwood" you may discover that there is a locked lich in Mordus's house. It is associated with the Taste of Freedom quest, in which you need to solve a puzzle.
Head to the ruined cave and along the way you can pick up the quest "Burning Prophet" (just light all the torches to complete it). You'll find a survivor inside the ruined cave, but there doesn't seem to be any way to explore it further. However, as you explore the end of the cave, four enemies will appear and attack you. You and your team members will be separated and sent deeper into the cave.
Cave map.
One of the team members (the main character) will be locked in a place without opponents. Explore the area to find several letters for the quests “Shadow over Driftwood” and “Law of the Order.” If you talk to the gnome near the strange mechanism, you will also advance along the personal quest of Ifan ben Mezd. The door to other areas is locked, so to get to the rest of the companions, you will have to open it with a master key.
If your character cannot use a master key and break into doors, then switch to another companion who happens to be in the bedroom. The key to the apartment is located next to it. However, this character will have to defeat several possessed gnomes and a fiend to obtain the key. If you want to leave this area right now, then try to find a hidden hole that will take you to the cave entrance. You will need to dig a hole using a shovel or the claws of a lizard.
Note. Use the spirit vision spell to spot several ghosts in the area. Talk to them to find out what happened.
The third team member ends up in a cave filled with fiends. If this character is not a strong fighter, then use other companions to save him. By going through the cave in that area, by the way, you can also find the key.
After you gather all the companions together, you can move to the next area (along the destroyed ship stairs). You will find Mordus attacking you along with his possessed minions. Once you defeat him, the battle will be over.
If you take the amulet from Mordus' body, you can use it to open the hatch in his chamber. Hidden behind the hatch is a stone that unlocks the dungeon under Mordus' house. Travel to Driftwood to complete the Shadow Over Driftwood (or Law Order) quest.
There are plenty of other side quests along the Reaper's Coast that might interest you. Aggressive Takeover requires you to speak with Garven at the Driftwood Tavern and agree to investigate the attack site (will be marked on the map). The attack site is near the bridge between the Reaper Coast and the monastery in the forest. Follow the bloody trail to find a small grave. Get the items from there, and then use the Spirit Vision skill.
You will see the ghost of Garven's partner, who blames not the fiends, but him for his death. You can agree to take revenge on Garven or refuse the ghost's request. On the bridge near the Reaper's Cave waypoint, there is a giant Gorg troll who wants you to kill another Marg troll. Marg is located on the bridge between the monastery in the forest and Driftwood. You can help one get rid of the other (Business Rivals quest), but be careful, as Gorg is a serious opponent who can kill your weak allies with one blow. Before fighting the trolls, make sure you are well prepared and save your game.
In the monastery in the forest (north of the Reaper Coast) you can find the merchant Eithne (X:168 Y:223). She will ask you to find a specific volume that tells you how to blow up corpses. In the ruins near the monastery waypoint in the forest, there is a powerful sorcerer named Hannag who fights the magisters. You can help the masters or the sorcerer. If you helped Hannag, he will give you another task On the Ropes (you need to explore the Blackpit). This way you will learn more about the Source (this is one of the ways to learn about it, which is required by the story quest).
To the east of the ruins you will find a demon hunter's house. Talk to him on Fain's personal quest to receive the quest A Hunter of Wicked Things.
To the north of the ruins there is Alice's corpse, next to the set fire area. Don't try to attack the enemy without proper preparation, as he has many powerful AoE skills and can heal from fire. Save your game before attempting. In the western corner of the monastery in the forest (at coordinates X:115 Y:269) there is a Lamenting Abomination. When you approach him, you will cause wolves to appear and attack you. Kill the enemies, then kneel at the altar to receive the Three Altars quest.
Another option is coordinates X:414 Y:301, on the river. In the fields of Driftwood you can take on the quests The Ugly Little Bird and Treated Like Cattle. Both tasks require the Animal Friend skill. To take the first quest you need to talk to the sick chicken on the farm. If you have the Scientist tag and the Animal Friend talent (like Sebilla), you can convince the chicken that she is actually a phoenix. All that is needed for this is to turn it into a real phoenix, that is, burn it.
When she agrees, cast a fire spell and the bird will turn into a phoenix egg. You can decide what to do - eat the egg or leave it. On a farm north of Driftwood, you'll come across a couple of cows that were once human before being enslaved by a witch. They want their human forms back. Treated Like Cattle quest.
The witch's house is east of the cows, and the key to enter is lying on the ground to the side of the hut. There are a lot of exploding rats in the dungeon under the house - attack the holes in the walls to stop their assault. There is also a lever that opens the door. Or here you can use teleportation. There is only one potion in the dungeon. The witch's book is located on a giant frog, and the witch's eye, one of the ingredients, lies in the house itself.
Having the Scientist and Mystic tags will allow you to decipher the recipe book to create a witch's potion.
There is an elven structure east of the Driftwood travel point, and across the river there are four statues surrounding a brazier (at coordinates X: 447 Y: 340).
Talk to the brazier to unlock the quest A Trial for All Seasons. You need to attack four statues using different skills to complete the task:
– Hero of Winter – cast Winter Blast or Hail Strike.
– Hero of Autumn – Static Cloud spell (use an arrow or fire spell on a pool of water, then attack the cloud with a lightning spell).
– Hero of Summer – Laser Ray spell.
– Hero of Spring – Raining Blood spell.
After you interact with all the statues correctly, four enemies will appear. There is an elf camp near the four elven statues to the east. Head there and show your respect to complete the Burial Rites quest. Talk to the elves and they will ask you to save Saheila during The Elven Seeker quest. If you didn't kill Saheila at Fort Joy.
Saheila is imprisoned in a sawmill in the north, which is guarded by wolves. If you have Ifan ben-Mezd on your team, you can calmly go inside the sawmill (after talking with the wolves, with whom you can even trade, because they have decent equipment and a lot of coins). Sell your unused equipment to the wolves, then you can return it later when the animals become hostile!!!
At the sawmill you can complete many quests - for example, personal tasks of Sebilla and Ifan ben Mezd. You need to go to the second floor of the main building and kill Rust. He is guarded by two people and a real wolf. After killing Rust, all other lone wolves will become hostile (if they weren't already).
Escort Saheila to the elf camp to complete the quest, and as a reward, the elf will show you how to master the powers of the Source. If Sebilla is on the team, Saheila will reveal her true identity and give her a choice.
To the east of the sawmill is the Red Princess's camp. Let your companion the Red Prince talk to her, which will advance his personal quest. Some lizards will attack you, but as soon as you defeat them, the Red Princess will disappear.
The right location.
When you travel to the northeast corner of the Reaper's Coast, the sky will suddenly become dark and all your characters will receive the decay effect. Healing turns into 100% damage! On the damaged bastion you will find the Doom Phantom along with the undead - kill him to return to normal.
Please note that the cracks that appeared have divided the location into many small areas, so you will have to use teleportation gloves to move around it. Or use spirit vision to find out what happened. However, be careful when teleporting to a certain location - undead will appear due to falling meteorites.
There is a Healing Chamber northeast of Stonegarden. Go there to unlock the quest “Dangerous to yourself and others.” Help the infected witch in the basement or kill her.
Gareth can be found in front of the house in Paradise Downs. He wants you to kill the silent monks and take revenge for everything - the Burying the Past quest. You can do what he asks, or talk and talk him out of the idea.
Pogost
Stonegarden is another place on the Reaper Coast, rich in story and side quests. However, in order to complete quests in this location, you first need to obtain the ability to see spirits. We wrote about this in the previous chapter.

Spirit of a dog.
A black dog named Andras wanders around this area. This is a powerful necromancer who can summon undead trolls. If you have the Animal Friend talent, you can fight him and get a reward. He guards the entrance to the tomb of his master Hannah. Hannah has the Dark Tomb key needed to complete the quest "A Family Affair". She mentions Anathema. Killing her and getting the information along with the key will require a blessing.
If you activate the see spirits spell, you will see many ghosts. Some of them can provide useful information and items, while others can even give out quests.
Interact with the rotten flower in front of the elven family tree to enter a small dungeon. There is a tough battle ahead, but you can also find a valuable reward.
Near the waypoint there is a tomb with two rotating statues. First you must find the missing angel head (to the west of the waypoint, in front of another tomb, lying on the ground). Restore the statue and then rotate both statues so they are facing outwards. You will open the tomb.
In the churchyard you can find a lizard chest, between two fire-breathing statues. Let the lizard talk to him and you will learn that a password is required to open it. Turning into a lizard won't help here! The password can be obtained from the salamander in Riker's mansion, but this will require a lizard character with the Animal Friend talent.
At the graveyard gate stands Tarquin, who will ask you to explore the family crypt and find his artifact. To enter the tomb, you will need to unlock the door with a master key or obtain Hannah's key. In the first room there are two buttons on the wall - get close to find them. Click on the buttons to open the stone gate.

The necessary hatch.
Have one of your companions go into the third room and stand on the pressure plate. Then activate the vision of spirits (can be learned during the quest "Sharp Awakening") to see three levers on the wall of the second room. Pull the levers (middle, left, right) to open the secret hatch. There is treasure in this hatch. Use the character with the highest luck to rob the place. The artifact is in the coffin. If your character is a lizard, then he will recognize the language he speaks. When you try to leave the tomb, the clay guards will come to life and attack you.
Cast Vision of Spirits at the Stonegarden waypoint, and you will be able to see the lizard ghost near you. He will ask you to dig up his remains and burn them in eternal fire. Place the remains of this lizard in the correct part of the cemetery (where the two dragon heads emit fire). A lizard ghost will appear and thank you for your help.
At the graveyard you will hear voices asking for help (at coordinates X: 625 Y: 153). Agree to dig up the one who asks for help, and the skeleton will tell you that he is a philosopher and challenge you to a duel. If you agree, he will ask you three questions. If you cannot outsmart him, the character will die instantly. You need to read three volumes of The Essence of Being to defeat the philosopher. Some tags may also help. South of the Stonegarden waypoint there is a coffin containing four heroes. Study them and find out the location of their belongings. But if you study all four burials, the heroes will come to life as skeletons.
In the graveyard you will find the gravedigger Farima, who asks you to kill Riker. In the mansion, Riker will ask you to return a certain item to him, in exchange for which he will teach you how to subjugate the forces of the Source - the quest “A Generous Offer”. Use the spirit vision spell and learn more about Riker.
Cast Vision of Spirits here and you can learn more about Riker. If you find a contract at the sawmill, you will find out that Riker is a lone wolf who must kill all believers. If your character is a lizard and has the Animal Friend talent, then talk to the salamander in Riker's mansion to find out the password to the chest.
Black Mines
Head to the Black Mines in the southeast of the Reaper Coast - this place is filled with Hollows and Magisters. The apprentice's house is located at the entrance to the Black Mines, where a group of magisters have captured ordinary people and are about to execute them (you can fight the magisters or leave them alone - this is part of the On the Ropes quest).
There are magisters guarding the gates that block the path to the next territory. If Raymond gives you the authority to help the masters, you will be able to pass through the gate without any problems. Otherwise you will have to fight. Outside the gate you will see a white master who is busy interrogating a wizard (a student of Hannag, still required for the same task). Approach the harbor where there are magisters blocking the way. You can try to get inside, but two Shriekers are blocking the passage. Use the source of vampirism to destroy them.
Note. If you have a special rod from Fort Joy, you can use it to destroy the masters. If not, then use the power of the source and complete the ritual in the quest “Sharp Awakening” to learn the “Source of Vampirism” skill.
Raymond and the other Harbor Masters interrogate a member of the black ring. When they find you, you will have no choice but to fight them. If Raymond's HP is low, he will try to escape.
After you defeat the masters, search the place and read the notes and letters to find out what happened. Or you can use spirit vision and communicate with the spirits (or let the elf eat the remains). On the other side of the harbor is Anna, guarding the mine in the Black Mines. Defeat her to get inside (nearby there is a place for the quest “Shelter of Heroes”).
This mine is filled with traps and pipes. Use teleportation or disarm traps. For teleportation, both teleportation gloves and two pyramids from Dallis' apartments on the ship "Mistress Vengeance" are suitable.
In the distance you can spot the Shrieker guarding the altar of wanderings. Apply the “Source of Vampirism” skill or a special wand on him. Moving forward, you will witness the battle between the masters and the Hollows. Defeat the fiend first, and then try to convince the masters that you got here by accident - otherwise you will have to destroy them too. Search the bodies of the masters to pick up the key to the nearby room. There is a hidden stone door in the room - approach it to make it light up. Behind the stone door is a mechanism that teaches you how to make masks. One source point will be required.
Leave this place and go to the workshop to meet with several masters. You must defeat them and destroy the gate by using, for example, a fire skill on oil barrels. This way you will go to the ancient temple. Use the mechanism inside the temple to find out more information.
There will also be a puzzle with a riddle and a shrine of the Seven. You must activate the God statues in the correct order.
Search the dead body in the ancient temple to find a book with a clue to solve the riddle. Each God is associated with a specific force or element, namely:
- Shooting gallery with blood.
- Duna with air.
- Wrojir with fire.
– Amadia with magic.
- Ralik with the ground.
– Zorl with fire.
- Xanthessa with reason.
The order of solving the riddle will be as follows: Amadia, Tyr, Duna, Zorl, Xanthessa, Wrodzhir and Ralik.
After you click on all the pillars, you will be able to talk to God. You will need to defeat the Eternal and her stalkers. Search the place, collect the loot and get out of here. After you return to the control point to the paladins, you will find that they were ambushed by the voids. Help the paladins to get your reward.
Blood Moon Island
Before you travel to Blood Moon Island, you will first need to study the power of the source in several places with the help of certain characters, which will allow you to continue the Sharp Awakening ritual and learn the Source of Vampirism skill. It is required for many quests on this island.
Ask the undead boatman north of the monastery forest to take you to Blood Moon Island. Your first goal is to talk to a Lawyer. This demon will ask you to kill the Black Rings hiding on the island. Note that the Lawyer is the target of the Hunter of Wicked Things quest and Lowse's personal quest, so to maximize profits, try to kill him later.
Explore the island, but don't go near the ancestral tree. On the eastern side of the island you will find an unfinished shelter. The nearby Black Ring has a silver ingot - kill it and take the item.

The necessary hatch.
There is another shelter in the northeast - dig out the nearby hatch. Inside you will find an archivist's journal - read it to find out the name of the ancestor tree. Here you can also find the second half of the artifact for the “Family Affair” quest. On the western part of the island, you can use spirit vision to see several ghosts. One of them will give you the quest “Druid” (in a destroyed house near the demonic enemies).
In the north of the island, use the ancient forge to create two levers from a silver ingot (there will be one nearby). You can now attack the Black Rings near the Ancestor Tree. Kill them and complete the Lawyer's quest. You can also kill the Lawyer to complete the Hunter of Wicked Things quest.
Activate the spirit vision spell and talk to the tree spirit. Say his name to continue the conversation and find out the name of the demon who captured Lowse. This way you will receive the Doctor's Orders quest.
From one of the members of the Black Rings, standing near the Ancestor Tree, you can get the book “Taming the Holy Fire” (before deciphering the book, you need to find a character with the “Scholar” tag). Use the Anthem to unlock statues in three vaults. You need to use spirit vision to see the guards, and then convince them or kill them using a source of vampirism. The silver lever must be used to repair the switch.
After you deal with everything on the Reaper's Coast, return to the Lady Vengeance and go to the Nameless Island.
Nameless Island
Here on Nameless Island, your first goal is to get to the Academy and complete your companion's personal quests. Examine the bodies and find out that the Black Ring and the masters are fighting each other on this island. On the corpses of some of them there is a special rod needed to destroy the Screaming Ones.
If you saved Delorus at Fort Joy, then meet him here and receive information about the Black Ring and Bishop Alexander. In the flooded temple (to kill inside, you will have to kill the Master of the Black Ring), interact with the altar to find out information about Wrojir. In the Temple of Ralik, interact with the altar to see a vision of this god. At the entrance to the elf temple there are several Shriekers - use a source of vampirism or a rod to destroy them.
Alexander is on top of the elf temple. You can agree to help him kill the man.
There are several other side quests in and around the Elven Temple.
To the east of Ralik's temple there is a cave guarded by trolls:

The same cave.
Enter the cave, use the stone that Alexander gave just after the altar to remove the fake wall. This way you can get to the right person.

Black Ring Camp.
Kill him and report this to Alexander. He will share the necessary information with you. If you sided with the Black Ring, then you will need to kill Alexander and bring his head to the altar. In this case, you will learn the necessary information from the person who needed to be killed in the previous quest.
Moon Gate Puzzle:
You must match all seven gods.
– Man is the Sun.
– Elf – Moon.
– Dwarf – Moon.
– Orc – Sun.
– Imp – Luna.
– Lizard – Sun.
– Wizard – Moon.
Once you get it right, use the Lightning skill and then hit the switch to open the gate. If you don't want to take sides, you can use your teleportation skills to get through the ruined areas in the south of the Dwarf Temple. In the easternmost part of the region, you can dig a hole to get inside.
Through this hole you can get into the academy without anyone's help.
Before you enter the academy, your companions will temporarily leave the team. You must convince them to agree that you must ascend to Divinity. You don't have to convince your romantic partner. No matter which method you choose, you will eventually end up in the academy. If there is a capacitor, you can repair the informant to find out details about the academy. The key in the vault is in the library.
If you activate the vision of spirits in the teacher's room, you will be able to see the spirits of the teachers. Each of these can boost one of your attributes if you sacrifice another. To remove the barrier, you need to activate all three squares at the same time. Like this:

Capacitor.
First, place the capacitor on the square in the teacher’s room (capacitors can be found in the Black Ring camp, where it was necessary to kill a person at Alexander’s request, as well as in the rooms of the academy - one in the western storage room, another on a corpse in the library, the third in the library office) . Place the supports in the correct position:

Solving the puzzle (screen 1).

Solving the puzzle (screen 2).

Solving the puzzle (screen 3).

Solving the puzzle (screen 4).
After you electrify all three squares in front of the barrier, use the switch to turn it off. Note that if you don't have enough capacitors, you can create a puddle and cast a lightning spell on it to activate both squares.
Alexander and other believers are behind the barrier (there are no companions in the team). When you're ready, talk to the Eternal Arbitrary to enter the One's arena. Before continuing, you can teleport one of your party members to the Forbidden Library to complete the side quest "Unscientific Endeavors".
In general, you can complete two additional quests at the academy:
– Unlearned aspirations (cast a vision of spirits in the library, communicate with the spirit of Taryan and help her find her lover in the forbidden library).
– Testing Ground (close the door to the teacher's room, enter the portal, then activate the spirit vision to communicate with the bird spirit and challenge the Eternal Protectors). In this quest you can get an excellent blade (Blade of Swornblade).
When you finish your business at the academy, you will talk to the Eternal Arbitrary and will be teleported to the arena of the One along with other believers. You will have to get to the end faster than others.
If Alexander is still alive, he will be here along with your comrades who have temporarily left the team. You can focus on them, and then go to the end. When you are ready, absorb the power. Suddenly Dallis will appear and take her away. Her actions will lead to the destruction of the Arena, and you will have to escape from the ruins before it is too late.
Angry at the failure, the Gods attack you. When you kill all of them, use the Illness Beacon to escape from here. Return to Lady Vengeance where you can spend the night with your lover. When you feel ready to move on, talk to the statue to summon the Ailment and go to Arx.
Arx
Your main goal is to get to Dallis in this location (quest “The Hammer Has Fallen”). First, go to the harbor, the area of which is controlled by the Netherfiends. Kill them all so you can talk to the lord and find out what happened. On the way to Arx, on the bridge you will meet paladins fighting Hollows. Help them to complete the Battle at the Gate quest.
When you get to Arx, use spirit vision to see many ghosts of magisters and paladins. Some of them can provide useful information. Or use the source of vampirism to get source points. The main goal in Arx is to find a way to get inside the tomb of Lucian the Divine (connected with several quests).
First, go to the masters' barracks. When you first reach them, you will see Lord Kemm - the leader of the paladins - who is about to execute the paladin without due process. You can save the paladin by convincing Lord Kemm (quest "Execution"). Later you can meet the paladin in the prison and take on the quest “Linder Kemm's Vault”.

Inside the master's barracks, find a room with traps, where there is a hidden hatch and the master's spirit. To see this hatch, remove the boxes on it. You can try to convince a nearby spirit to reveal the combination to this hatch, but this is extremely difficult (you will need level five persuasion).
The correct combination to open the hatch is related to the masters' motto:
- Society.
– Loyalty.
For solving the puzzle you will receive experience points, and the spirit will disappear. Therefore, if you want to use the spirit to obtain the source, then do it before solving the puzzle. Inside the magister's vault there are four switches hidden behind paintings. Remove the painting and activate them in the correct order to open the secret room: Mind, Body, Society, Loyalty.

Location of the first switch.

Location of the second switch.

Location of the third switch.

Location of the fourth switch.
Inside the secret room, read the report to gain experience points. If you use the vision of spirits, you can get additional information. At this level you can find a book that will activate the side quest “Master of Sleep and Nightmares”. There are three Geists on the second level of the Magister Vault. Defeat them, search the bodies to get another book, which says that Dallis resurrects King Brakk (quest "Rebirth of the King"). Fight Tarkin in the Chamber of Echoes to complete this quest.
Return to the masters' barracks, go up the stairs to the prison. If you saved the paladin during the “Execution” quest, then you will meet him here. Talk to the paladin guard to learn about the missing prisoners. Agree to investigate this incident (quest “Missing Persons”).
You can also find Windego in the prison and convince the paladins to let you deal with her. You can free her by providing coins or items to improve relations, and then lower the barrier (quest "Mercy is Strength"). If you have a special blade, you can free Windego from the God King. But it is likely that you will not want to use this blade from Lord Kemm's vault, since it will be needed for the Red Prince's personal quest.
In the Masters' Prison, activate the spirit vision and talk to the ghost. Agree to help him find Bannet. The corpse of this character can be found near the sewer, where you will have to activate the vision of spirits and talk to the ghost. Enter the sewer.

Communicate with spirit.
Inside it you will find a crying boy. If you use spirit vision, you will see how the spirits are holding him. If you let the boy go, he will turn into a madman and attack you along with the undead (quest “Mistakes of the Past”).
Use the stairs to go to the second level of the sewer - there you will find the thieves guild. Near the room with fog. You can find out the girl's location in the school house.

Thieves Guild location.
There is a group of children and trolls here. Buy the painting they stole from Lord Kemm's hideout. Or get it in other ways - part of the quest “Linder Kemm's Vaults”. Go to Linder Kemm's mansion, talk to the character on the first floor and convince him to give you the task "Old is Golden" (you need to collect three items in Linder Kemm's vault). The entrance to Lord Kemm's vault is in his garden - you will need to pull a hidden lever to open this hatch.

Hidden lever.
After you pull it, enter the vault through the hatch. Inside Kemm's hideout, there are several automatons patrolling the area. You can either sneak past them or destroy them. For the latter, you will need a source of vampirism.

The necessary hatch.
At the end of the vault, use spirit vision and frame the painting you got from the thieves guild. This will open the door to the secret room. There is another painting inside - take it with you. Search the room and then activate the book on the right shelf. Behind the stone door is a hatch that will lead you to the Temple of the God King. After you finish talking to the king, interact with the sign on the ground. It says here that only King God knows the weight of responsibility (this is the same picture).

The right book.
Place the Responsibility painting on the altar to open the hatch to Arhu Prison. Lord Arhu is here. To free him, you need to use spirit vision and use the source of vampirism on these tormentors. The statue has the Swornbreaker blade you need. Once Lord Arhu is freed, four defenders of the Black Ring will appear and attack you. Next, Lord Kemm will arrive, who will also have to be defeated. You will have to teleport Arhu to a safe place to keep him alive. Or, if he is killed, you can talk to him using spirit vision.
After you defeat Lord Kemm and the Black Rings, Lord Arhu will tell you how to solve the puzzle in the cathedral. Before leaving the shelter, do not forget to pick up three antique items needed for the quest “Old is Golden.”

Location of painting and scroll.

Bowl location.
After you find all three items, return to the appraiser and collect your reward. To enter Lucian's tomb, you will need an amulet and a scroll from the toy seller (quest "Master of Dreams and Nightmares"). Go to the toy store, convince the man to help you and get an amulet that can hold the source. You need to fill out the amulet and then return to Sanders. When you do this, go back to the toy seller Sanders. If you can convince him, he will tell you that the Scroll of Atonement is another item needed to enter the tomb. The scroll is locked in a table on the second floor of the store, and the password is Giyora. If you can't convince Sanders, you'll have to sneak up to the second tier and steal the scroll.
Side quests of Arx
In the southeastern part of the location there is a school inhabited by drug addicts and a priest expelled from the church. If you talked to the little girl and convinced her to give the task, she will mark the right place on the map (quest “School Exit”). Talk to Berila Griff. If you share information about Griff from Fort Joy, you will receive additional experience points.
Beryl will ask you to help rebuild the school. You need to talk to Shori's sister and convince her to leave or force her to leave. Then you can return to Beryl for your reward. There are several ways to get the quest “Secrets of the Dwarves”. Either you make your way to the wedding venue or through the backyard of the house. The wedding invitation can be obtained from the drunken dwarf behind the building.

One of the passages.
Alternatively, you can get there through the sewers:

Path through the sewer.
Be careful when exploring the sewers, because there is a new type of enemy here - when killed, the spiders release a deadly cloud that kills everyone in the area. Uninvited guests will appear at the wedding - fiends of the Void. If you examine the statue, you will find their traces leading from the pipes. You can talk to the gnomes here to get more information. If you activate spirit vision, you will see wandering guests.
Interacting with the wedding cake will cause an explosion. Constructs will appear that attack everyone. After you kill them, you can talk to the guards and find out that the pie was made by a certain Doctor (this is connected with Lowse’s personal quest).
Enter the sewers and then go to the queen. On the east side of the second level of the sewer, use the lockpicks on the suspicious hole in the wall to gain access to the trial. When you meet the queen, you will understand that she is being manipulated by her own adviser named Isbeil. You can convince the queen to remove the fog of death, since it was not her own idea. However, Isbal bans everyone in the laboratory.

Suspicious hole in the wall.
After some time of torture, you will be able to free yourself from Isbeil's spell. Now you need to kill the woman and her followers from the Black Ring. This is a very difficult battle as you will be in a cursed poison pit and Isbale and her people will be above you. However, you can use powerful origin skills to defeat your enemies. Use spirit vision to see many ghosts inside the pit - use them to get source points.
Using spirit vision, you can talk to the spirit of Isbale and find out why she is so angry at Arx. Also, do not activate the device if you are not sure that you want to do this. After collecting loot in this location, find the queen and decide her fate to complete the quest.
Screen. Go through the illusory door here to find the queen. Note that on the other side of the laboratory there is an illusory door with a death trap.

Illusory wall.
The additional quests “Overcoming the Demon” and “The Consulate” are related to the personal search for Lowse and the Red Prince.
In Overcoming the Demon, if you want to enter the doctor's house, you first need to do something - either kill the dwarf Isabel, or free Arha inside Linder Kemm's vault. When you receive the invitation, go to the doctor’s house (Black House) and at the entrance you will again meet with the Ailment.
Talk to her, she will teleport you to the demon dimension. Interact with all the candles, go inside and kill the nurse (use physical damage, since the nurse has good magical armor, but weak physical armor). If this is not done, the nurse will cast the demon and heal it.
After you defeat all the nurses, talk to the doctor and he will reveal his true origin. Try to use the source as quickly as you can, as he may steal it from you. After you defeat the demon, you will see a small surprise from Lowse. Go down to the basement (inside the room with the corpses) and find Jahan locked inside. There are also even more rooms filled with magic that can still be opened with regular lockpicks. In one of the cabinets there is Quinn's armor, which allows him to fly.
In the northwestern corner there is a lizard consulate, where you can take the quest “Consulate” and continue the quests of the Red Prince.
Note. The Consulate quest may contain errors, so save before entering here.
I highly recommend finding the Swornbreaker blade before coming here. You can make it from two parts found on the Nameless Island, or find one in the prison with Lord Arhu (task "Linder Kemm's Vault").
Use your character with the highest hacking and stealing ability to get into the consulate until you reach the fountain. If you find yourself in combat, use the retreat to start over. You may need a key, which is located in the "office" (the room on the left when you enter). You might be able to unlock the doors with a master key.
This key opens the door in the room to the right of the entrance. You then have a second locked door to the garden. I don't know if there is a key for it, but it can definitely be hacked with the fifth level theft skill.
When you approach the fountain, use the teleportation pyramid to regroup with your team. Then use spirit vision to see the portal above. You will be teleported to a strange arena. There you will have to fight the shadows of Malaise, Bishop and Windego. However, they do not appear immediately, but only after you move away from the center.
They will be reborn even after death, so you will have to break all the mirrors in the arena for a magic door to appear. There's a little trick here that will make a very difficult fight look easy. If you have a character with a long-range weapon (crossbow or bow), you can destroy all the mirrors without leaving the center of the arena (before the start of the battle). You need to choose the right angles and destroy objects. It may not work out right away, but I’m telling you for sure – it is possible!
After that, move towards the door, and when the battle begins, simply use one of the heroes to approach the door and interact with it - the entire squad will be teleported. Talking to the dreamers will open a portal to the princess's hideout. If you have the Swornbreaker blade, then you can free the princess from her attachment to King God. Have the Red Prince use his fire breath to revive the dragon.
Leave this place to complete the quest.
Once you have the information from Lord Arhu and the amulet along with the scroll from the toy seller, you can go to the cathedral. It's best to do this after you've completed side quests and companion personal quests. There is a switch in front of Lucian's temple. Place the amulet you got from the toy merchant in it, then read the scroll to open the hatch:

We open the hatch.
When you enter Lucian's crypt, a puzzle with pipes awaits you ahead.
To solve it, first, you need to create a pool of blessed blood. Spill blood on the sink, bless it. If you don’t have the bloody rain skill, you can attack any companion to add blood. The second step is to align the pipes. Here is one possible solution:

One of the solutions.
Once you place them correctly, touch the altar to activate it. Lucian's coffin will be moved and a secret hatch will open. Coming forward, go into a room full of levers and traps. Use the source of lifesteal to kill enemies, and then pull the five levers with initials to spell the word POWER. Perhaps in Russian localization it will be the word POWER (four levers). Make sure you're ready to continue before entering Lucian's Crypt, as you won't be able to return once you do. Equip the best items, stock up on source and choose the best skills.
Final battle
This chapter is related to the final battle in which you will participate. Prepare as best you can because the battle will be long and difficult. When you come to the tomb, your followers from the “Lady of Vengeance” (Illness, Gareth and Tarquin) will appear and agree to pray for the hero. Their prayer will reduce the initial cost of all skills.
Please note that you need to divide all resurrection scrolls evenly for all comrades. During the battle, it is likely that one or more of your companions will die, while others will be able to save them. Lucian Deval faked his death and is waiting for you with Dallis, King Brakk and several masters. The Lucians will explain their plan.
Dallis will also reveal his true face. You can surrender to him, otherwise you will have to kill both Lucian and Dallis. Surprisingly, out of all three bosses, Lucian is the weakest. And he's the only one you can really beat at this point. Focus on him, after which he will soon lose consciousness.
If you neutralize Dallis, Brakk will help her by summoning the Kraken, which attacks everyone else. The battle will move into the second stage, where the health of Brakk and Dallis will be fully restored. If you knock out Brakk, he will also be freed with the help of Dallis.
The second stage of the battle is much more difficult than the first. The Kraken has many powerful AoE attacks and can summon followers from the Black Ring (Isbale, Lord Kemm). If you manage to kill all three followers, the Kraken will begin to summon the defenders of the Black Ring. If you allow several masters to survive in the first stage, the battle can be significantly simplified, since they are at enmity with the Black Rings. Use them to keep the Black Rings occupied - teleport the Masters directly to them. The skills of summoning creatures can also help, especially shooting slugs and the Red Prince's dragon (learned in the "Consulate" quest).
Focusing on one target while attacking it with all your characters is a good strategy. Perhaps the enemy will teleport to a safe location to restore health. Dallis especially likes to do this - as soon as her health bar drops to a critically low point, she can turn into a dragon to fully restore her HP and armor.
Constantly use the blessing to heal the land - this is another key to the team's survival. Before attacking any opponents, carefully study their parameters to discern their strengths and weaknesses. Killing the Kraken is very difficult because it can teleport from one place to another and you cannot interact with it in melee combat. But as soon as you defeat Brakk, the Kraken will also be considered defeated.
Once all the bosses have been defeated, you will have to choose what to do next. Either you become Divine, or rid the earth of the source, or allow everyone who can to use the power of the source. Regardless of your choice, the quest will be completed, and you will find yourself on the “Mistress of Vengeance”.
The city of Arx in Act 3 of Divinity Original Sin 2 is a very large location. And you will find quite a lot of quests in it that will take up a lot of time in your adventure. To resolve difficulties that you may encounter when completing quests in the city of Arks, read a detailed description of them in this article.
Battle of the Gates of Arx
When you get to the bridge near Arx, vampire fiends will appear. Defeat them and receive a reward from the paladin captain.
Execution at Arx
Go to the courtyard of the masters' barracks, you will meet a woman who will ask you to save her wife - a paladin who is about to be executed for not following orders. Approach Lord Kemm and convince him to spare this paladin (or conduct the necessary investigation). Later, you can meet the freed paladin in the magisters' prison to receive from him the quest "Linder Kemm's Refuge".
Linder Kemm's Vault
If you saved the paladin from execution in the quest of the same name, you will meet him (in fact, she) a little later in the masters' prison. She will tell you that Lord Kemm has his own secrets. If you free Windego during the quest "Mercy is Strength", you will learn that Lord Kemm is secretly working for the God King. In the town square of Arx there is an artist painting pictures about the war. Cast a ghost spell to see his father's spirit standing nearby. Talk to the artist's father to learn that Lord Kemm has a unique collection of paintings in his vault.
In the thieves' guild in the sewers, you can buy the desired painting (from the children) if you can convince them. You can learn about the location of the entrance to the thieves guild from the little girl from school. The entrance to Lord Kemm's vault is in his garden. You need to pull the hidden lever to open the hatch.
After pulling the lever, enter the vault through this hatch.
Inside Kemm's hideout, there are several automatons patrolling the area. Either get past them or fight them (you need to kill them with a source of lifesteal). At the end of the vault, activate the ghostly vision and put the painting you bought from the thieves guild into the empty frame (where it was stolen from). This will open the secret room.
Inside the room there is a painting called "Responsibility" (rough translation). Take it with you, leave the room, and then activate the book on the right shelf.
Behind the stone door is a hatch that will lead you to the God King's Temple. After you complete the dialogue with the god king, interact with the sign on the ground. It says here that only the king God knows the weight of responsibility. This is a clue connecting this place with the painting.
Place the Responsibility painting on the altar, which will open a hatch leading to Arhu Prison.
Lord Arhu was imprisoned here by Lord Kemm. To free him, you need to use ghostly vision and use the source of vampirism (in conversation) on two tormentors.
Please note that on the statue there is a dagger needed for the Red Prince's quests.
Once Lord Arhu is freed, four defenders of the Black Ring will appear and attack you. A little later, Lord Kemm will arrive, who will also have to be destroyed. If you want to save the life of Arch, then it is advisable to keep him as far as possible from opponents, using teleportation. But if he dies, you can still talk to him by using Phantom Vision. After you defeat Kemm and the Black Rings, Lord Arhu will tell you how to solve the puzzle in the cathedral.
Finding Lord Arhu
Lord Arhu is locked in Lord Kemm's vault. We offer you detailed instructions on how to get to Linder Kemm's hideout in the quest of the same name. First, visit the thieves guild, which you learn about from the girl at school, and buy the painting stolen from Kemm from the children. Move into the garden and find a hidden lever that opens a hatch, which will lead you to Kemm's vault.
Bypass or defeat your opponents using the source of lifesteal. At the end of the hideout, use ghostly vision and place the painting you received from the children in the thieves guild in the empty frame. Go into the opened corridor, find the painting “Responsibility” inside it and take it with you. Interact with the book on the right shelves to open the passage further. Behind the stone door there will be a hatch that leads to the temple of the god king.
After talking with him, examine the sign on the ground, and then place a picture on the altar with the name that is indicated there (responsibility). So you will get through the hatch to the prison in which Arhu sits. Use Ghostly Vision to find the two spirits holding Arhu, then destroy them with a source of dampirism. Then take from the statue the dagger that the Red Prince needs in his personal quest, and then defeat all the enemies, including Kemm. You can teleport Lord Arha further away so that he will surely survive. Or, if he does die, use ghostly vision to communicate with the spirit of this person. This will tell you how to solve the puzzle in the cathedral.
Master of Dreams and Nightmares from Arx
In the Master's vault, located under the barracks, you can find the book “Report on the Toy Dealer”. This way you will learn more about this seeker. Alternatively, in a conversation with the freed Lord Arhu, you will learn about a certain Jefferson, whom you need to contact in order to get into the cathedral. Go to the toy store and convince him to help you. He will give you an amulet that can contain the source.
You must fill the amulet with the source and then return to Sanders. When you do this, talk again with the seller of the toy shop. If you can convince him, he will tell you that to enter the divine tomb you will need a scroll of atonement. The scroll is in a locked table on the second floor of the store, and Sanders himself will give the password for it. If you cannot convince the man, you will have to sneak to the second floor and break open the box with the scroll. The amulet and scroll are needed to open the hatch in the cathedral.
The Masters' Last Battle
When you get to the masters' barracks, you will see that the paladins are busy searching for the masters' secret quarters. The hatch they need is hidden under several boxes in the trap room. You can try to convince a nearby spirit to point to the correct combination for the hatch, but this is very difficult to do. The right combination actually ties in with the Masters' motto: mind, body, community and divinity.
You will gain experience just for solving the riddle, but the spirit will disappear. Therefore, if you need the source, then use vampirism before solving the riddle. Inside the vault you will see four switches that are hidden behind the paintings. Remove them and activate them in the correct order according to the Masters' motto described above. Inside the secret room, read the report to gain experience, and if you use ghostly vision, you will receive additional information. Here you will also find another report about the toy seller. This will activate this quest. There are three Geists on the second level of the Magister Vault. Kill them all, search them and pick up another book, which says that Dallis wants to resurrect... (and we won't spoil it). At the same time, the quest “Rebirth of the King” will start.
Rebirth of the King
On the second level of the masters' shelter, located under the barracks, you will find a book next to the table, which indicates exactly who Dallis wants to resurrect. Return to the Hall of Echoes and meet with Tarquin. He admits that he helped Dallis, and as compensation he will give you the Anathema (the BEST two-handed weapon in the game).
Missing prisoners in Arks
Enter the prison and talk to the paladins. You will learn that the magisters were investigating the disappearance of several prisoners who disappeared directly from their cells under the magisters' barracks even before the paladin uprising began. After you defeat Isbeil in the quest “Secrets of the Dwarves”, you will be able to find the missing prisoners in her laboratory. They died because they were sucked out to obtain the source.
Mercy is strength
In the camp of the leader of the Black Ring, you will find a letter that lies in the war room and tells about Windego. You will meet this witch again in the inner basement of the magisters' prison on the island of Arx. To get there, you need to convince the paladins that you can resist her. If you decide to save her, you will need to give a sufficient number of items or coins to improve your relationship with her.
After this, interact with the switch nearby to open the cage. If you have the special blade needed for the Red Prince's quest (and you can find two blades - one whole and the other in parts), you can free Windego from his oath to the king god. But in this case, do not forget that if you have one blade, then you will not be able to save the Red Princess in the Red Prince’s personal quest. If you don’t have a blade, Windego will tell you that there is one in Lord Kemm’s vault.
Mistakes of the past
The title of the quest is the name of a prisoner in the Masters' Prison, which you can get into through the sewers (first, use ghostly vision in the Masters' barracks, and then talk to Winslow and agree to help him find Banne). Banne's corpse can be found near the sewer. Using a ghostly vision, find his spirit and talk to him, after which you can go inside.
When you get to the cell with the boy, activate the ghostly vision and see dead seekers trying to keep the prisoner in the dungeon forever. You can leave them alone or break the boy's cage. He will turn into a crazy villain and attack you. If you leave this area without killing the boy, then when you visit this place again after some time, you will find that he has escaped.
Old means golden
In the western part of Arx, near Lord Kemm's mansion, there is an antiques dealer waiting for a famous appraiser named Kat. Inside Kemm's mansion, you need to talk with expert Kat, and if you can convince her, she will ask you to find three valuable antiques stored in Kemm's hideout. Inside this shelter there are several automatons that you will have to kill or bypass. If you kill, then use vampirism. Once you find three relics, return to Kat for your reward.
School release
In the southeast corner of this area is a school occupied by outcasts and excommunicated monks. If you talk to the little girl there and convince her, she will indicate on your map the place where the thieves guild is located. Talk to another Griff, and if you tell him about the one in Fort Joy, you will receive experience points. Griff will ask you to help restore the school and drive away the enemies. You need to talk to Shori's sister and convince or force her to leave. After this, you can return to Griff for your reward.
Secrets of the gnomes
There are several ways to activate this task. Either you sneak into the wedding venue, receive an invitation from a drunken dwarf located outside the building, or sneak through the backyard. In addition, you can get here through the sewer. When studying the latter, be careful, because new opponents will appear there - fog spiders, which emit a poisonous fog after killing. The feast was interrupted by an attack from the fiends of the Void.
Examine the statues to find traces of fiends near the pipes. Talk to the dwarves for more information, then activate the ghost vision to see the wandering ghosts of the slain guests. Interact with the wedding cake and it will explode. Enemies will appear, and you will have to destroy them. Having dealt with them, talk to the guards and find out who exactly sent this cake. He will be a certain doctor, who is also connected with Lowse’s personal quest. Enter the sewers and then make your way to the royal courtroom. On the eastern side of the second floor of the sewer, there is a suspicious hole in the wall.
Destroy it and then go to the courthouse. When you meet the queen, you will learn that she is being manipulated by Advisor Isbeil. Try to convince the queen, but Isbeil will neutralize everyone and the ban in his laboratory. After a while you will be freed from the sorceress's spell. It will be necessary to kill her along with the minions from the Black Ring. The fight will be difficult since you are at the bottom and they are all at the top. Use ghostly vision to communicate with the spirit of the murdered Isbeil and find out the reason for her anger. After searching the place, find the queen and decide what to do with her. An illusory door located nearby leads to the queen. On the other side of the laboratory there is another similar door, but behind it there is a deadly trap.
Demon Crush
This quest is related to Lowse's personal quest. When you get to Arx, you will find out that in the northeast there is the house of a powerful demon who has settled in a certain doctor. If you want to enter this house, you will first need to do something - either kill Isbeil in the quest “Secrets of the Dwarves”, or free Lord Arhu from Kemm prison.
This way you will receive an invitation from the doctor. Go to his back house and talk to Illness near the entrance. Chat with the woman, she will transport you to the demon dimension. Follow her and smell the candles. Even after this, the boss's HP reserve will be equal to 11,000. Go inside and kill the nurse, and then talk to the Doctor. If you don't touch the nurses, they will constantly restore his HP supply. Spend the source as soon as possible so that the doctor doesn't suck it out of you. In one of the cabinets there is Quinn's armor, which allows your character to fly.
Consulate
You will need a special dagger. You can either find it in Lord Arhu's prison, or collect it in parts (two in total) on the Nameless Island. Without him, it will be impossible to free the Red Princess. To get to the consulate, use a character with the best theft and hacking. Get to the fountain. You can find the key that opens the doors, you can break them. Using teleportation pyramids, you can move the entire group behind one character. Finally, activate the ghostly vision to find the portal.
Go through it to the arena, fight with the reflections of the characters you met earlier. Destroy their mirrors early, from afar, to avoid the battle, or do it during the battle (otherwise the reflections will respawn). Go to the door, one of the heroes get to it during the battle to move the entire squad to a safe zone. Talk to the seeker near the portal and find out where the Red Princess is. If you have the blade, you can free her from her oath to the king god. Use the Red Prince's fiery breath to give birth to a dragon, and then leave the dream.
Due to numerous requests (one) I am publishing my FAQ here
When passing through, the “scientist” tag will help you a lot; in Driftwood, at least 7 quests are tied to it, some of them can be completed alternatively, some cannot.
General issues:
Q: what to download? what batch should I collect?
A: a detailed video guide on creating and developing a party (physical/mage/hybrid party) https://www.youtube.com/watch?v=Z2M2QM_y_uA&t=3180s
Q: Where can I find a detailed walkthrough?
A: Here is a fairly detailed walkthrough of all the quests:
Q: Will there be a universal chest where you can put your swag, like in the first part?
A: Yes, on the ship (after Act 1), you can send things to it with RMB directly from your inventory
Q: What is cleaving and piercing damage?
A: Piercing damage is damage that ignores armor and hits health directly. Cleaving is splash damage that hits a small AoE from the target, but not at full force, but at a specified percentage. The impact angle is approximately 150 degrees.
Q: How to craft "itemname"
Q: How can I increase my action points?
A: Statami (as in the first part) - no way. Only with spells/buffs/talents
Q: Is it possible to reset the settings?
A: Yes, on the ship at the end of Act 1
Q: Why am I constantly being cursed/maimed, etc., even though I'm not even in combat?
A: Most likely, you have put on 1 of the items from the Tyrant's set, they do not give a debuff only when they are put on all at once
Q: Why do I take damage when I use healing potions?
A: You are playing as an undead and any "normal" healing causes damage, but necromancy spells and all poisons heal you. Or you are not undead, but you have the spell "Rotting" cast on you
Q: Is it possible to have more than one summoned creature? For example, a demon, a wolf and a cat.
A: No, you can't. The second creature replaces the first.
Q: How can I remove the “stolen” status from an item?
A: If the master searched you and found stolen things, it’s easier, of course, to load, but still, the stolen status disappears if you combine the item into a stack with “non-stolen” things (true for potions and other “stacked” things)
Q: Is it possible to change character tags during the passage ("Mystic", "scientist", etc.)
A: Yes, but only 1 time, 1 tag and 1 character. To do this, in Act 3 we complete the quest
White-faced, dragging Alexander's head to him (it is not necessary for the GG to talk).
Bug with the Idol of Rebirth (if you know that you won’t resist and it will ruin the passage for you, don’t open the spoiler)
In the underground tavern of Driftwood there is a madam who is ready to reward you with a lot for just 1 kiss. Among the rewards there is also an Idol of Rebirth (phoenix), which you can simply steal from her, but it is better to complete her quest by receiving it as a reward (for each of your party members separately. In fact, the bug itself is if the charged (blue) Idol is placed in the inventory in the Backpack, then when triggered (in battle, as a rule), the “Dim Idol of Revival” is added to your inventory, i.e., it is discharged, but the charged one does not disappear from the backpack (i.e., you duplicate the rod and become immortal - at least 20 times they'll kill you in a row, at least you don't care.) Just in case, the rod can be charged quite “legally”,
by combining a discharged rod and a scroll of Resurrection.
Act 1:
Q: A black cat followed me, why is it needed?
A: If you can get him out of the fort (into the swamps), he
will become your companion with 2 skills. (the companion of the character to whom he became attached)
Q: I completed the quest with oranges or the arena, but the quest in the diary is not completed
A: This is a bug, it will be fixed (attention, the quest with burning pigs ends, it just has an unobvious continuation, similar to the dragon quest - it ends only if
trigger it to destroy the screaming ones
Otherwise the quest will fail)
Q: How to disenchant a burning man in a labyrinth?
Pour blood under it (bloody rain, or cause damage to yourself) and bless the blood
Q: How to open the doors in the Braxis armory (where is the lever)
bless the lever, and in the next room you need to use the power of the Source
Q: Where can I find all the parts of the Tyrant's set?
A: 1) Pants - on the first floor of the fort, next to the main entrance there is a secret button that opens a secret hatch (the one pierced by a spear from the cave with the elves will tell you more), behind the secret hatch, in addition to the phylacteries there are two statues, we need the left one and perception (wits ) 15-16 (if not enough, there are buffs in pyrokinetics, food and temporary acceptance of susceptible companions in the party)
2)Boots in the old watchtower in the north of the Marshes, there is a thundercloud in it
3) Helmet - in Brakk's armory, room behind the cursed lever
(use the power of the Source to open. The Helm itself gives the ability to draw the Source, which after a few uses will reveal a guest to you)
4) Gloves - Bracca Castle
(behind the labyrinth with the burning man there is an entrance to the dungeon, where you receive an entry quest from three necromancers; in the future, you must go through the force barrier using the power of the Source in one of the sarcophagi and there are gloves)
5) cuirass - Brakk's treasury (cave on the eastern shore of the location (where the salamanders are)
the spear and ring are not technically part of the set (although the ring does provide a debuff when worn)
Q: Graphic artifacts appear on my starting ship (black and black), what should I do?
Q: How to replenish the magic of the Source? (Act 1)
A: 1) green puddles
2) an endless source in Bracca's armory (where the damned lever is)
3) drain corpses (using a rod; when the rod runs out of charges, contact the priestess in the rebel camp)
4) Brakk's helmet
Q: Is it possible to return to Act 1 later?
Q: Where can I find the face cutting tools and transformation mask for Fane?
The hypocrite falls from the master in the torture room (fort, 1st floor), the mask from the sorceress from the start video, the server beach in the swamps? You will meet another Lyserezka in Act 2 on the 2nd floor of the tavern.
Q: How do I open the door on the ship at the end of Act 1?
in addition to the password, you also need to steal the stone from the sleeping Alexander
Q: How do I complete the burning pigs quest?
after you have disenchanted them all with the power of the Source, one of them will meet you near the dragon’s habitat (descent to his beach) - you invite her to go to the sanctuary to the partisans, in the sanctuary you offer to swim in the source (it should already be blessed, to do this, communicate with the statue of this source, in the same place, in the sanctuary), after which the pig turns into a very rich merchant
Reaper's Coast:
Q: How to complete the quest with the skeleton philosopher in the Pogost?
A: Find 3 books in Riker's house, one book for each of the 3 skeleton questions. Some answers can be given not by the book, but by the character's tag ("Mystic", etc.). Fain can complete the quest without finding books by using the tags "Undead" "Scientist" "Mystic"
Q: Quest Midnight Oil, order of inclusion of columns:
1.Amadia 2.Tyr - Tsindelius 3.Dune 4.Zorl Stissa 5.Zantezza 6.Vrogir 7.Ralik
Q: How to complete the quest with 4 elven heroes (summer, winter, spring, autumn)?
Cast “Laser Beam” for summer, “destructive hail” for winter, “bloody rain” for spring, electrified cloud for autumn (in one way or another)
Q: How to complete the quest with the potion, the witch and the cows?
A: In the basement of the witch's hut, in addition to, in fact, one of the potions,
There is a frog that drops a recipe for making, but not everyone can read it (you need knowledge of the language). Here is the recipe: "Witch's Eye + Catalyst + Caesar's Mushroom" (without flask)
Q: How to open a burning chest in the Churchyard?
A: You need 2 things: to be a lizard and the "Talk to Animals" talent.
For a character who has this talent, we put on a transformation mask and make him a lizard, go to Riker’s salamander (in the mansion in the graveyard) and she says the password.
Q: Is it possible to end the meeting peacefully with
On the 2nd floor of Riker's mansion?
In the dialogue, you can agree with him that you will bring him human meat, 3 (4) pieces are enough (maybe other types of meat are suitable, perhaps those that elves eat for memories, I haven’t personally checked), you also need to have the “Kiss of the Spider” status "(this may not be a required status) which can be obtained from the Underground Tavern in Driftwood
Sometimes a meeting on the 2nd floor begins immediately with a fight, without conversation, as far as I understand, it depends on which entrance you enter his room from.
Q: How do I get into the room without a lock in Riker's basement?
A: Lever next to the mirror in the main hall
Q: How to complete the pressure plate quest?
A: The trick is that you need to press 5 plates at the same time - you can summon a summoner, you can use vases. Location under spoiler:
FAQ on the most frequently asked questions
FAQ on the most frequently asked questionsQ: How to assemble the Scythe-Deliverer (not Anathema, don’t confuse it)
Recipe in the Mines on the 2nd island, the handle in the White-faced cave (3rd island), the Blade from the guardian in the temple where we become divine (3rd island)
Q: What is the “void fish exchange” scroll for? (2 island)
A: In Arks, near the black house, past the graves we go down to the beach, there is a barrel there - we throw in “fish touched by the Void” - and we are amazing. But there is also a small problem - if you throw a teleportation pyramid there, cast a scroll and teleport to the pyramid, you will end up in prison with the resident of this house)
Q: How to remove the possession status in the underground prison with a demon under Blood Moon Island?
A: A demon has possessed your party member, kill the party member so that the demon comes out and becomes vulnerable again. Then resurrect your party member. Maybe.
Q: How to complete the quest with Hen Marge (chicken coop on the way to Driftwood), island 2?
A: We take the quest from the hen (tag of conversation with animals), clear out the fiends of the void at the indicated marker, take the only surviving egg, take it back and give it to the hen. After some time, we return, talk to the spirit of the dead Marge, a yellow “Magic Rooster” marker appears on the map, take the Void chick to it and either receive a chest with rewards from the rooster, or clear a bunch of chicks and loot them.
Arx:

Currently unanswered questions (if you know the answer, write in the comments):
1 Is there a quest use (ie other than “eating”) the phoenix egg and heart? I suppose the egg could be taken to Marge the hen to hatch, but for me she was already dead by that time.
2. What to do with Maol seeds (given in Fort Joy)?
3. What to do with a possessed child on your ship? (if you decide to send him to the ship after completing the quest on Blood Moon Island)
4. In the basement of a moneylender (loan shark) in Arx I found vials of blood with the inscriptions “Garvan and Dorothea”, where are these unfortunate people to whom you can give this? and where can I find my blood if I took out a loan? In the Dwarf Queen's laboratory you can find 4 potions related to this quest.
5. What should you combine the Pilgrim Shell from Blood Moon Island with? There are 2-3 of them in the entire game, in the “non-quest” crafting lists, torn from the game, this recipe is not present, it is possible either a defect or a quest.
6. What to do with the 3 altars on the 2nd island to close the quest? The quest is buggy, after prayer, each of them has no development. There is an opinion that the quest is tied to Scarecrows in the fields, but at the beginning you need to go around all 3 altars, and then go to the Scarecrow.
7.How to complete the quest with the cursed ring from Act 1 (Brakk's ring)?
8. How to complete the quest “A Man and His Dog”? At the moment, the quest is also bugged, the dog points to the monument in the churchyard, there is no development of the quest.
9.What does the blue star next to the parameters on things mean?
10. Where can I get the Apportation skill http://divinityoriginalsin2.wiki.fextralife.com ... if it is not sold from merchants and is not crafted, but some players drop it from chests?
11. Is it possible to peacefully complete the quest with the Slime Princess (1 island), to whom should I give the wedding invitation?
12. Are there any quest interactions with the dwarf Zillik and the cursed Verdas in the Fort Joy dungeons?
So many questions and so few answers.
OEPTSYDBOOP KHCHMELBFEMSHOBS YZTB, LPFPTBS MYYSH OENOPZYN KHUFKHRBEF Dragon Ade Origins . PYUEOSH LBUEUFCHEOOBS, DEFBMSHOP RTPTBVPFBOOBS Y U ChPNPTSOPUFSHA RPMOPZP LPOFTPMS DEKUFCHYK RETUPOBTSEK. YOFETEUOP, YuFP PDYO Y FPF TSE LCHEUF NPTsOP TEYYFSH DCHHNS-FTENS TBOSCHNY URPUPVBNY. eUMY CHCH OBUMY LCHEUFPCHSHCHK RTEDNEF YMY RTPYZOPTYTPCHBMY LMAYUECHPZP RETUPOBTSB, LPFPTSCHK Refinery ChBN RPNPYUSH, KH CHBU CHUEZDB EUFSH CHPNPTSOPUFSH ЪBLPOYUYFSH LCHEUF DTHZYN R HFEN. l RTYNETKH, RPLYOKHFSH ZhPTF tBDPUFSH NPTsOP NYTOP ABOUT MPDLE YJ RPDENEMSHS FENOYGSCH YMY RPTKDS YUETE RPTF RPUME VYFCHSHCH ZHPTFE Y CHSHCHOPUB CHUEI NBZYUFTCH, YUFP LPOYUOP CHUEMEEE RTEDRPYUFFEMSHOEE CH RMBOE OBVPTB PRSHCHFB.
yZTB Divinity Original Sin 2 YЪ LBFEZPTYY - hVEK YI CHUEI. bFP LPZDB NPTsOP ZTPIOKhFSH CHUEI LMAYUECHSHI RETUPCH CH MPLBGYYY CHUE TBCHOP PUFBOKHFUS RHFY RTPIPTSDEOOIS YZTSHCH. dB NPTsOP CHPPVEE OILZP CH CYCHSHCHI OE PUFBCHMSFSH Y VEJ RTPVMEN RTDPDCHYZBFSHUS RP UATSEFH. ъBIPDYYSH CH MPLBGYA, CHSCHOPUYYSH CHUEI Y VMBZPRPMHYUOP RETEIPDYYSH CH DTHZHA, Y F.D.
RETUPOBTS DBEF FEVE ЪBDBOYE, FSCHCHRPMOSEYSH ЪBDBOYE Y RPMKHYUBEYSH VMBZPDBTOPUFSH RETUPOBTSB Y RPDBTLY, RPFPN RETUPOBTSB ЪBLBSHCHBEF DTHZPK RETUPOBTS Y FSHCH, KHVYCH VSH CHYEZP ЪOBLPNPZP RPMKHYUBEYSH PRSHCHF Y RPDBTLY PF DTHZPZP ЪBLBYUILB. dBMSHYE LFPF ЪBLBLBUYUIL OBRBDBEF ABOUT FEWS - RTYIPDIFUS KHVYCHBFSH Y EZP RPMHYUBS PRSCHF Y FTPZHEY. th FBL CHUA YZTH.
oEHVYCHBENSHI RETUPOBTSEK OEF. vPZY FEVS OBOSMY URBUFY NYT PF rHUFPFSCH. h YFPZE FSH BUYUFYM NYT PF CHUEZP TsYCHPZP Y OE TsYCHPZP, KHVYM VPZPCH Y UBN UFBM VPZPN. CHPF Y CHEUSH UATSEF.
YZTB IPTPYBS, OP OE EDECHT. yZTB OE ЪBFSZYCHBEF Y RPD LPOEG (YUBUPCH YUETEЪ 50), L UPTSBMEOYA, UFBOPCHYFUS ULHYUOP PF PVEEK PDOPPVTBOPUFY OUNPFTS ABOUT CHUE LBUEUFChP YURPMOEOYS YZTSCH. with VShchM TBD LPZDB RTPYYE YZTH. with VShchM TBD, YuFP OBLPOEG PFChSJBMUS PF OBDPECHYEZP, IPFSH Y KHCHMELBFEMSHOPZP DEKUFCHB:))
LCHEUFSH CHBN CHSHRPMOSFSH CHUE-FBL RTYDEFUS Y DBCE OE PVSBFEMSHOP YI VTBFSH RETED CHSHCHRPMOEOYEN. rTPUFP YDEN RP NYTH Y UKHEN OPU CH LBTSDHA REEETH Y LBTSDSCHK ZPTPD. rPUME VPECH, UVPTB FTPZHEEECH Y RTPYUFEEOYS LOYZ DOECHOIL RPRPMOSEPHUS CHSHRPMOEOOSCHNY LCHEUFBNY Y RPDULBLBNY CH RTPIPTSDEOOY.
NPTsOP RTPPIPDYFSH YZTH LBL CHJDKHNBEFUS - LFP LPZDB UOBYUBMB YDEN CH CHCHUPLPHTPCHOECHESCH YUBUFY MPLBGYY FBN RTPLBBUYCHBENUS, RPFPN DPNYOITHS Y OE OBRTSZBSUSH ЪББУ YEBEN CHUE PUFBMSHOPE, YNES CH BTUEOBME UKHRETVTPOA Y LHYUKH PRSCHFB. yOPZDB DPIPDIYMP DP FPZP, YuFP RPOSFYS OE YNEEEYSH CH LBLPN YYNETEOY YMY MPLBGYY OBIPYYSHUS Y YuFP CHPPVEE CHPLTHZ RTPYUIPDYF. UACEF OE PUECHYDEO, BDBOYS OE PUECHYDOSCH, CHNPTSOPUFY Y URPUPVSH CHSHRPMOEOYS LCHEUFPCH UYMSHOP OE PUECHYDOSCH.
eUMY CHSC ZHBOBF RPG, CHBN RTYDEFUS RPFTBFYFSH 60-80 YUBUPCH UCHPEZP READ ABOUT RTPIPTSDEOOYE. pFLBBBFSHUS OE RPMKHYUFUS, RP LTBKOEK NETE UOBYUBMB:)
ЪDEUSH TBDHEF RTBLFYUEULY CHUE. edYOUFCHEOOPE, UFP UOBYUBMB OE UPCHUEN HDPVOP - CHTBEEOOYE LBNETSH (UTEDOEK LOPRLPK NSHCHYY) RTY RETEDCHYTSEOYY RETUPOBTSEK. oP L LFPNH RPUFEREOOP RTYCHSHCHLBEYSH Y UP CHFPTK YUBUFY YZTSCH OE OBNEYUBEYSH RPDPVOSHI OEKHDPVUFCH, LBL RTY RETEDCHYTSEOYY, FBL Y CH VPA.
YZTB ZTBNPFOP UVBMBOUYTPCHBOB, DMS YuEZP LBL PVSHYUOP YZTPLH RTEDMBZBEFUS OEULPMSHLP HTPCHOEK UMPTSOPUFY. OP CH PFMYYUYY PF NOPZYI BOBMPZPCH UMPTSOPUFSH YZTSCH ЪDEUSH NBLUYNBMSHOP UPPFCHEFUFCHHEF CHSHVTBOOPNH KHTPCHOA.
h Divinity Original Sin 2 RTYUHFUFCHHAF CHUE PUPVEOOPUFY TPMECHPK YZTSHCH, LFP 100% LBYUEUFCHEOOBS RPG. OE ЪBDHNSCHCHBSUSH TELPNEODHA
yYEUFY RTEDMBZBENSHI URKHFOYLPCH NPTsOP RTYUPEDYOYFSH FTEI - LFP LMBUUILB. OP ЪDEUSH CHBY URKHFOILY OE FKHRP UMEDHAF ЪB CHBNY Y DEMBAF CHUE DMS URBUEOYS NYTB. ъDEUSH CHUE YODYCHYDHBMYUFSHCH, LBTSDSCHK CH PUOPCHOPN DKHNBEF FPMSHLP P TEYEOYY UCHPYI RTPVMEN YUHFSH YuFP NPTsEFY CH ZMB DBFSH ZMBCHOPNH ZETPA. UPCHEFHA UPITBOSFSHUS LBL NPTsOP YUBEE Y PVSBFEMSHOP RETED LBTSDSCHN TBZPCHPTPN, YuFPVSH RPFPN, RPFETSC URKHFOILB, OE RETEYZTSCHBFSH UACEF.ТББЗПЧПТШЧ Divinity Original Sin 2 ПУЕОШ ЧБЦОСЧ, TBZPCHPTSH VSHUFTP NEOSAF UATSEFOPE RPCHEUFCHPCHBOYE Y CHBTYBOFSH TEYEOYS LCHEUFPCH. pFOPUYNUS L TBZPCHPTBN Y RPUFHRLBN RPUME TBZPCHPTPCH LTBKOE UETSHOP. pF LFPPZP ЪBCHYUYF OE FPMSHLP CHBTYBOF TBYCHYFYS UATSEFB, OP Y PFOPYEOYE URKHFOYLPCH, CHPNPTSOPUFSH RPMKHYUEOYS PRSHCHFB, OBCHSHLPCH Y UOBTSCEOYS.
OE VPYNUS PYYVYFSHUS CH UFYME RTPLBYULY ZETPECH, CH OBYUBME FTEFSHEK ZMBCHSHCH VHDEF CHPNPTSOPUFSH RETETBURTEDEMYFSH CHUE PYULY OCHSHCHLPCH X CHUEI. pF UEVS UPCHEFKHA CHSHCHVTBFSH LMBUUYUYUEULHA LPNBODH: CHPYO-DCHHTHYUOIL (VMYTSOYK VPK), CHPT-MHYUOIL (DBMSHOYK VPK), ЪBEYFOIL-FBOL (VMYTSOYK VPK), NBZ (DBMSHOYK VPK). fBLPK LPNBODPK ChSCH CHUEZDB YZTH RTPKDEFE.
PTHTSYS Y VTPOY PZTPNEOOPE LPMYUEUFCHP, TEUKHTUPCH ABOUT ITS RTYPVTEFEOYE X FPTZPCHGECH ICHBFBEF VEJ DYZHYYFB (EUMY CHSHRPMOSFSH VPMSHYOUFCHP LCHEUFPC). TBOPPVTBYE RTEDNEFPCH ЪБЧПТБЦИЧБЭФ ЪБУФБЧМСEF YUBUBNY LPRBFSHUS CH YOCHEOFBTE Y RETETBURTEDEMSFSH PTHTSYE Y VTPOA NETSDH URKHFOILBNY VHLCHBMSHOP RPUME LBCDPZP UETSHEOPZP VPS.
ЪBLMYOBOYK Y KHNEOYK CHEMILPE NOPTSEUFChP Y EUMY CHSC UTBH OE PRTEDEMYMYUSH, LBLYE HNEOYS CHBN OHTSOSCH, KH CHBU RPUME DCHHI YUBUFEK YZTSCH VHDEF CHPNPTSOPUFSH CHFPTPZP UFBTFB. nPNEOF, LPZDB NPTsOP RETETBURTEDEMYFSH OBCHSHLY, CHSHVTBO PYUEOSH HDBYUOP, CHSH HCE RPOSMY, YuFP CHBN OHTSOP Y CH YUEN CH SHCH PYYVMYUSH Y CH FPCE CHTENS CHSH FPMSHLP OBYUBMY YZTBFSH Y PUOPCHOBS YUBU FSH YZTSH EEE CHREDEDY.
RTPTBVPFBOOPUFSH PE CHUEN, op! OE ICHBFBEF TBULTSHCHBAEYI UACEF Y CHOKHFTYRBTFYKOSCHE PFOPYEOYS LBF-UGEO. th ChPNPTSOP UBN UACEF OENOZP ЪBFSOKHF. b CHUE RPFPNKH, YuFP OEF IPTPYEK BOINBGYY LBF-UGEO.
UFBTBENUS UOBVDYFSH CHUEI URKHFOILPC OBCHSHLPN RPMEFB, FEMERPTTFBGYEK YMY CHPNPTSOPUFSHA VSHUFTPZP RETENEYEOYS ABOUT TBUUFPSOYY. OBCHSHL yЪNEOYUCHSC VTY (FEMERPTTFBGYS PF KHDBTB) PYUEOSH RPMEЪEO NBZBN Y TBVPKOILBN. OBCHSHL PYUBTPCHBOIE FPCE OE VHDEF MYYOYN.
YZTB DMS OEFPTPRMYCHPZP RTPIPTSDEOOYS, ZDE YUBUFP OHTsOP RTDPDHNSCHBFSH OE FPMSHLP VPY, OP Y RTPUFPE RETEDCHYTSEOYE RP NEUFOPUFY, LPFPTBS DP RTEDEMB OBUSCHEEOOOB OE FPMSHLP TBUFE OISNY, RPUFTPKLBNYY TSYCHPFOSCHNYY, OPY MPCHKHYLBNYY, LMBDBNYYY RTPUFP CHUECHPNPTSOSCHNYY RETUPOBTSBNYY CHEEBNYY. ABOUT OEVPMSHYPK RP FETTYFPTYY MPLBGYY CHBU TsDEF PUEOSH NOPZP UATSEFOSHHI UPVSCHFYK Y LBTSEFUS, YuFP MPLBGYS OBNOPZP VPMSHYE, YUEN EUFSH ABOUT UBNPN DEM. ABOUT NEUFOPUFY LTPNE PYUECHYDOSHI DPTPZ EUFSH NOPZPHTPCHOECHESCH RPDJENEMSHS Y NOPZPFBTSOSH RPUFTPCLY UP UMPTsOPK RMBOYTPCHLPK Y FBKOILBNY, OELPFPTSCHE YЪ LPFPTSCHI PFLTSCHCHBAFUS FP MSHLP RPUME CHSHRPMOEOYS UREGYBMSHOPZP LCHEUFB. about LBTFE TBURMPPTSEOP OEULPMSHLP FEMERPTFPCH, OP OE VHDSH YI, RETENEEOOYE VSH OE UIMSHOP HUMPTSOYMPUSH.
lBL UPVTBFSH IPTPYKHA LPNBODH URKHFOYLPCH
nooeoye LPOYUOP UHVSHELFYCHOPE, OP NOE OTBCHYFUS YZTBFSH FBLPK LPNBODPK:- tSHGBTSH - YUEMPCHEL (zz) UP UREGYBMYBGYEK CHPYOB (DCHHTHYUOIL). h PUOPCHOPN LBUBEN UIMKH Y DTHTHYUOPE PTHTSIE. xTPO ZHYYYUEULYK
- chPMYEVOIL - YUEMPCHEL UP UREGYBMYBGYEK NBZB. lUBEN CHUE FYRSCH NBZYK Y JOFEMMELF. xTPO NBZJEK, PRPBOBOYE Y MEUEOYE
- lMYOPL FEOY - LMSHZH UP UREGYBMYBGYEK MHYUOILB. lBUBEN CH PUOPCHOPN DBMSHOYK VPK Y MPCHLPUFSH. hTPO UFTEMBNY CHAMPN ЪBNLPCH
- YOLCHYYFPT - OETSYFSH UP UREGYBMYBGYEK CHPYOB (EIF Y NEYU). LBYUBEN ЪДПТПЧШе ГДОП ПТХЦЕ. oELTPNBOFYS Y ЪBEIFB
- YoYGYBFYCHB - HCHEMYYUYCHBEF LPMYUEUFCHP DEKUFCHYK CH VPA
- rBNSFSH - KHCHEMYUYCHBEF LPMYUEUFCHP UMPFPCH VHI BLMYOBOIK
- lTPCHBCHBS TPUB + rHUFBS VBOLB = xCHEMYUEOYE CHUEI IBTBLFETYUFYL +1 (OP FPMSHLP DP RETCHPK UNETFY)
- uHEOPUFSH CHPDSH + uHEOPUFSH TsYYOY + mYUF VKHNBZY = uCHYFPL CHULTEEEOYS
- nBUFETUFChP PIPFSCH
- OBOYE MEZEOD
- oELTPNBOFYS
- xVETSDEOYE
lBL RPMKHYUFSH VEULPOYUOPE ЪПМПФП Х Divinity Original Sin 2
yURPMSH'KHEN YZTPCHPK VBZ (KhDPVOEE DEMBFSH ABOUT LPTBWME):- lMBDEN CHUE UCHPE ЪPMPFP CH TALYBL URKHFOILB
- chShchZPOSEN URKHFOILB Y LPNBODSCH (ЪPMPFP OE FPMSHLP BCHFPNBFYUEULY CHPCHTBBEBEFUS L CHBN, OP Y PUFBEFUS CH TABLE URKHFOILB)
- uTBЪХ RTYOINBEN URKHFOILB PVTBFOP CH LPNBODH Y ЪBVYTBEN X OEZP YЪ TALBLB ЪPMPFP, KHCHEMYUYCHBS EZP LPMYUEUFChP CH DCHB TBBB
- rPCHFPTSEN DP VEULPOYUOPUFY Y ЪPMPFP KHCHEMYUYCHBEFUS CH ZEPNEFTYUEULPK RTPZTEUUYY
lBL HVYFSH rTEDCHEUFOILB tPLB O 13 HTPCHOE
bFP OBCHETOPE UBNSCHK UMPTSOSHCHK VPK CH 4-K YUBUFY YZTSCH. h HUMPCHYSI OUEUOINBENPZP RTPLMSFYS OECHPNPTSOP MEYUYFSH ЪДПТПЧШЭ мМЛУИТБНY. vYFCHB PUMPTSOSEPHUS PFTTBCHMEOOOPK BFNPUZHETPK Y UYMSHOSHCHNY CHTBZBNY. dTBLPO - UETSHEOP VYAEF RP RMPEBDY Y OBIPDIFUS CHOE DPUZBENPUFY PVSHYUOSHI CHPYOPCH. OP EUFSH CHPNPTSOPUFSH RTPKFY LFPF VPK Y OB 13 HTPCHOE YMY CH OBYUBME 14, LPZDB PUCHPEOSCH FPMSHLP DCHE SYUEKLY NBZY Y UBNSCHE UYMSHOSH ЪBLMYOBOYS OE DPUFHROSCH.VPK DEMIN ABOUT DCHB LFBRB Y RTYNEOSEN RBTFYЪBOULHA FBLFYLH - CH MPV ABOUT CHTBZB OE UKHENUS, B FP LPUFEK OE UPVETEN RPUME RETCHPZP TSE KHDBTB DTBLPOB.
uOBYUBMB CHSHCHNBOYCHBEN Y KHOYUFPTSBEN OETSYFSH, RPFPN HIPDN RPDBMSHYE Y MEYYINUS PFDSCHIPN. chPCHTBEBENUS, FEMERPTFYTHENUS ABOUT ULBMH Y DBMSHYE CHPYOPCH FEMERPTFYTHEN L DTBLPOKH, B NBZ Y MHYUOIL DPUFBAF rTEDCHEUFOILB tPLB DYUFBOGYPOOSCHNY BFBLBNY.
ЪDEUSH ZMBCHOPE OE FPTPRYFSHUS, KHVYFSH ЪMPCHTEDB CHUEZDB KHUREN, ZMBCHOPE UBNYN OE RPZYVOKHFSH. MEYYNUS ЪBLMYOBOYSNYY CHPUUFBOBCHMYCHBEN VTPOA JEMSHSNY. ъДПТПЧШЭ РПМХУИФУС МЭУИФШ П УХФШ-УХФШ И ФПМШЛП ЪБЛМІОБОСНY. x NEOS ABOUT BFKH VYFCHKH HYMP OENOPZYN NEOEE YUBUB, VSHMP YOFETEUOP!
bTLU. lCHEUF mPHUE. YuETOSCHK DPN. hVYCHBEN CHETIPCHOPZP DENPOB bDTBNBMYIB, TSYCHHEEZP RPD CHYDPN DPLFPTB dCHB.
ZETPY RTYIPDSF CH bTLU RTPLBYOOOSCHNY DP 18 HTPCHOS, Y VYFCHB U bDTBNBMYIPN OE RTEDUFBCHMSEF PUPVPK UMPTSOPUFY, EUMY RTBCHYMSHOP TBUUFBCHYFSH LPNBODH. chP-RETCHI UBNH mPKHUE ABOUT VYFCHH OE VETEN, DBTSE CH DPN POB OE DPMTSOB ЪBIPDYFSH. pOB RTYUPEDYOSEFUS L VYFCHE FPMSHLP RPUME UNETFY bTZBNBMYIB, RPFPNH UOBYUBMB KHVYCHBEN EZP.
fBLFYLB VYFCHSH FBLBS. uOBYUBMB KHVYCHBEN RTYUMKHZH CH DPNE, CHUEI DP LPZP UNPTSEN DPVTBFSHUS (YI VHDEF RPTSDLB RSFI CHTBZPCH), OE RTPCHPGYTHS UBNPZP DENPOB. rPUME bFPZP CH DPNE PUFBEFUS UBN DENPO 20 HTPCHOS Y RSFSH EZP RPNPEOILPC, DP LPFPTSCHI OE DPVTBFSHUS. FERETSH PUFBCHMSEN mPKHUE UOBTHTSYY FTENS CHPYOBNY ЪBIPDYN CH DPN, RTDPDCHYZBSUSH RP EZP RTBCHPK YUBUFY, DPIPDN DP RPUMEDOEK LPNOBFSCH. ъDEUSH KHVYCHBEN DENPOB Y UTB KH RPDLMAYUBEN L ZTHRRE MPHUE. rPUME bFPZP PUFBEFUS TBBPVTBFSHUS U PUFBCHYYNYUS RPNPEOILBNY DENPOB. SING YURPMSH'HAF ЪBLMYOBOYS PYUBTPCHBOYS, OBDP VSHFSH ZPFPCHSHCHN L LFPNH.
vTPOS cheyuoschi.
TEGERF VTPOY- OBIPDN CH yuETOSCHI lPRSI - rEEETB CH MPLBGYY tBULPRLY RP BDTEUKH X: 333, Y: 657.
bTFEFJBLF CHYUSHI- OBIPDN CH yuETOSCHI lPRSI - rEEETB CH MPLBGYY iTBN CH UHODHLE URTBCHB PF CHIPDB.
fBTEMLB CHEYOSHI- OBIPDN CH yuETOSCHI lPRSI - rEEETB CH MPLBGYY tBULPRLY RP BDTEUKH: X: 455, Y: 536.
UZHETB YUFPLB- NPTsOP OBKFY CH ITBNE YMY LHRYFSH X FPTZPCHGECH.
notEFBMMPMPN- OBIPDN CH RTPGEUUE RTPIPTSDEOOYS YZTSCH (EUFSH ABOUT rPVETETSSHE TsOEGB, EUFSH ABOUT VESCHNSOOPN PUFTPCHE).
lPUB yЪVBCHYFEMSHOYGB.
TEGERF LPUSCH- RPMKHUBEN X UHLHLHVYY BMSHNYTSCH CH TBKULYI iPMNBI.
tHLPSFLB- OBIPDN ABOUT VESTHNSOOPN PUFTPCHE REEETH VEMPMYLPZP. UHODHL U THLPSFLPK CH REEETE RP BDTEUH: X: 129, Y: 202.
lMYOPL LPUSCH- On Vychnsoopn Puftpche, Machshch BDTeuh: 335, Y: 823. Chokhhty ITBNB RTPPDINN RPTFBM RP BDTEUKH: X: 618, Y: 600. Kommersantben LMYOPZP Kheuopzp Kommersalbi Kommers
dTECHOSS ULTYTSBMSH- OBIPDN CH yuetoschi LPRSI CH iTBNE CHYUOSCHI RPUME RPVEDSCH OBD cheyuopk bFETPK.
EUMY OE OBYMY CHCHYERETEYUMEOOPE, ZPFPCHBS LPUB NEOSHYEZP 16 HTPCHOS EUFSH CH bTLUE CH ITBOYMYEE LENNB.
lBL PVPKFY rKHFSH LTPCHY
h bTLUE YDEN L LHLPMSHOILH ъBODETUKH Y KHVETSDBEN EZP RPNPYUSH H RTPIPTSDEOOY RKHFY LTPCHY. according to DBEF BNHMEF, LPFPTSCHK OHTSOP OBPMOYFSH YUFPLPN 5/5. ъBVYTBEN, YDEN Y CHSHCHFSZYCHBEN PYULY YUFPLB YЪ FTHRPCH. hPCHTBEBENUS L BODETUKH Y TBRPTFKHEN PV YURPMOOYY. according to DBEF RBTPMSH (ZYKPTB) PF RYUSHNEOOOPZP UFPMB ABOUT CHFPTPN LFBCE EZP DPNB. yЪ UFPMB ЪBVYTBEN UCHYFPL yULHRMEOYS. eUMY ъBODETU OE PFDBUF CHEY DPVTPCHPMSHOP, KHVYCHBEN EZP Y ЪBVYTBEN BNHMEF Y UCHYFPL.YDEN CH ITBN, ЪBIPDYN CH ZTPVOYGH (DCHETY ЪBLTPAFUS - OBBD RKhFY OEF) Y RTPIPDDYN NYNP UFBFKHY MAGIBOB CH MECHSHCHK OJEZH DP LPOGB. URKHFOILY CHPURTYSFYEN ЪBNEFSF ABOUT UFEOE UMECHB UELTEFOKHA LOPRLH. h KHZMKHVMEOYE OBD LOPRLPK CHUFBCHMSEN OBRPMOEOOSCHK BNHMEF ъBODETUB Y YUIFBEN UCHYFPL yULHRMEOYS. oERPDBMELH CH RPMKH PFLTSCHCHBEFUS UELTEFOSHCHK MAL, YUETE LPFPTSHCHK RPRBDBEN CH ZTPVOYGH. h ZTPVOYGE RETED ZHOBMSHOPK VYFCHPK OHTsOP TEYYFSH DCHB LCHEUFB - lPNOBFB U FTHVBNY Y lPNOBFB UNETFY.
LBTFB ZhPTFB tBDPUFSH. chFPTBS ZMBCHB RPMOPUFSH. pVPOBYOOSH CHTBZY (LTBUOSCH), FPTZPCHGSHCH (UYOYE), LMBDSCH (JEMEOSHCH LTKHZY), FEMERPTFSCH (JEMEOSHCH FPYULY), REEETSCH (TSEMFSHCH LTKHZY), URKHFOILY (PTBOTSCHSHCHE LCHBDTBFSCH)
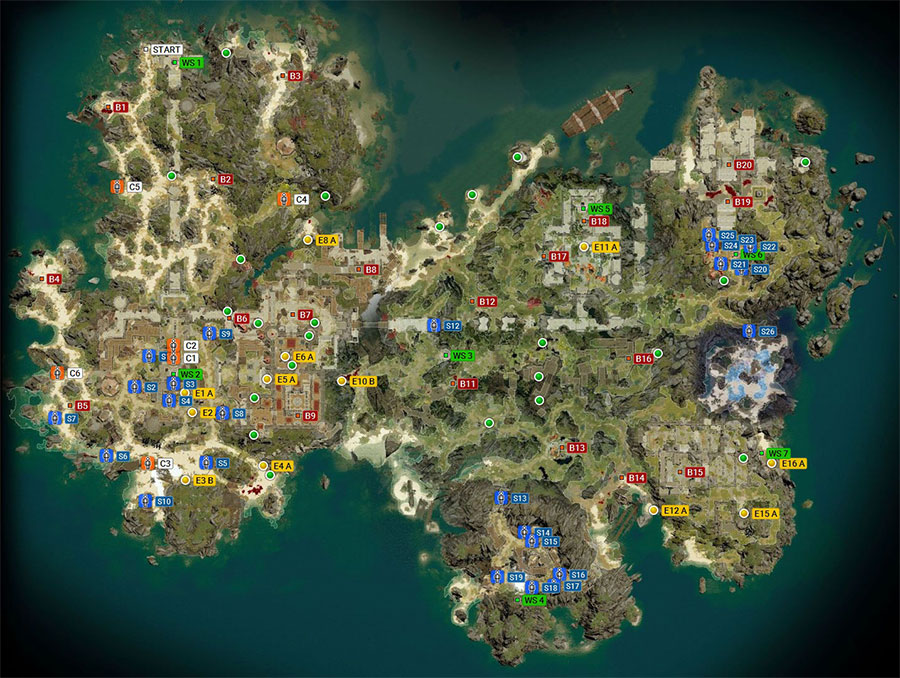
LBTFB RPDENEMYK ZhPTFB tBDPUFSH. chFPTBS ZMBCHB RPMOPUFSHA

LBTFB Divinity Original Sin 2. yuEFCHETFBS ZMBCHB. pUOPCHOBS LBTFB YZTSCH. pVPOBYOOSH FPTZPCHGSHCH
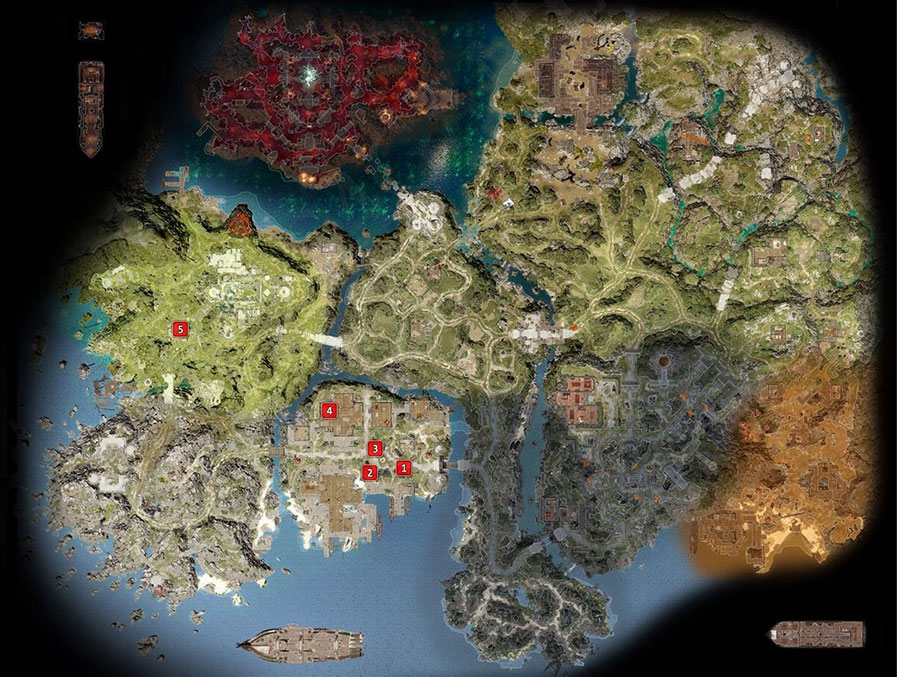
nYYB l. 2017 Z.
Quest " Forgotten and damned" can be obtained by talking to the Shiny Statue, which is located on the Blood Moon Island. After that, you have to activate 3 sculptures on the same island.
How to activate sculptures?
In order to perform this action, you need to read the book " Taming the Sacred Fire" ("Exquisite Hymn" or "Ornamented Psalter" before deciphering). You can find this book in the House of Jaan, in the archive in the northeast of the island, pick it up from the dead master of the Black Ring (near the Tree of Ancestors).
How to decipher the book "Taming the Sacred Fire"?
To decipher the book you need a character with the Scientist tag. The reward will be 14450 exp.
Preparation
Before heading to the first basement, look at the northern part of the island and look for the Ancient Forge (317, 479). You need to make 2 silver levers (for the 2nd and 3rd basement). Not far from the forge, find silver ingots (on the corpse of a member of the Black Ring in the unfinished crypt). Now go back to the forge and use it to make silver levers from the silver bars.
In the south of the island, not far from the Demon Camp, there are 3 basements. Using the hymn, you can destroy the statues and go down to the basement.
Archive
In the archive you will find a green teleport pyramid and medical notes (the quests “Megalomania” and “Silent” will begin). Read the notes, from which you will learn that people infected with demons are imprisoned in the basements. The poor fellows were locked underground along with the healer.
First refuge
Megalomania"
Bound by Pain"
Bound by Pain." Once inside (use the lever made earlier), use "Ghostly Vision" and ask the spirit to open the door (if he refuses, then use "Source of Vampirism").
Behind the door you will encounter a possessed gnome who will ask you to destroy the pillars. If you fall for his trick and do what he asks, the demon will be freed. It's better not to do this. Attack the gnome until he falls (about 10% of HP). After that, release him. You may need to heal the gnome, in which case the Life on the Edge spell will suit you.
When the demon is released, attack it, but be careful. He can possess one of your party members who is within a radius of 8 cells. To make the demon come out of your companion, deal damage that brings the companion almost to death.
In this situation, the gnome will share information about the treasure (coordinates 193, 379, near the three crosses).
If you simply destroy the pillars and release the demon right away, the gnome will die. On your way out, talk to Calvin to receive your reward. If you didn't save the gnome, then most likely you won't find Calvin.
Fourth shelter - quest "Silent"
Friend of Animals"). If you fail the test, you will have to kill Buttons. After that, destroy the Source chains that bind the girl and talk to her.
Be careful. If you fail the speech test, the girl will not be able to come out of sleep. Having failed with all four characters, you will have to leave the quest uncompleted.
If the test is successfully passed, you will receive 14,450 experience points as a reward and teleport the girl to the Lady Vengeance. A little later you will be able to start treating her. The quest "Silent" will be completed. Talk to Brother Morgan to collect your reward.
Now that all four vaults have been explored, the quest "The Forgotten and the Damned" will be completed, and the entry "We have found and cleared all four vaults on Blood Moon Island" will appear in the journal.
The underground temple, in which you need to pass tests for the “proud name of the Immaculate,” is located northwest of Silverglen, in the Valley of Sandstorms. You need to go from the Altar of Silverglen to the west, and fast to the north, passing the Immaculate checkpoint. The entrance to the dungeon is a stone skull.
After entering the test dungeon, go through the tunnel. Ahead you will see a statue that will offer you a test in the Hall of Perdition.
Note: If we didn't pass Loic's exam in Silverglen Chapel, the statue will tell you to come back later.
First test
In the hall, which is located behind the statue, everything is covered with green fumes of rot. When infected with rot, health decreases by one every second. But the ability "Teneberium" gives immunity against rot. If you have completed the "Troll's Gold" task, this test is not scary for you. On the floor you will see a dead body, after searching it you will find a letter from a member of the Magnificent Five Mendia, from which it becomes clear that Mendia wanted Loic to join their group of adventurers. However, Loic turned out to be more cunning; in return, he demanded that Mendius undergo an initiation rite into his sect. But Mendiy remained rotten in the testing room. In his suicide note, he asks that the contents of the cache near the tree stump be handed over to his mother, Gregia of Grugam, whom he loved very much.
Second test
Before entering the testing hall, the Statue will say: “Only those who can bear the burden of knowledge will see the walls of ignorance disappear before their eyes.” You have to solve some kind of riddle with the placement of cargo, the correct solution of which removes the magic from the exit from the hall. There are four buttons in the room on which you need to place the correct items. The buttons are triggered by a certain weight; when triggered, a click should appear. When placing an item on the button, the weight is shown as a percentage; if the item is selected correctly, you will see a value of 100%. If the object is heavier, the value will be more than one hundred percent, if it is lighter, less.
On one of the buttons you need to place a broken vase that stands nearby.
On the second there is a heavy barrel, which can be found by going down to the lower room.
On the third button you need to put a bucket of water. The bucket of water is in the secret room, which is located between two bookcases. A button that opens a passage into it. located on the wall to the right of the stairs.
On the quadruple button you need to put the “Book of the Immaculate 2”, which lies on the fallen bookcase in front of the secret room.
Collect things from vases and boxes in this room
Third test
After going through the door that was previously protected by a magical barrier, you will find yourself in another room. The statue of this butt will say: “Watch, watch, or the sharp-toothed shadows of failure await you.” On the left there is a row of three levers that need to be placed in the following position: the left lever is to the right, the central lever is to the right, the right lever is in the middle position. Then you need to turn the lever, which stands separately. If the levers are placed incorrectly, the Shadow of Misfortune monster will appear.
If the levers are installed correctly, the passage will open further. Enter the door and go south. You will see a bedroom where there are many books Immaculate, chickens are running around further. If you talk to one of them, she will ask you not to kill her. Since you are not infected, there is no point in killing the poor animal. There is a star stone in the circle, which activates when you approach it. Take the inert stone.
Next, near the altar, stands Loic, who will order to kill the chicken, sprinkle its blood on the star stone and be healed. But then he will see that you don’t need healing, that you don’t have the blessing of the blood. He will order to kill a chicken, sprinkle it with blood... and he will run away, and will return soon. But he will return with his assistants to punish us. A fight will ensue. After the victory, take the Amulet of the Immaculate and the keys to the hatch in the chapel and to the temple of portals in the Woods of Luculla.
Losses in the Ledger is a side quest in Divinity: Original Sin 2. We met merchant Garvan, who told us that he and his mentor Liam were attacked by Netherfiends near Driftwood.
Important NPCs
- Garvan
Walkthrough

Find Garvan in the Driftwood Tavern on the first floor. He will tell you that he and his mentor Liam were attacked by fiends of the Void. Liam was killed and all their belongings were gone. He asks you to find missing supplies on the road west of Driftwood.
Go to the marked location and you will notice a troll guarding the bridge. You can kill him, or help him in the task “Competitors”.
Follow the trail of blood (can be detected with high Perception) and you will see a wooden chest. Try to hack it or take it into inventory and an undead master of beasts will appear with his “pets” fiends of the Void - Pasha and Tasha.

After the fight, you can inform Garven that the supplies were destroyed, or return the chest to him with or without the contents.
If you investigate the area further, you may discover (again requiring high Perception) a shallow grave. Dig up the remains. If there is an elf in your group, then he can eat them and then you will find out that Liam was killed not by fiends, but by someone close to him. Use Spiritualism (quest " Sharp Awakening") to talk to the spirit. You can agree to avenge him (task “Aggressive Capture”).
Job structure
We met the merchant Garvan, who told us that near Driftwood he and his mentor Liam were attacked by Void fiends. Liam was killed and all their belongings were gone. Perhaps we should help him.
We agreed to try to find and return Garvan's supplies. They should be found somewhere on the trade road west of Driftwood.
We arrived where the enemies attacked Garvan and his mentor. Traces of struggle are really visible here.
We've found Garvan's missing belongings.
Options for completing the task:
- Garvan's belongings were destroyed.
- We told Garvan that his belongings were missing.
- We returned Garvan's belongings.
- Garvan is dead. He won't need these things anymore.
- We left the Reaper's Coast without solving Garvan's case.
Larian Studios has done the impossible by releasing a sequel that is superior to the original in almost every way. You can go through it a huge number of times and still constantly find something new, for example, additional puzzles and riddles, the solution of which can lead to valuable items. True, some of them are almost impossible to complete on your own, so we decided to write a guide to solving them.
Puzzles and riddles in Act I
Brakka word puzzle
When speaking with articles of illusion, you will notice that each letter in the highlighted words has a specific meaning. Therefore, you just need to compare them with certain values. If you talk to the rat outside the room (you need to have the Animal Friend skill), you can get a couple of clues to solve this puzzle.
First word
BRACCUS, which consists of the following letters and meanings: B (bloody), R (rotten), A (thieving), C (very), C (very), U (awful), S (fellow). Therefore, we need to choose values that correspond to the letters from the word CUR (mutt): very, awful, rotten. In Russian localization it looks like this: very terrible, rotten.
Second word

SOURCE, which consists of the following letters and values: S (scourge), O (devil), U (misery), R (blight), C (hex), E (curse). Therefore, we need to select values that correspond to the letters from the word CURE: hex, misery, blight, curse. In Russian localization it looks like this: slander, suffering, poisoning and curse.
Bracca Tower
In this place you will have to solve several different “puzzles”, some of which will make you think a lot. We'll quickly list them and give short instructions on how to implement them.
Closed gate next to the statue (pass the undead)

Here your hero will need to use the lever located in the room located on the other side of the main room.

To get to the lever, you need to click on the sewer grate installed in front. We advise you to use the jump skill - this will allow you to quickly reach the sewer. Although you can also try to knock down a door nearby.
To solve the well puzzle, you simply need to fill it with water. The easiest way to do this is with a rain spell. Just cast it over the well and wait a couple of minutes.

Barrier in the tomb
If you want to remove the barrier, you will have to take out one Source point and place it in the “Mysterious Technique” located not far from the barrier.

To cure the historian from his curse, you will need to place him on a surface with blood, and then cast the Blessing spell on the blood. How to get blood? The spell “Blood Rain” can help with this.

If you don't have the above spell, you can use the Flesh Sacrifice ability a couple of times and then move the historian to the pool of blood. As a last resort, you can attack your companion, and then teleport the historian to a puddle of blood.
Cursed lever (Gareth's rescue)
Here you just need to bless the lever. Unfortunately, it will not be possible to save the soldier (at least we have not found such a way).

Puzzles and riddles in Act II
Cemetery (Ryker area)
Stunning Tomb
To gain access to the coffin, you simply need to cast Amour of Frost on yourself. To free Qanna, as well as talk to or kill her, you need to throw a buff on her.

Flaming Chest
There are several conditions: you must be a lizard and know the ancient language. After learning the language, go and talk to the salamander located in Ryker's house. This is where you met him for the first time. Having found out the password, return to the burning chest and cast a rain spell on both sides of the heads of the lizards spitting fire. This should be enough (you can also try blessing the water if it doesn't work the first time). You will then be able to talk to the chest.


Johanna's Tomb
First of all, you need to find two buttons that will allow you to open the wall blocking the passage to the coffin.
After this, you need to place some of your equipment (we used a pot, but you can also install equipment, since nothing will happen to it) on the large button located in the farthest room. Then use the Spirit Vision skill, which will allow you to see the levers on the wall. You need to press them in a certain sequence to open the hatch: first use the middle lever, then the left lever, and finally the right lever.


Elemental puzzle in Mordus' house
Everything is quite simple here. You need to use Ghost Sight to see the solution to the puzzle (it appears on the top of the block of squares).


If you have problems solving this puzzle, then we advise you to read our guide, where we examined this riddle in detail.
Burning Prophet Statue
This puzzle is also quite simple. You need to light all the braziers at the same time using fireball or ignition.

Puzzles and riddles in Act III
Lucian's Coffin - how to complete the mini-game
Basically all the information you need is presented in the picture below. However, here you may encounter one unpleasant bug in which the blood does not become blessed even after passing through the blessed fire. To solve this problem you will need at least 2 teleportation pyramids.

You need to throw one of them beyond the blue barrier. Then teleport to it, use your jump ability and get to the end of the blood pipes to manually bless it. This method is suitable even for lone wolves, since only one component out of three is not blessed.
Puzzles and riddles in Act IV
Lucian's Altar - how to complete the mini-game
After setting up the pipe system as shown in the screenshot below, you will need to fill the central cup with blood. You can choose any method, but we recommend doing it through the grate next to the altar (you can use the Blood Rain spell or attack your companion). Then you need to cast “Blessing” on the chalice to consecrate the blood.

Puzzles and riddles in Act VI
Answers to questions from Cranley Hubert
When you get to the city of Arx, you can find the house of the Wise One, where you can talk to a scientist named Cranley Hubert at any time. He will ask you to play a guessing game, that is, you will need to answer all his questions correctly. However, even if you make at least one mistake, he will stop talking with your character (you can choose another one). For this reason, we decided to publish answers to his questions.

First question
The answer is: “House of Dreams.”
Second question
The answer is as follows: 1234.
Third question
The answer is as follows: Tenax
Fourth question
The answer is: Cassandra
You're probably wondering why exactly you played this simple game. The fact is that if you can give the correct answers to all the questions, then the wisest will take you to his hiding place. Don't be afraid, there are no enemies here, but there are a huge number of books telling about the game world (some were written by Hubert himself). He will also give you a key to his house and a reward.

Not bad stuff for a couple of questions. In addition, in a secret room you can find a chest, the items in which are generated randomly. But the most important thing is that you will be able to unlock the door leading to the backyard without committing a crime. This will allow you to continue (start) completing the quest “Secrets of the Dwarves”.
They won't pass
On the Reaper Coast, talk to a boy named Barin, who is standing on the edge of a destroyed bridge. Or contact bridge advocate Mary. This is how the task begins.
Go to the house of the bridge keeper (through the paladin fortress and the cemetery) and deal with the fiends. To open the gate, you will need master keys and good lockpicking skills.
Mary will provide a reward for this (if she survives). You can also find the key to Mary's hatch inside her house.
Plundered Caravan
You will receive this quest after you find a caravan of masters near the starting point of the Reaper Coast. Talk to the surviving gnome to find out that the fiends captured the sorcerer and dragged him into a special cave called Wrecker Cave. After you talk with Raymond in the Driftwood area, tell Master Julian what happened to the caravan.
Hide and seek
In Driftwood, talk to two children standing near the docks - Ben and Harietta. You learn that their friend Joe tried to swim to Fort Joy but disappeared. They are concerned about his disappearance.
Go to coordinates (X: 450, Y: -46) to find a beached shark on the beach of the Reaper Coast (by the way, not far from the starting point). She doesn't want to go back into the water because she's afraid of some monsters. Finish off the shark in any way, search its body and find a severed leg. Choose an elf and eat this leg in order to find out that it belongs to the dead boy. This is Joe.
Return to the children and inform them of Joe's fate. You will receive the usual reward and complete the quest.
Advice. If you don’t have an elf in your group, but have Fain, then use his many-faced mask to turn into an elf. This will give you his ability to see the memories of killed people.
Reward: 3000 experience points if you eat the leg and learn of Joe's fate, plus regular loot.
When to count chickens
On the Reaper Coast you will find a chicken coop with several chickens. If one of the team members has the Animal Friend talent, you can chat with the main chicken and find out that their eggs have been stolen. Big Marge will give you the task of returning the stolen eggs.
Move to the indicated place, marked on the map, which is slightly north of the chickens, and deal with the fiends of the Void. All the eggs will be spoiled, but there is one that has survived - a little further, at the very edge of the shore. Take the egg and return it to Big Marge.
As a reward for this, you will learn about the place where the treasure is buried - it is behind the chicken coop. Dig it out.
Return to the chickens a little later to find that the newly hatched chicken, Pipir, has killed everyone else, but is somehow friendly towards you. He will follow you just like the black cat did on the shore of Fort Joy.
Use spirit vision to make the spirit Big Marge appear, who will tell you that you must find Pipir's father. Go to the indicated location on the map at coordinates X:437, Y:304 to find Pipir's father - Magicockerel.
He will tell you that you must kill Pipir, since the one he sees in front of him is only a murderer, not his son. You can agree and kill Pipir or refuse it.
If you decide to kill Pipir, you will receive a reward in the form of loot, and a chest with legendary and epic items will appear next to Magicockerel. If you choose not to kill Pipir, he will turn into a monster and summon dozens of chicks to fight you. Afterwards you will receive a chest. In any case, the quest is completed.
Reward: 5000 experience points (regardless of choice), chest with legendary and epic items.
Scientist Grebb
Eat three fish that are infected with poison. In the Driftwood fishing area, Grebb studies infected fish infected by the Void. If you agree to eat it, you can get experience and other rewards for it.
He will give you a choice of poisoned fish - brown, red and yellow. After eating, you will be poisoned for several turns. You will receive a mixture of plants from him depending on what kind of fish you eat - duchy for bream, etc. He will also say that he would recommend mixing this herb with the fish you ate to enhance the effect of the potion.
One character can only eat one fish out of three. Eat every fish, which requires three characters. When you talk to Grebb as the fourth hero, the quest will be completed as the scientist admits that there are no more fish.
You can even use hired heroes to complete the quest (if you don't have a full team).
Losses in the ledger
Return Garvan's property.
At the Driftwood Tavern, there is a man named Garvan who asks to investigate missing supplies along the trade route west of Driftwood. Go to the indicated location where there is a troll guarding the bridge. You can kill him or agree to help as part of the “Business Competitors” quest.
Follow the bloody trail and meet the gnomes and their pet Pasha. You can inform Garvan that the property was destroyed, or return the wooden box to him with or without its contents. Or you can continue your investigation at this point.
You can dig up the remains from a shallow grave, let an elf from the party eat them, and find out that the merchant was killed not by fiends, but by his companions. Activate the vision of spirits and the ghost of a merchant will appear. You can agree to avenge him, which will lead to the start of the "Aggressive Capture" quest.
Garvan only needs his box, and the reward will vary depending on its contents (what you leave inside).
Business competitors
Trolls Gorg and Marg are engaged in the same business, being competitors for each other. Each of them will ask to kill the other. You can help one get rid of the other. But be very careful in this, since the Gorg troll is a dangerous enemy that can kill a weak party member with one blow. Before you fight the trolls, make sure you are prepared and save your game.
Using fire on Gorg and poison on Marg will remove the effect of their blood regeneration.
Aggressive takeover
To the west of Driftwood, near the bridge, there is a trail of blood. We indicated this location in the quest “Losses in the Ledger”. At the end of the bloody trail, you will discover Garvan's property, but will also be ambushed by enemies.
After the fight, use spirit vision to spot the ghost of Merchant Liam. Talk to him to find out the truth about his death and agree to avenge him. If you want to kill Garvan without attracting attention, you must feed him a poisoned meat stew, made from regular meat stew and any fish infected with the Void. He will then move to the infirmary behind the tavern and attack you as soon as he sees you. After searching his corpse, you will receive Garvan's severed head. Give it to Liam, and he will mark on the map the place where the treasure is buried, which Garvan could not find. This is your reward.
However, if you eat Garvan's head with an elf from your party, you will receive the unique talent "Merchant's Secrets", which increases the "Exchange" option by one point. If you decide to do this, Liam will not give you a reward.
If you decide to kill Garven, but he is inside the tavern and has not become your enemy, then do it without warning anyone. You need to have a poisonous weapon, the rain skill and about 1000 gold coins in reserve. Cast rain near it, and then infect the puddle using a poison weapon. After that, go outside and return to the tavern so that no one can see you. Wait until Garvan dies without anyone knowing who did it.
1000 gold will be needed to bribe anyone who tries to interrogate you (about 400-500 coins will probably be enough, but it's better to have more just in case). Or you can try to convince such people. After this, do not approach the tavern until the situation calms down and all NPCs return to their places. This way you can safely take Garvan's head.
Buy Stew Meat from Lovrik at the Tavern and combine it with any fish you catch. Give the rotten fish to Garven. To begin with, you may have to give Garven the usual stew, after which he will ask for the third one himself (you can slip in poisoned fish).
You can discover Liam's treasures yourself.
Wishes Network
At the bottom, under Driftwood, you will meet a strange woman named Dorothea. Agree to look at her ring and choose one vision, each of which will cause one reaction or another. She will ask you to meet her in the corner, so you will have to divide the squad (in a well-known way) and keep your companions somewhere away. Once you meet the woman, she will turn into a giant spider and you will have to decide whether to let her kiss the hero or take out a weapon and fight the enemy.
If you choose the second option and defeat the spider, then your companions will receive 4000 experience points, and on her corpse you will find an idol of revival (resurrects the character who has it in his inventory if he dies), two unique daggers and a key.
If you allow yourself to be kissed, she will bite the character on the neck, and you will receive the “Spider Bite” talent, the effect of which depends on what vision you have previously chosen:
- Towering Oak (+2 Strength, -2 Constitution).
- Curved Feather (+2 Intelligence, -2 Constitution).
- Golden chest (2000 gold, -2 constitution).
- Dragon (+2 to intelligence, -2 to constitution).
- Cocoon (-2 constitution, one revival idol).
After the kiss, you can attack Dorothea, or you can let her go.
Although you are required to face Dorothea alone, you can use other characters you control in the battle (if it starts). Therefore, the battle will be quite easy. To maximize the experience, kiss the spider with all four characters, and attack her last when Dorothea tries to leave.
Drowning her sorrows
On the second floor of the Driftwood tavern, you will meet Captain Ableweather, who will ask you to stop the ringing that is tormenting her. Use the ability to see spirits in her room and you will see one ghost torturing a woman. Convince him to leave, after which Ableweather's torment will end.
Ableweather will mark the location of his compass on the map. When you go there, you will need to teleport one companion to open the hatch. Inside the cargo you will find a compass surrounded by fog. You need an undead character to receive a compass or a teleport spell.
Strange cargo
After you find Higba (the “Lost Masters” quest) in a barrel of fish in the fishing room, you can help him escape or bring him back.
If you decide to help with the escape, you must escort the character outside of Driftwood, while making sure that he is not caught by the masters. Use your mini-map to track the location of the remaining Masters, and use stealth to escape. Or simply take your character to the western part of the port and use the teleportation skill to move to the other side of the river.
For this you will receive a reward and a new clue about who the real criminal is (the cook in the tavern) and where to find Master Hanang. In addition, you can teleport along the marker and receive a reward. Don't forget that when you try to escape, you can still return your character to the masters.
Love has a price
A man named Lovrik at the Driftwood Tavern promised you to try something exotic. If you pay him the specified price, he will give you the key to the upper apartment.
Go there alone and spend the night. The next morning, thugs will suddenly appear while you are naked and demand your money. If your character is Ifan ben Mezd, the thugs will recognize you and simply leave. Otherwise you will either die or lose money. If you're playing as the Red Prince, the lizard you encounter will turn into the Red Princess instead.
Returning to Lovrik, you learn from him that he did all this for his daughter. If you question the cook, you will find out that he is lying. Unfortunately, Lovrik will have time to escape.
Driftwood Arena
This quest can be taken in the basements of the tavern in Driftwood. In the first fight you will fight blindfolded, which reduces range and accuracy, so prepare carefully.
Murga, who is to be fought in the second battle, fights like a scoundrel. After her second turn, fiends will appear, which you both will have to destroy. After the fiends die, you will need to defeat Murga to receive the champion title.
In both battles, be sure to cast shields and various buffs in advance. Be careful with your transformations: wearing a blindfold will prevent you from using different skills.
The first battle can be made easier by summoning creatures about which you were not told anything.
If Murga does not reach you before the fiend appears, she will attack your common enemy. Move away from her. The worm will not be as dangerous as the one that appeared in the fight with Alexander, but it is not as bad as the one you could fight in the swamp. He will try to put chains of pain on you. Sebilla can break the bonds, but this requires an Origin point.
Are you a third-level geomancer? Invest gold and origin point in an artillery mount, which can be bought on the market. I used it to defeat Murga after she finished off the Worm.
Burning Prophet
There is an unusual statue on the Driftwood cliff with several torches next to it. You need to light all the torches at the same time, but they won't burn for too long. Create an oil surface and use a fireball or other spell (or a weapon with fire damage) on it to light the torches.
A rainbow will appear and the statue will speak to you. You will be able to choose your reward and get some experience points.
Ugly little chick
There is a sick chicken on a farm north of Driftwood. If you have the Scientist tag and the Animal Friend talent, you can convince her that she is actually a phoenix. All it takes to turn a chicken into a phoenix is to burn it. Cast any fire spell and the chicken will actually turn into a phoenix egg. You can decide what to do - leave the egg or eat it.
Bestial treatment
On a farm north of Driftwood, you'll encounter a pair of cows who are actually people - they were turned into cows and enslaved by a certain witch. You will need the Animal Friend talent to talk to the cows. They want to return to their human appearance, which is why they ask you for help. The quest can be started by simply picking up the key to the witch's house, which is located to the left of the house, on a large rock.
The witch's house is located right in front of the cows. Enter it (we indicated the location of the key above) and take the witch's eye (which is used to create a potion and return the cows to their human appearance). Then open the hatch leading to the dungeon (requires level 4 thievery). If you don't have the required theft skill, you can meet the witch in the monastery forest to get the key to the basement. But keep in mind that the battle will be difficult.
In the basement you will find a lot of exploding rats. Attack holes in the walls to stop them from appearing. You can also find the lever that opens the door, although it can also be unlocked with the fourth level thief skill. Or even teleport inside!
In the basement, be sure to pick up the witch's potion (which will turn you into a cow forever if you consume it). You can also find the witch's book on the giant frog. You'll probably have to kill the frog to get the book, since it won't give it up. Having the "Scientist" and "Mystic" tags will allow you to decipher the recipe book dropped by the frog to create the desired potion. Otherwise, use our recipe: growth stimulator + boletus mushroom + witch's eye.
If you drink the witch's potion to turn into a cow, the quest will be completed automatically and you will receive 10,775 experience points. This is not recommended because you can only create one potion and you will have to return two cows to form.
Take the potion so that you end up with two of them (one was crafted, the other was found in the witch’s house). Return both potions to the cows and receive 13,450 experience points for each. In total, you will be rewarded with 26,900 experience points.
Reward: 10,775 experience points if you drink the potion and turn into a cow; 13,450 experience points for each cow that returns to human form - there are two of them, so there will be a total of 26,900 XP.
A test for all times
To the east of the altar of Driftwood wanderings you can find an elven building, across the river. There are four statues surrounding the brazier (coordinates - X; 450, Y: 340).
To pass the test, you will need to attack four statues using different elemental skills:
- Hero of Winter - spells “Winter Blast” or “Hail Strike”.
- Hero of Autumn - Static Cloud Arrow or manually cast fire spells on a pool of water, then attack the cloud with a lightning spell.
- Hero of Summer - use the Laser Beam spell.
- Hero of Spring - use "Blood Rain" or the Elven race ability "Sacrifice of Flesh".
Be ready! As soon as you light the last totem, four heroes will appear and begin the battle with you. Each contender (Winter, Summer, Spring, Autumn) is immune to their respective element. These are pretty strong opponents if you are on the same level with them. Defeat all enemies so that the brazier will speak to you, congratulating you on your victory and creating a chest with a phoenix heart. This will end the quest.
Reward: 20,775 experience points for each killed opponent - a total of 83,100 XP; 51,900 experience points for completing the quest; a phoenix heart (which gives the Burning Tongues skill if eaten by an elf) and a chest.
Hints:
- Summon the Fire Slug (Ring of the Mage) to activate the Statue of Summer, as it also uses a laser beam.
- Spill the blood to activate the Spring Statue. You can do this by attacking a follower standing near the statue.
Speaking in Forked Tongues
In the cemetery you can find a lizard chest, between two fire-breathing statues. Let the lizard talk to him and you will learn that a password is required to open it. Transforming Fain into a lizard will not help you.
The password can be obtained from the salamander in Riker's mansion, but you need a lizard character with the Animal Friend talent. Teleport the chest from the flames. Breaking it will give you loot, but will not solve the quest.
Family Affair
At the cemetery gates is Tarquin, who asks to explore the family crypt and get a family heirloom. You can get the key from the petrified sorceress found in another underground room. In the first room there are two buttons on the wall that you need to get close to to find them. Click on these buttons, which will open the stone gate.
Have one of your companions enter the third room and stand on the pressure plate. Then use the vision of spirits (which you will study as part of the quest “A Sharp Awakening”) to find three levers on the wall. Press the middle, left and right levers in sequence to open the secret hatch. If you have already touched the levers before using our combination, then you need to “reset” the middle lever. Pull the middle one until the water comes out, then interact with the left and right once each.
Under the hatch is a treasury. Use the character with the highest luck to get the loot. The artifact lies in the coffin. If you have a lizard, he will understand what language the inscription is engraved in. When you try to leave the tomb, all the clay guards will come to life and attack you. Tell Tarkin that the task is complete, after which the man will say that there are other artifacts on Blood Moon Island. When you go to Blood Moon Island, you can find a hatch in its northeast corner. It's hidden in a rather clever place.
Inside the vault is the other half of the artifact. When you have both halves in your hands, talk to Tarkin. Sometimes he will not be at the cemetery gates, but on the Lady of Vengeance, near the boat. If you go to the Lady Vengeance by fast traveling, Tarkin will be right next to you.
Hints
You can destroy the clay armor before looting the room, which will avoid the battle.
If Tarkin is missing, then one of the possible solutions is to follow the marker to the Lady Vengeance, taking a boat from the shore, and then re-use the boat on the galley. Tarkin should appear near the boat.
There is a much simpler way to enter the crypt:
- Look at the stairs leading down the crypt.
- Go left.
- As soon as you go down the hill in front of the gate, you will see a crypt with statues of two knights with shields.
- Destroy or open the gate (there is a lever on the right side).
- Enter the tomb.
- As soon as you go down into the tomb, don't touch anything, or you'll turn to stone.
- Use the Blessing or Ice Armor spell.
- Or kill Kanna to get the key to the tomb to get inside.
Stranger in a strange land
Use spirit vision near the altar of wanderings in the cemetery to see the ghost of a lizard near you. He will ask you to dig up his remains and burn them in eternal fire. Place the remains of the lizard in the part of the cemetery where representatives of this race are buried - where there are two dragon heads emitting fire. A lizard ghost will appear and thank you.
Existential crisis
In the cemetery you will hear a voice asking for help - coordinates X: 625, Y: 153. He asks to dig up the remains. Agree to do this. After you dig up the character, a skeleton named Crispin will appear, claiming to be a philosopher, challenging you to a duel. At this point, if the character talking to him is not undead, he will need to prepare and defeat him. Otherwise, feel free to join the battle immediately.
He will have three questions for you. Answering any of them incorrectly will result in instant character death. The most common way to win for non-undead characters is to read The Essence of Existence, volume three, to destroy the skeleton.
However, if your character is undead, simply select the "Undead" tags in all three questions and you will automatically win (for example, if you have Fain). You can also give the correct answers to questions by consistently using the tags jester, mystic and scientist. Unfortunately, due to the inability of any character to have all three tags at once, reading at least one book will still be necessary. The first volume contains the answer to the first question, the second - the second, and the third - the third.
You can find all three volumes in Riker's mansion. The first volume was found where Riker is, in his personal office. The second is located in the living room on the lower floor. The third volume can be found on the second floor in Riker's bedroom. Please note that if you take books, it will be considered theft. And to get into the bedroom on the second tier, you will need to break the door.
If you answer the first question correctly, you will see the skeleton trembling. If you answer the second question correctly, he will scream. If you answer the third question correctly, the skeleton will explode. Correct answers to all three questions will lead to successful completion of the quest, for which you will receive 21,525 experience points and a skill book from Crispin's body.
REMEMBER that Fain, being an undead creature, can answer all three questions correctly.
Lowse can answer the first and second questions, being a jester and a mystic, but the third will require the third volume of The Essence of Being. It is located near the bed in the room with the cat and dog, on the second floor of Riker's house.
Heroes' Shelter
To the south of the cemetery's wandering altar there are coffins with four heroes. Examine them to find out four places where treasures are buried. But if you examine all four coffins, undead heroes will revive and attack you. After that, go to the marked points and find the heroes' equipment to complete this quest.
Kill each hero one at a time, as after the first death they will resurrect in a more powerful form. Therefore, first kill one hero twice, then another, etc.
Resistant Servants
In the cemetery you will find the gravedigger Farima, who begs to kill Riker. After you do this (Riker is in the private office of the mansion), then inform Farima. You will be able to kill Riker after you complete the Generous Offer quest, allowing you to maximize your profits.
Generous offer
In the mansion in the cemetery there is a character named Riker, who will ask you to get a special tablet, in return for which he will teach you how to control the source. The tablet is located inside the caves in the Black Mines. In Rust's room (at the sawmill), you will find a contract suggesting that Riker is the Lone Wolf assassin, tasked with destroying all the believers he encounters.
Travel to Blackpit on the southeast coast of the Reaper to find that the gate is guarded by mages, blocking further access. If Raymond gives you the authority to help the masters, you will be able to pass through the gate without any obstacles. Otherwise you will have to defeat the guards.
Behind the gate you will see a white magician interrogating a mason (a student of Hannag, required for the quest On the Ropes). After killing the master, you will lose the thread of the task, after which fiends will also appear.
On the other side of the harbor, Quartermaster Anna is guarding the entrance to the mine. Defeat her to get inside. This shaft is filled with traps and oil pipes. Use crates to block the pipes and disarm them. Or use teleportation to go through this place. If you have two teleportation pyramids, which you may have found in Dallis's hidden room on the Lady Vengeance, then leave one pyramid with one companion and the other with another. This way you can teleport as a team.
In the depths of the cave there is a Screaming One, guarding the altar of wanderings. Use the “Source of Vampirism” skill to destroy it (there is a corpse on the broken bridge - if you teleport there, you will find a note and a key).
Note. If you have a special rod that you found in Fort Joy, you can use it to kill the Screamer. If not, then you need to master the source and complete the ritual in the quest “A Sharp Awakening” to learn the “Source of Vampirism” skill.
Moving forward, you will see some Battlemasters fighting the Netherfiends (at the excavation site). Defeat the fiend, after which you can convince the masters (if any of them survived) to just pass by. If that doesn't work, you'll have to kill them too. Take the key to the room nearby from one of the masters' corpses. There is a hidden stone door inside the room - you need to get close enough to see it. Behind the stone door there is a strange device that will teach you how to create a mask (requires one Origin Point).
Leave the excavation site by going to the workshop where a group of masters is located. You need to defeat them and destroy the gate (use fire skills on the oil barrels) to open the way to the Ancient Temple. Interact with the device in the Ancient Temple to get more information. The clue to the puzzle is in a book on a corpse inside the Ancient Temple. The second page will say that each God represents an element or force:
- Ralik is earth.
- Duna - air.
- Tyr is blood.
- Zorl - fire.
- Vrogir - fire.
- Xanthess is the mind.
- Amadia is magic.
The correct order would be: Amadia, Tyr, Duna, Zorl, Xanthessa, Vrogir and Ralik.
Once you hit all the pillars in the correct order, the force field will disappear. The item you need is in one of the boxes near the sarcophagus. Retrieve it and return it to Riker. Touching the sarcophagus will ultimately lead to a difficult fight.
Return to Riker's mansion, go to his personal office through the hatch. Riker will sacrifice the souls of the farmers to give you more origin points (increase the origin points, but not more than three). He will then attack you, so be prepared for a fight.
If you simply give the artifact to Riker, he will give you the blueprint. The door without a keyhole can be opened using the switch near Riker, next to the mirror. Cast the See Spirits spell during the fight against Ryker to see the souls of your defenders, allowing you to instantly kill them using the source of lifesteal.
On the Ropes
Hannag, one of the masters of the source, will give you this quest after you save her from the masters (near the altar of wandering in the monastery forest). In return, she will teach you how to control the source. Apprentice Hannag can be found in the Black Mines location. However, when you reach him, you will find that he has already escaped, and a group of magisters have captured his family and are preparing to execute him. You can fight them or leave them alone.
Before continuing to explore the black hole, you need to overcome the guards at the gate in the form of masters. If Raymond (Order Law) has authorized you to investigate the incident, you will be able to pass through the gate without any violence. Otherwise you will have to fight with enemies.
Gvidian, Hannag's student, is tied up and interrogated by the white magicians. Now you can free him, but this will cause everyone to become hostile and attack you. This is a very difficult battle, so be prepared, choose skills related to water, since there will be a lot of fire and oil fiends. After freeing Gwydian, use the waypoint to teleport to the monastery forest and report this to Hannag. Hannag will teach you the knowledge of the source, increasing your maximum supply by one point. If you already have two source points, now there will be three.
Three altars
Go to the Monastery Forest and go to coordinates X:115, Y:269, where the Lamenting Abomination character is located. When you approach it, wolves will appear and attack your squad. Kill the enemies, and then kneel before the altar.
The second altar is located at coordinates X:414, Y:301, on the river.
The third altar is located at coordinates X:482, Y:260, also on the river. When you get close, fiends will attack you.
Elven Seer
- Sawmill - Saheila.
- Reaper's Coast - elf camp.
If you managed to convince the elves to let you into the ritual site, then after its completion you will be able to talk with them. You learn that Saheila has been kidnapped by the lone wolf Rust and is being held captive on the grounds of the sawmill. If you have a high level of persuasion, you can convince the elves to leave it there.
Your next goal is to go to the sawmill and get inside. Saheila is being held captive on the floor of one of the buildings. Most of the territory is well guarded by Rust's people, which means you will either have to pay handsomely or fight serious enemies.
Another fight awaits you on the floor. This time you will face Rust himself and his bodyguards, including two wolves and crossbowmen. If you stay in a small room throughout the battle, you will greatly simplify your task. When the battle is over, you can free Saheila. She will ask you to escort her back to the elf camp. If you defeat the Rust people you met before, then this task should not be a problem.
Talk to Saheila as soon as you reach the camp. She will teach you how to collect additional source points.
Reward: four guaranteed items and one item from three powerful ones to choose from - depending on the character class.
Lost and Found
Reaper's Coast - Lagan
Not far from Driftwood, you will come across a fisherman's hut, inhabited by a character named Lagan. He will tell you that he lost his ring and ask you to return it.
At the same time, you will not need to go far and search uncharted territories. The ring is in the area marked below. It will also be automatically detected as soon as you and your team get as close to its location as possible. However, when you pick up the ring, fiends will appear.
If Lagan survives, then you can decide what to do with the ring.
Choice 1- give the ring.
Talk to Lagan and confirm in your conversation that you really want to return the ring to him. If your conviction is strong enough, you can convince him to give up the extra gold.
Reward: 5000 experience points and additional gold.
Choice 2- keep the ring for yourself.
You may also decide that you want to keep the ring for yourself.
Reward: copper ring.
Saheila tribe
Reaper's Coast - Elf Camp
If you saved Amiro on the territory of Fort Joy, then he will definitely ask you to tell the story about Saheil to all the remaining elves who live on the territory of the Reaper Coast. You can do this in this location, since the elf camp is located here.
When you appear at the camp, you will find an elf performing a mysterious ritual. If you try to get closer, a conversation with the guard will begin, which can end in two ways.
Ending 1- get permission.
If your conviction is high enough, you will be allowed to enter the ritual site. This will allow you to unlock the quests Burial Rites and The Elven Seer.
Reward: 5800 experience points.
Ending 2- you were denied entry.
If you fail to convince the elves, they will not want to listen to you. Additionally, you will be asked to leave the ground.
Reward: absent.
Funeral rites
If you have been admitted to the sacred ground, then one of the members of your squad will take part in the ritual. You should raise the elf if you can (ideally Sebilla can do this). Your task is to choose those dialogue options that will most impress the elves. These are always the top phrases in the dialog box!
Reward: the number of experience points you receive depends on how much you impressed the elves; four guaranteed items and one of four powerful ones to choose from depending on the character's class (only if the ritual ends well).
Wishful thinking
Reaper's Coast - Genie's Lamp
You will see a mysterious lamp lying on one of the beaches of the Reaper coast.
If you interact with her, a Genie will appear. It turns out that the lamp was thrown away because the Genie was acting very aggressive. There are two ways to solve this problem.
Ending 1- fulfillment of desire.
If you have a high enough level of persuasion, then you can convince the Genie to fulfill the wish, and not pester you. You can choose which wish the Genie should fulfill.
Reward: 9750 experience points and the item you wish for.
Ending 2- battle with the Genie.
If you were unable to convince the Genie, he will attack your squad. The battle is not that difficult, but ends with the death of the Genie, which means no reward.
Reward: absent.
Bite
Activate the ghostly vision at the sawmill to see the ghost of an elf located near the timber. He will ask you to help him take revenge on the spirit of the sawmill master. The spirit of the former sawmill master is located southwest of the bridge near the same sawmill. The location will be marked on the map! Apply the source of vampirism on him to completely destroy and absorb the source point. You can learn this skill in the quest Sharp Awakening.
Return to the spirit who gave you the quest, talk to him and complete the quest.
Reward: 25,950 experience points and a unique shield called Livewood Shield.
Enduring Spirit
Activate the ghost vision at the sawmill to find the mute spirit and learn that his name is Syrus Oates.
He was burned by the lone wolf Pigsbane, who is still alive. Now the spirit wants its killer to die. After you deal with Pigsbane (his location will be marked with a marker on the map), return to Sirus and collect the reward.
Former lovers
Use ghost vision to see the ghost of a woman named Edie Angrim located at the sawmill.
She was killed by her former lover named Firewater. And he did this in order to undergo initiation and join the ranks of the lone wolves. Now she wants to hear him say her name so she can rest in peace. Make the man say Edie's name, then return to the woman for your reward.
Forced Recruited
In the Lone Wolves camp you will meet a man named Corbin Day.
Rust Anlon forced him to come here and work for the Wolves. After you kill the Lone Wolves, talk to Corbin and tell him that he is free. Invite him to the Lady Vengeance galley.
Reward for murder
The deer spirit will ask you to find a wreath of wildflowers. Dig up the burial site of the deer and the poacher who killed it.
An eye for an eye
Cast a ghostly vision spell while at the sawmill (in the Lone Wolves headquarters) to find the master's spirit. He will ask you to take revenge on the Lone Wolves archer who killed him. After you kill Dead Eye, return to the spirit for your reward.
You can receive different rewards:
- Tell him you like the air (Pressure Spike).
- A surge of pain around (Global cooling).
- Say you are looking for earthly strength.
- You can also choose a board in the form of a source - you can absorb the master's ghost.
Bitters
While at the sawmill, activate a ghostly vision spell to encounter the spirit of the lizard named Black Widow (rough translation) - this is a known poisoner of the Lone Wolves.
He was tricked by Lone Wolves member Snakeroot into consuming poison. He wants her to die. You can absorb the spirit of this lizard or kill the “lone wolf” marked with a marker on the map. Ask the character about the reward if you helped the lizard.
No reason for jokes
While at the sawmill, cast a ghostly vision spell to see the spirit of Mudbarrow. He wants you to force the sleeping Lone Wolf to reveal where she hid her gold after she killed him.
Talk to the correct character (marked with a marker) at the sawmill to find out where the loot is, and then kill it. If you have already killed the Lone Wolves before completing this quest, then it appears that this quest can no longer be completed. Return to the quest giver for your reward.
Reward to the finder
Use Ghost Vision at the Lone Wolves Lumber Mill.
Then talk to the paladin spirit. After you collect the mummy's head, give it to the paladin to complete the quest. The task is easy - the necessary points are marked with markers.
Dangerous to yourself and others
Northeast of the churchyard (cemetery) you will come across a healer's house. Convince him that he can trust you and tell you about his problems, allowing him to enter the house to cure the infected seeker.
Follow the healer into the basement (or hack it), where you will have two options: kill the girl or heal her. If you approach her with a character who does not have the “Scientist” tag, then there will be no opportunity to cure the girl. The only option in this case is to kill all enemies that appear in the location. However, if you approach her with a character with the Scientist tag, you can point out that she is suffering from a trephine wound. The healer will ask you not to kill her during the fight so that he can heal her. Either way, both paths will lead to the seeker, who will attack you along with four of her nightmares (Natalie's Anguish, Natalie's Fury, Natalie's Despair, and Natalie's Fear).
In the ensuing fight, you will face four monsters created by Natalie's emotions, and Natalie herself. Each enemy killed will reward you with 10,775 experience points. If you decide to cure Natalie, you will have to weaken her by lowering the health bar to the minimum level. However, as soon as you do this, all emotions will disappear! Thus, in order to get the maximum possible amount of experience points, it is recommended to kill the monsters first, and only then attack Natalie herself. Of course, if the battle seems too difficult, then ignore the monsters and attack Natalie.
After you successfully weaken the girl, a dialogue related to the operation will begin. To ensure that Natalie doesn't die during the operation, you'll need the help of a healer to hold her down, so don't start the operation right away. Select dialogue options:
- Ask the healer to hold her.
- Select a pair of fine tweezers and try to carefully remove the larva.
- Slowly close the wound.
You will successfully cure Natalie and receive 13,450 experience points for your efforts. Talk to the healer to receive +50 attitude and an epic item of your choice as a reward. From now on, he will also be available as a healer and merchant (remember that healing spells damage undead, Fain). After this you will complete the quest.
If the girl does not survive the operation, then you will not receive experience points and reduce your relationship with the healer to a minimum. The quest will also be completed after you simply kill the girl in battle (if characters with the “Scientist” tag did not approach her). In this case, you won’t be able to get anything other than experience for destroying each of the four monsters.
If you decide to kill her, then simply finish off all opponents.
Reward:
- 5800 experience points for convincing a healer to send a squad into your home.
- 10,775 experience points for killing each monster from Natalie's emotes - a total of 53,875 experience points can be gained if you decide to go the "Kill Her" route.
- 10,775 experience points for killing each monster from Natalie's emotions and 13,450 experience points for a successful operation - for a total of 56,550 experience points if you go the "Heal her" route.
- Gregory will be available as a healer and merchant, you will automatically receive +50 units of attitude with him, as well as one epic item of your choice (if you manage to cure the girl).
Bury the past
To start this quest, you must travel south of Driftwood to coordinates X:380, Y:274 - inside or in front of the burning house. If you start the quest in the area X:380, Y:274, you will find Gareth standing over an old friend, White Master Jonathan. After a short dialogue, you will be given the opportunity to convince Gareth (intelligence or memory check) to either free Jonathan or kill him. Regardless of the outcome, you will still be able to attack and kill Jonathan, who will offend Gareth and force him to leave.
Otherwise, Gareth will show mercy and go to Paradise Dawns.
After convincing him of mercy, you can choose the lowest option to bypass the check. As soon as your journal is updated and the phrase “We convinced Gareth that...” appears (the continuation depends on what exactly you convinced Gareth of), then you will be able to advance the quest.
If you start the quest in Paradise Downs or find Gareth after the above line, he will want you to kill the Silent Monks as revenge. These monks are located on the farmer's house, you will have to convince the paladins to let you inside. You can do what he asks, or talk and convince him that this is not an option.
Opposites attract
In the basement of Riker's mansion you can find a rat and a turtle. If you have the Animal Friend talent, you will learn that the turtle is in love with the rat. You can use a variety of products to lure your rat to your turtle. Drag food from your inventory and throw it on the ground, forming a path of food.
Hunter of evil spirits
In a house located east of the Monastery Forest, there is a demon hunter named Jaan (the same Jaan from the original Divinity: Original Sin). Approach him to automatically receive 14,975 experience points for exploration.
Jaan will ask you to explore Blood Moon Island and kill a powerful demon called the Advocate. If you have Lowse on your team, you can allow the girl to talk to him to increase your reputation by 10 points. He will agree to help Lousa in exchange for killing the demon Lawyer. In any case, you will advance in completing the quest and earn another 7500 experience points.
It is highly recommended that you complete three other quests along with this quest, as they are all partially connected by their location - "The Secret of Blood Moon Island", "The Lawyer" and "The Forgotten and Damned". Rewards and completion of quests will be listed separately.
In Jaan's house there is a book called "The Ornamented Psalter", which is necessary to complete the quest "The Forgotten and the Damned". By reading this book with a character tagged “Scientist” you can get 14,450 experience points (unless you read it with another character).
Travel to Blood Moon Island through the port in Monastery Woods or use the Ghostly Vision spell near the broken bridge next to the Altar of Wandering in Driftwood Fields. You can teleport safely using the ghost bridges that appear. In any case, after you find yourself on Blood Moon Island, talk to the Lawyer in the demon camp and agree to complete his personal task, since in this case you can get a large number of experience points and advance along the main storyline. You can also kill the Lawyer right here and now, at the first meeting, but this is not recommended - it is better to kill him after completing the task and collect the maximum possible experience points and reward.
Having dealt with the Masters of the Black Ring who surrounded the tree, you can kill the Lawyer himself. In battle, he will be helped by three characters and a dog (the other dog will remain on the beach - you can kill it and get 7225 experience points). Before attacking the Lawyer, deal with the pickpocket Basatana. Killing the Lawyer will give you a measly 7,225 experience points, but it drops some pretty powerful loot. You will also earn 7,225 experience points for killing the dog and 28,900 experience points for killing each of the other four characters (pickpocket Basatan, Chtiltsia, Lady Agony, Eiren Havok and the knight. Once they are all dead, be sure to search Basatan and pick up the scroll. Also clear the area of remaining enemies to gain experience points and loot.
After you kill the Lawyer, you will need to find out the name of the demon. When you report to Jaan, you can go to the Ancestor Tree, activate the ghostly vision spell and talk to the spirit of this Tree to find out the name of the arch-demon Jaan.
To talk to Tree, you will need to find out his name, which you will find if you read the archivist's journal in the Archives located in the picture below (this archive is actually associated with the quest “Secrets of Blood Moon Island”). Say the name of the Tree and you will earn 66,200 experience points, and you will also learn the name of the arch-demon who has settled in Dr. Daeva.
The above screenshot shows the entrance to the Archives. You will need a high enough level of intelligence to locate the mound and dig it out. Upon entering the Archives, you will receive 50,575 experience points. Tell Jaan that the Lawyer has been killed and you will earn 36,100 experience points. As the dialogue progresses, you will receive another 36,100 experience points, for a total of 72,200 XP. After you reveal the name of the demon Jaanu, you will officially complete the quest and receive your choice of some legendary loot. If the swami is Louse, then Jaan will try to cure her, but will ultimately fail. He will then agree to join you on the Lady of Vengeance and meet the demon later.
Reward:
- 14,975 experience points for approaching Jaan's house.
- 7500 experience points for agreeing to explore Blood Moon Island.
- +10 attitude towards Lowse if you let her talk to Jaan.
- 14,450 experience points for reading the book “The Decorated Psalter” with a character tagged “Scholar” (the book is associated with the quest “The Forgotten and the Damned”).
- 7225 experience points for killing a Lawyer and two dogs (for each enemy). A total of 21,675 experience points (one dog will probably be left on the beach and you will have to go to it).
- 28,900 experience points for killing each of the Lawyer's four minions during the fight with him. A total of 115,600 experience points.
- 50,575 experience points for entering the Archives and searching for the archivist's journal (related to the quest "Secrets of Blood Moon Island").
- 66,200 experience points for naming the Ancestor Tree (associated with the quest "Secrets of Blood Moon Island").
- 36,100 XP twice (for a total of 72,200 XP) for telling Jaan the demon's real name after killing the Advocate.
- Selecting an item from the legendary category upon completion of the quest from Jaan.
Secrets of Blood Moon Island
This quest can be obtained after you learn of the Black Ring's attempt to pass through the fog of death surrounding Blood Moon Island. Once you are on this island, go to the location shown in the picture below - this is the entrance to the Archives.
Just getting inside the Archives will give you 50,575 experience points. You can also use ghostly vision and talk to the spirit of the Archivist. Regardless of which dialogue option you choose, 14,450 experience points will be credited. In the Archives, find the archivist's journal and read it to find out the name of the Ancestor Tree - Eleaness.
Walk forward and discover that the wall is actually an illusion, the hidden door will require intelligence to see it). Pick up an unusual blade to get 50,000 experience points. If you interact with him as a lizard character (Red Prince), you will be able to understand the words engraved on the blade. There is also a locked Tenebrium chest here that will consume one Origin from your character with each interaction. But if you use a master key, then the source will not be consumed. If you search the chest, you will find a green teleportation pyramid. You could find the first two in Dallis' chambers on the Lady Death (one on the table in the chambers, and the other in the secret room).
The Ancestor Tree is located in the center of Blood Moon Island, but is surrounded by the Masters of the Black Ring, who will attack you as soon as they see you (unless you pass the check during the conversation). Get close to the tree to attack enemies. It is recommended to start the “Lawyer” quest, and then kill the same masters, but for a much larger number of experience points.
If you haven't killed the Lawyer yet, he won't let you talk to the Tree, so you'll probably have to deal with the demon. Killing the demon is also part of the Evil Things Hunter quest, so it is recommended to kill it in conjunction with this quest.
Kill the Lawyer and cast a ghostly vision to speak with the Ancestor Tree. Say his name (Eleanessa) to start a serious conversation. The tree will thank you for easing its pain. You will receive 66,200 experience points for calling the name of the Ancestor Tree. Then the Tree will ask you to kill Doctor Daeva, who has been possessed by the powerful arch-demon Adramalich (this quest will launch another task, “Doctor's Orders”).
Like many other island quests, after these actions the quest will be completed.
Reward:
- 50,575 experience points for simply finding and entering the Archives.
- 14,450 experience points for communicating with the spirit of the Archivist.
- 50,000 experience points for picking up an unusual blade.
- Green Pyramid of Teleportation - lies in the Tenebrium chest near the Unusual Blade.
- 66,200 experience points for saying the real name of the Ancestor Tree.
Advocate
Travel to Blood Moon Island using the port in Monastery Woods (you'll have to pay some gold) or the Ghostly Vision spell on the destroyed bridge near the Altar of Wandering in Driftwood Fields. In the second case, a ghostly bridge will appear, which will allow you to teleport to the Blood Moon Islands. You can also use the Spread Your Wings skill to move between the supports of a place and cross it.
When you reach Blood Moon Island, talk to the demon Lawyer. It is located in the west, near the beach. He will ask you to help him destroy the forces of the Black Ring, which surrounded the nearby Ancestor Tree. By calling him the King of the Voidfiend, you will cause the appearance of monsters that attack your squad. Fortunately, the Lawyer and his allies will take your side in battle.
Note. While the Voidspawn are spawning, you can use the chaos on the battlefield to kill the Advocate. In this case, you will be left without a quest reward.
Agree to help the Lawyer, and he will immediately teach you how to master the source. You will receive one more point towards the maximum source reserve. If you already have the maximum possible three slots, then your character will receive a book with a random skill from the Lawyer instead.
Approach the Ancestor Tree, located north of here, and prepare for battle. There will be four Masters of the Black Ring, two of which will summon golems (two) to help them in battle. Bone golems will allow you to earn 14,450 experience points for each. At the beginning of the battle, a powerful destroyer (undead) of the Black Ring will also appear, but you will not receive experience points for killing it.
After all opponents are dead, a Lawyer will immediately appear with whom a conversation will begin. Ultimately, the Lawyer will point out the location of the Nameless Island, as promised before. The quest is effectively complete, although you can still attack the Lawyer now.
Reward:
- One point to mastery of the Source or a book with a random skill (if you already have three slots for the Source).
- 14,450 experience points for killing each of the two bone golems summoned by the two Masters of the Black Ring near the Ancestor Tree. A total of 28,900 experience points.
- 28,900 experience points for killing each master - a total of 115,600 experience points.
- 194,550 experience points for destroying all representatives of the Black Ring, as well as information about the location of the Nameless Island.
- One item of your choice from a rare category (after completing the quest).
Forgotten and damned
On Blood Moon Island, a shiny sculpture will appear standing in front of the demon camp. You can interact with the statue to begin this quest. This quest can be activated in another way - take the book “Taming the Sacred Fire” and read it with a character with the “Scientist” tag.
There are three sculptures on Blood Moon Island. To activate them, you will need to read a book called "Taming the Sacred Fire". This book is also called "The Decorated Psalter" (which is approximately what the title will be before you decipher the book with the character tagged "Scholar"). You can find the book in one of these places:
- Jaan's house (read the first quest of this location).
- Archives in the northeastern part of the island.
- On one of the corpses of the masters after you kill them near the Tree of Ancestors.
You will need a character with the "Scholar" tag who can decipher the book. After reading the book to scientists you will receive 14,450 experience points. However, before entering the vault, first go to the northern part of the island and find the ancient forge (at coordinates X:317, Y:479). Use this forge to combine it with a Silver Ingot to create a Silver Lever. You will need two silver levers for the second and third vaults. Silver bars can be found near the forge and on the Black Ring member inside the unfinished crypt.
In the southern part of the island, near the demon camp, three vaults are scattered. Use the hymnal to destroy the statues and enter the vault. The quests "Delusions of Grandeur" and "Bound by Pain" require you to install a special lever made from a silver bar. See below for more details.
Here you will find a green teleportation pyramid and medical notes, which will allow you to begin the missions “Delusions of Grandeur” and “Speechless”. For more detailed information, see the description of the quest “Secrets of Blood Moon Island”.
If you read the notes, you will realize that these vaults are actually inhabited by people affected by demons that the healers could not cure. Thus, these sufferers were locked away along with the healer so that the demon could never become a threat to humanity.
This crypt is unfinished and does not actually contain anything of value except for one silver ingot. However, studying it may be required to complete the current quest.
Upon entering this vault, you will encounter a broken lever mechanism that will require a lever made from a silver bar. This is needed to repair and open the door. Unfortunately, when you try to use the lever, it won't work. Cast a ghostly vision spell to see the spirit of Brother Robert located near the statue. Talk to him and pass a Persuasion check to have him open the door and ask him to kill the creature inside.
Enter the room and walk forward a little. If any character absorbs the energy of the source from a puddle in the room, then the lizard will start a conversation with him. So be careful! If you agree to release the lizard, then Rajarima will absorb the entire source of your hero and break free, which will lead to the beginning of the battle. Also be careful that after freeing and starting the battle, your opponent will throw a powerful storm of arrows, which will cause enormous damage to the squad, especially if the heroes are grouped at one point - perhaps this spell will even kill two or three heroes. In any case, you will have to kill the possessed one.
If you refuse to release her, you will eventually have to pass a speech test. If you succeed in the dialogue, then Rajarima will not be able to steal source points from your character, and will not be able to break free. You can then shoot it with arrows or use ranged spells to safely destroy the enemy.
Ultimately, the easiest way here is to attack the lizard from above at the very beginning. Don't even bother finding the source and absorbing it, so that the lizard doesn't talk to you. Regardless of the method you choose, once the lizard dies you will earn 36,100 and 21,675 experience points for a total of 57,775 XP. This will complete the quest “Delusions of Grandeur”. Don't forget to talk to the spirit of Brother Robert, tell him about the decision and collect the reward.
This hideout is the main location in the quest Bound by Pain. Go through it, activate the ghostly vision spell and talk to the spirit of Brother Calvin. Either way, move forward and repair the broken lever using the lever crafted from a silver bar. Then talk to Brother Calvin again and convince him to open the door for you. You will need to pass a speech test to convince Calvin that this needs to be done. Be careful: the speech test requires intelligence. It looks like you'll fail even with a seven-point belief. The memory test can be passed with five points of belief.
Either way, as soon as the door opens, you'll find yourself face to face with a possessed gnome. He will ask you to destroy the pillars - when they are destroyed, of course, the gnome will be freed, which will lead to the start of the battle. Unlike Rajarima from the second shelter, the gnome is a much weaker opponent. You won't need too much effort to destroy it, and for this you will receive 28,900 experience points.
After the gnome dies, a demon will appear and immediately attack your squad. He is slightly stronger than the Possessed Dwarf, but is still a relatively easy opponent. The danger here is that when you damage a demon, there is a chance that it will instantly turn one of your party members around and force you to fight against you (this effect manifests itself as “Demonic Invasion” and is not healed). Simply attack the possessed ally to revive or kill him. So the demon will leave the body of his comrade. Attack him, and after death you will receive 21,675 experience points.
Additionally, there is a glitch where if you supposedly deal the final, killing blow to a demon, it will disappear, placing a Demonic Invasion debuff on one of your party members, but that character doesn't actually "go crazy." In this case, the battle ends, and the debuff on your character remains until the character is dealt fatal damage, which is why the demon will suddenly appear and the battle will begin again.
An alternative, better option is to simply save the gnome from the invasion. The trick is that you can use the same character to damage the gnome, but not kill him. You will probably need to cast healing spells on the dwarf to keep him from dying. Continue until it doesn't fall anymore, then destroy the pillars.
The moment the pillars are destroyed, the demon must leave the dwarf's body, leaving the dwarf unharmed. At this stage, the same thing will happen as above. Attack the demon, and if it possesses one of your squad members, then kill it to force the enemy to show itself. After the demon dies, you will receive 21,675 experience points. In this case, however, the dwarf will survive, and talking to him will result in another 36,100 experience points. The quest will be completed.
When you leave their hideout, be sure to talk to Brother Calvin about your choice to receive your reward. If you failed to save the gnome, then Brother Calvin will most likely disappear, leaving you with nothing.
This vault is associated with the quest "The Silent One". Enter it and cast the ghostly vision spell to see the spirit of the healer, Brother Morgan. Talk to him and he will ask you to free the poor girl imprisoned in the shelter. Agree or lie to him and he will open the hideout.
Inside, to talk to the girl, you will first have to pass a speech check with the cat (requires the Animal Friend talent) in order for her to allow you to talk to her owner. In the event that you fail the speech test, you will have no choice but to kill the cat and receive 1400 experience points. Destroy the source chains that bind the girl and talk to her, but note that if you fail the speech test, the girl will not be able to leave the dream. If each of all four characters in the party fails the speech check, then there is nothing left to do except leave the quest incomplete (or not change the companion). You also need to pay attention to the fact that you cannot kill the girl - in the game she is invulnerable to all types of attacks.
If you pass the speech check, you will receive 14,450 experience points and will be able to teleport the girl aboard the Lady of Vengeance, where you can heal her and complete the last stage of the quest. The Silent One quest will be completed. Talk to Brother Morgan to receive a reward for your efforts.
After exploring all four vaults, the quest should automatically complete. The final entry should be “We have found and cleared all four hideouts on Blood Moon Island.”
Reward:
- 14,450 experience points for reading the book “The Decorated Psalter” with a character tagged “Scholar”.
- 57,775 experience points for killing the possessed lizard and completing the quest "Delusions of Grandeur".
- 21,675 experience points for killing the demon that possessed the dwarf from the third vault, as well as 36,100 experience points if you leave the dwarf alive after completing the quest "Bound by Pain."
- 14,450 experience points for being able to wake up the girl from the fourth shelter and completing the quest “Silent”.
Druid
Read the Archivist's Journal found in the Archives in the northeast of Blood Moon Island. This is how you learn the name of the Ancestor Tree.
At the ruins on the western side of the island (where you'll encounter some demons), cast a ghostly vision spell to see the druid's spirit. He will ask you to ease the suffering of the Ancestor Tree. The tree is located in the center of Blood Moon Island itself, but to get there you will need to defeat members of the Black Ring.
To talk to the Ancestor Tree, activate the ghostly vision spell, which will alleviate its suffering. You may also have to kill the demons that are the subjects of Luose's personal quest "Hunter of Evil Spirits".
Then the Tree will ask you to kill the doctor who is possessed by the demon (this will begin the quest “Doctor's Orders”). After freeing the Ancestor Tree, communicate with the spirit of the druid and complete the quest.
Doctor's orders
You can learn the name of the demon from the Ancestor Tree on Blood Moon Island. If you talk to Jaan, he will tell you that the doctor is currently hiding in the Arx location. Explore the wedding location in the quest “Secrets of the Dwarves” to find out that it was this doctor who sent the gnomes an explosive wedding cake as a gift.
Outside the Arx school, an unfortunate citizen will tell you that the doctor thanked you for serving him on Blood Moon Island (if you helped the Lawyer). In addition, you will need to kill Isbal (quest “Secrets of the Dwarves”) or Lord Kemm (quest “Linder Kemm’s Refuge”) to receive an invitation to a meeting from the doctor.
You can find a doctor (level 20) in the Black House in the northeast of the Arx location. The Illness will already be waiting for you near it. Talk to her and she will teleport the party to the demon dimension. When you walk with the Illness, you will see candles. Smell them, make a moral choice, but even after that the health reserve will be around 11,000 HP. After you smell all the candles, go inside and first finish off all the nurses who are restoring the doctor's health. When attacking them, use physical damage, since the enemies have very strong magical armor.
When you destroy all the nurses, talk to the doctor so that he will reveal his true form for the first time. Try to use up all the source as soon as possible, since the demon can suck it out of you. Defeat the enemy and then talk to Lowse.
You can visit the doctor's basement and find Jaan locked inside. There are also a huge number of magically locked rooms that you can open with a simple master key. One of the chests contains Quinn's armor, which will give you the ability to fly.
Clue. If you throw a box of death fog at him, he will be killed instantly.
Bound by pain
To begin this quest, you need to get into one of the vaults sealed by the statue on Blood Moon Island. To open the statue, you must allow one of the characters tagged "Scholar" to decipher the book "Ornamented Psalter" so that it turns into "Taming the Sacred Fire". This book can be found in several places, including the Archives in the northeast of the island and the Black Ring representatives near the Ancestor Tree.
Travel to the ancient forge in the north of Blood Moon Island to use a silver ingot to create a silver lever. Use this lever on the slot inside the shelter, then activate the ghostly vision and ask the spirit to open the door. If he refuses, then you will need to use “Source of Vampirism” (a skill that will be learned during the quest “Sharp Awakening”).
A possessed gnome is waiting for you behind the door, who will beg you to destroy the pillars. If you do this, you will free the demon. You need to attack the gnome until he can no longer stand (when about 10% of his total HP remains), and then free him by destroying the pillar.
Note. You may have to heal the gnome during this entire process. If you kill the dwarf, the quest will automatically be completed. To avoid accidentally killing a gnome, consider using the Living on the Edge spell.
As soon as the demon is freed (can be done during the battle, but to do this, defeat the gnome), attack him. After a while, he can possess one of your companions located within a radius of eight cells (but he cannot possess summoned creatures).
When you help the dwarf, you can find his treasure at the location at coordinates X: 193, Y: 379 in the western part of the island, where there are three graves (crosses).
Silent
To begin this quest, you need to get into one of the vaults sealed by the statue and located on Blood Moon Island. To open the statue, you must allow one of the characters tagged "Scholar" to decipher the book "Ornamented Psalter" so that it turns into "Taming the Sacred Fire". This book can be found in several places, including the Archives in the northeast of the island and the Black Ring representatives near the Ancestor Tree.
Use Anthem to destroy the statue, enter the vault, and then use Ghostly Vision. convince the spirit of the protector to open the stone gate. If you fail to do this, then you will need to use the source of vampirism - this skill is learned in the quest “Sharp Awakening”.
Convince or kill the undead cat so that you can approach the possessed girl (to convince the girl, you need a character with high strength). You will be able to teleport her to the Lady Vengeance, where you can continue her treatment.
Megalomania
In one of the vaults on Blood Moon Island you will find a note lying on a bookshelf. It describes this case in detail.
To open the statue, you must allow one of the characters with the "Scholar" tag to decipher the "Ornamented Psalter" so that it turns into the book "Ornament of the Holy Fire". this book can be found in several places, including the Archives in the northeast of the island or the Masters of the Black Ring at the Ancestor Tree in the center.
Go to the ancient forge in the north of the island, where you can make a silver lever from a silver ingot. Use the lever on the slot inside the vault, then activate the ghostly vision and ask the guard to open the door. If he refuses, then you need to use the “Source of Vampirism” on him, which you will learn in the quest “Sharp Awakening”. Defeat the demon inside.

 How to quickly level up after the revelation plot
 Consciousness of a strong defensive army Rules of war pd 13 no more than 5
 Fallout 4 clear the blockage in the castle
 In the video lessons, Spanish game in chess. Spanish game with white, the whole theory.